

From my years working with dishwashers, Whirlpool models have earned my respect.
Particularly:
Their ability to self-diagnose impresses me. Yet, even they aren’t immune to the occasional hiccup. And believe me, I’ve felt the frustration of a malfunctioning dishwasher firsthand.
Enter the diagnostic mode:
This hidden feature, an essential tool for service technicians and DIY homeowners alike, helps us decode dishwasher issues.
As my fellow repair ace and good friend, Paul Ryan, puts it, “Master the diagnostic mode, and you’ve tamed the beast.”
So:
Let’s team up with Paul and me to unlock this powerful feature when your Whirlpool dishwasher pulls a fast one.
Ready to dive in?
Table of Contents
What Is Diagnostic Mode in a Whirlpool Dishwasher?
The first thing I asked Paul during our chat was his simplified definition of the diagnostic mode.
In his own words:
“The diagnostic mode is an in-built test cycle, tailored mainly for repair technicians and tech-savvy homeowners to troubleshoot dishwashers.”
The best part:
It’s found on all Whirlpool dishwasher models, and accessing it typically involves pressing specific buttons, as specified in the tech sheet.
Delving deeper, Paul explained:
“Imagine the dishwasher running condensed versions of its regular cycles – like a normal wash, high temperature, or the sanitized cycle. That’s the diagnostic mode for you.”
In essence:
This mode is a stress test, putting components like the wash motor, thermistor, diverter, heater, and drain motor through their paces.
Finally:
If the dishwasher identifies a faulty or malfunctioning component, it will display the relevant error code so that you can fix it.
Now:
Beyond just troubleshooting, the diagnostic mode has other applications:
- Accessing stored error codes.
- Calibrating the dishwasher, particularly after replacing a component.
Case in point?
This Redditor replaced a faulty heating element only to find that the dishwasher still didn’t start.
The reason?
Skipping the calibration step post-replacement.
- Resetting the dishwasher to resolve minor glitches.
For instance:
This Redditor’s WDT710PAYM2 dishwasher wasn’t drying dishes properly. By simply accessing and running the diagnostic cycle, the issue was resolved.
Where To Locate Your Whirlpool Dishwasher Tech Sheet
Just so you know:
Unless you are a Whirlpool engineer, you’ll need your dishwasher’s tech sheet when running the diagnostic mode.
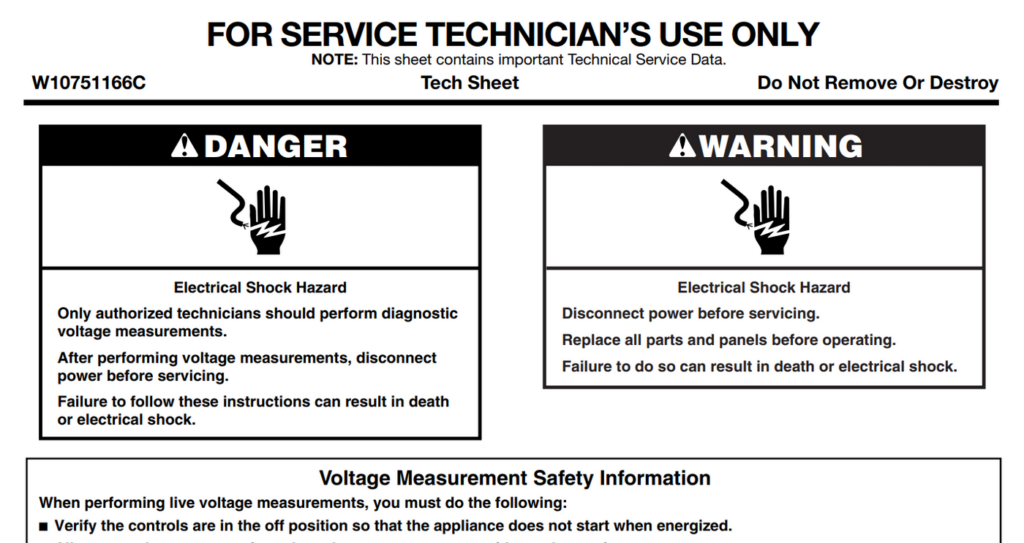
Also referred to as the service manual, the tech sheet is a 10-15 page document usually with the bold title FOR SERVICE TECHNICIAN’S USE ONLY.
Purpose?
It provides detailed instructions on how to enter diagnostic mode and is usually tucked away inside your dishwasher.
For instance:
This user followed the tech sheet and was able to fix his Whirlpool WDT750SAHZ0 dishwasher that was not heating.
Why is it usually hidden?
As Paul suggests, “The assumption is that most homeowners would misplace it if it was packed with the user manual.”
That way, it will be available when it’s necessary. Plus, it’s not really meant for everyday use.
Take note:
In most Whirlpool dishwashers, you’ll find the tech sheet tucked away behind the kickplate, which is at the very bottom front of the dishwasher.
So:
You will need to remove a few screws to take off the kick plate.
Paul adds, “If you don’t find it there, check inside the back panel or inside the door panel.“
But what if it’s missing?
Especially with preowned dishwashers, the tech sheet might be AWOL – perhaps the previous owner misplaced it.
Don’t stress:
These sheets are available online, or you can request yours from our Facebook Group.
How To Put Your Whirlpool Dishwasher in Diagnostic Mode – 7 Techniques
Now that you understand what the diagnostic mode is and where to locate your tech sheet, let’s delve into how to put your dishwasher in diagnostic mode.
Keep in mind:
As I mentioned earlier, there are different techniques for accessing the diagnostic mode depending on the model.
Here are some of the most common techniques that Paul and I have encountered.
| Technique | Models |
|---|---|
| The 3 Keys, 1,2,3 Technique | W10610059B W10751166C W10849767A W10610059B W10751166C W10580720B W10543820B W10904612A W10849767A W10904612A W10350140B W10350333A W10751166C W10461429A W10904612A WDT920SADM3 |
| On/Off and Start/Pause Buttons | 24-Inch ADA-Compliant front display models |
| Cycles and Start/Cancel Buttons | 18” Front Display ADA-compliant models |
| Rinse and Start Buttons | Whirlpool 18” and 24” Top Display, Panel Ready Dishwashers UDT555SAHP |
| High Temp Wash + Heated Dry | DU915PWSQ0 DU930PWST0 |
| High Temp + Air Dry | Whirlpool GU1100XTLQ1 Q uiet Partner III GU1200XTLS0 Whirlpool WDF320PADB3 |
| Heated Dry + Normal | Whirlpool Quiet Partner 3 GU2200XTSB3 Whirlpool GU2300XTVQ1 Dishwasher Whirlpool W10142800 Dishwasher Whirlpool Dishwasher DU1055XTVQ1 |
1. The 3 Keys, 1, 2, 3 Technique
In my journey with Whirlpool dishwashers, I’ve found the “3 keys technique” to be the most tried-and-true method.
Paul, a seasoned dishwasher technician, adds, “90% of the Whirlpool dishwashers I’ve worked on use this technique.”
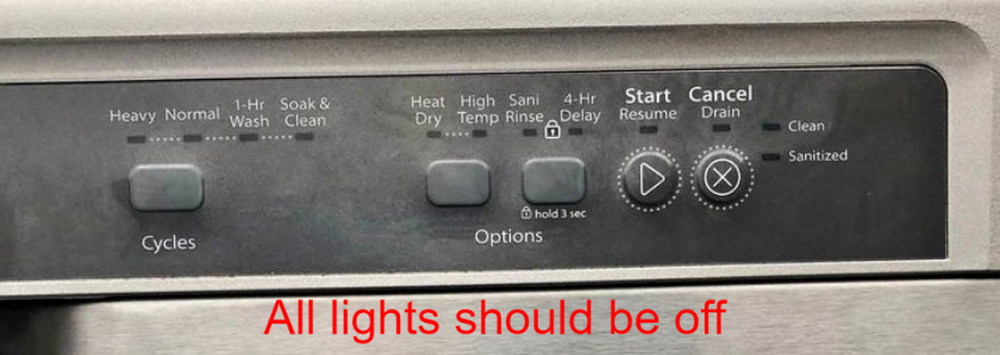
Step 1: Setting the Dishwasher in Standby Mode
This technique kicks off with your dishwasher in standby mode. To explain, your appliance should be powered on but not in operation. The lights on the display should be off.
How do we achieve this?
Paul recommends a straightforward solution: “Unplug and plug back in the dishwasher, but resist pressing any buttons.”
Step 2: Selecting the ‘3 Keys’
The next step involves selecting any three keys, excluding the ‘cancel’ and ‘on/off’ buttons. You have the freedom to choose, but I suggest picking keys next to each other for convenience.
The aim is to press these three keys in a 1,2,3-1,2,3-1,2,3 sequence. Ensure there’s no delay longer than a second between each press.
So:
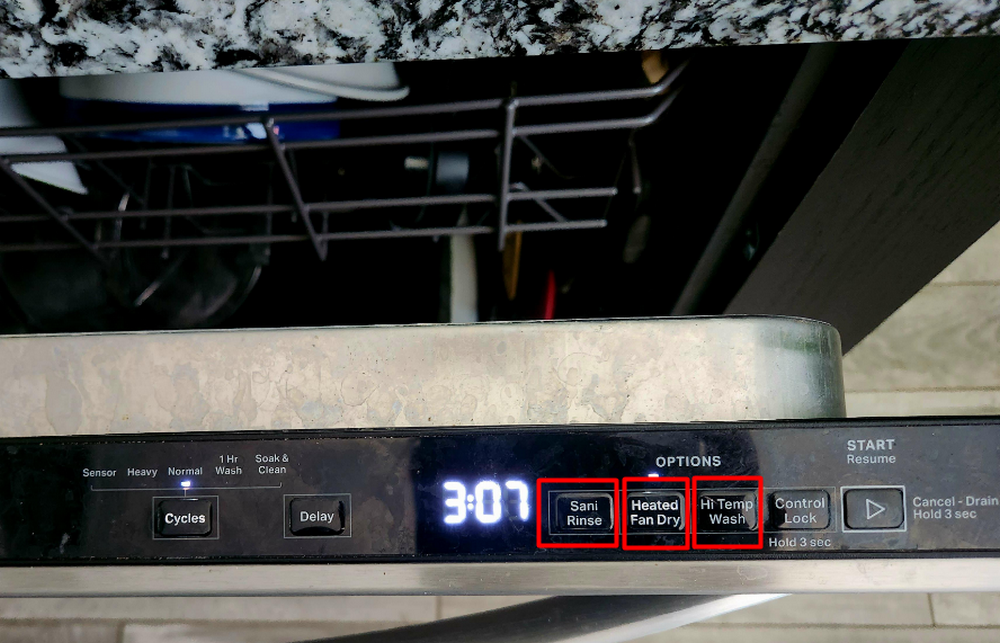
Which buttons do the pros prefer? Paul reveals, “I typically go for the Sani Rinse, Heat Dry, and Hi Temp Wash buttons.”
In other words, (Sani Rinse ⇒ Heat Dry ⇒ Hi Temp Wash) X3.
Remember:
After choosing and pressing your preferred buttons, shut the door. This seemingly simple action is a crucial step, often overlooked by many.
Step 3: Documenting Stored Error Codes
This stage of the process is critical – noting any stored errors. Let me simplify what this entails.
The diagnostic cycle has 26 intervals (though some models have fewer). The entire procedure takes approximately 23 minutes, starting at interval 26 and descending to interval 1. Each interval symbolizes a distinct function.
Here’s a quick rundown of the 26 intervals:
| Interval | Function |
|---|---|
| Interval 26 | Display test. All display lights will light up |
| Interval 25 | Error code 1 |
| Interval 24 | Error code 2 |
| Interval 23 | Error code 3 |
| Interval 22 | Error code 4 |
| Interval 21 | 10-second pause to clear stored errors |
| Intervals 20 – 3 | Service diagnostic cycle |
| Interval 2 | Error 1 |
| Interval 1 | Error 2 |
Paul and I agree:
For most users, the essential intervals are the error intervals, namely 25, 24, 23, 22, 21, 2, and 1.
However:
Paul reminds us, “Intervals 20-3 are equally vital as the washer tests different components and functions, providing you with error codes at the end.”
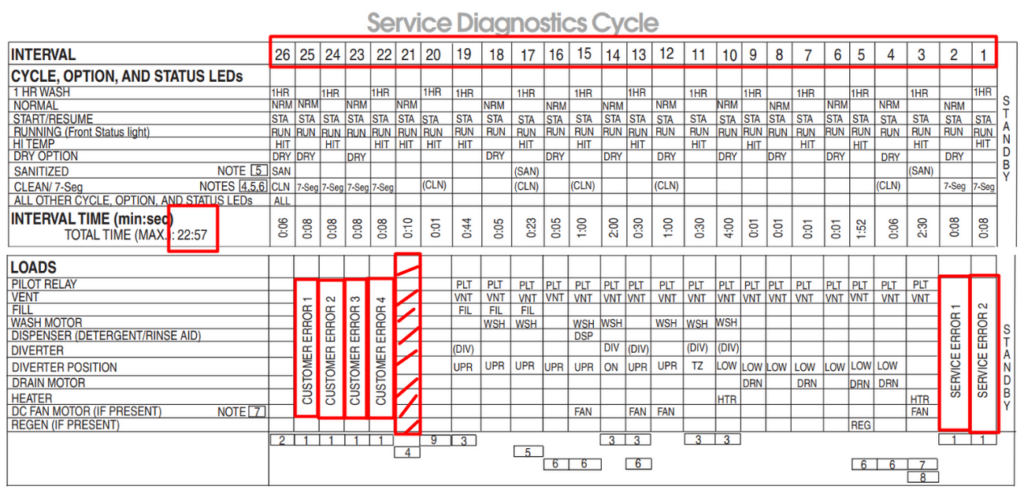
A section from the Whirlpool W10610059B dishwasher tech sheet outlines these intervals and functions. It serves as a handy reference for other models using the ‘3 buttons technique.’
Cracking the code:
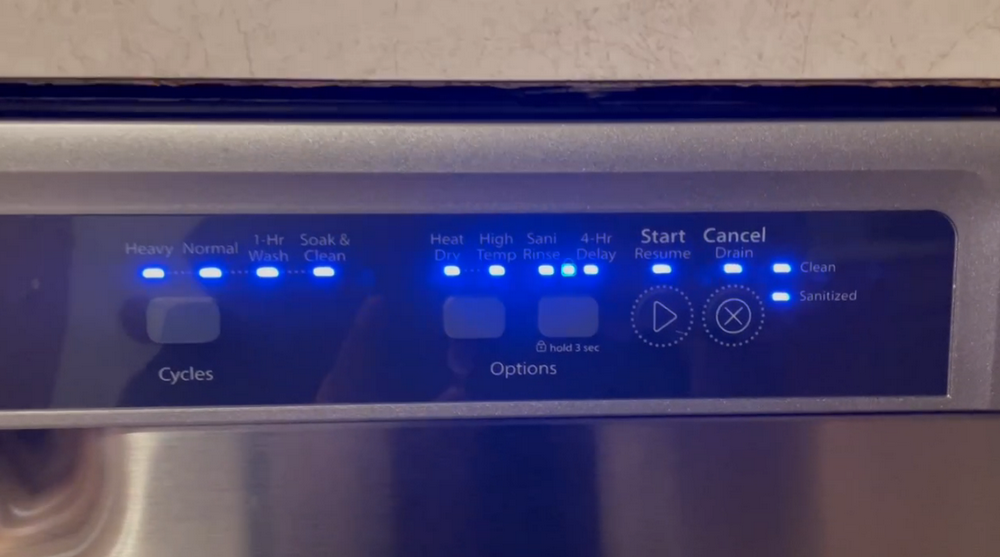
Following a dishwasher malfunction, one of the first steps involves understanding the error codes. These are signaled by the LEDs on the display, post-closing the door. Instantly, the dishwasher kickstarts interval 25, lighting up all the LEDs.
Now, pay attention:
The subsequent four intervals (25, 24, 23, and 22) are critical as they communicate any stored errors, starting with the latest. The key lies in the frequency of the Clean LED blinks, each indicating a specific error code. After identifying the error code, hit the Start or the pre-selected 3rd button to proceed.
As Paul, a seasoned technician, suggests, “Some models have replaced the Clean LED with Completed.”
It’s important to note:
Your dishwasher may not always house four stored error codes. It can range from none to three. Therefore, consult your tech sheet for specific guidance.
For instance:
In some models, the three buttons that you selected above may have specific functions.
- 1st button – Activate user interface test
- 2nd button – Activate service test cycle
- 3rd button – Display next error code (press and hold for 5 seconds to clear errors)
Reading the error codes in the diagnostic mode is straightforward. Here’s how:
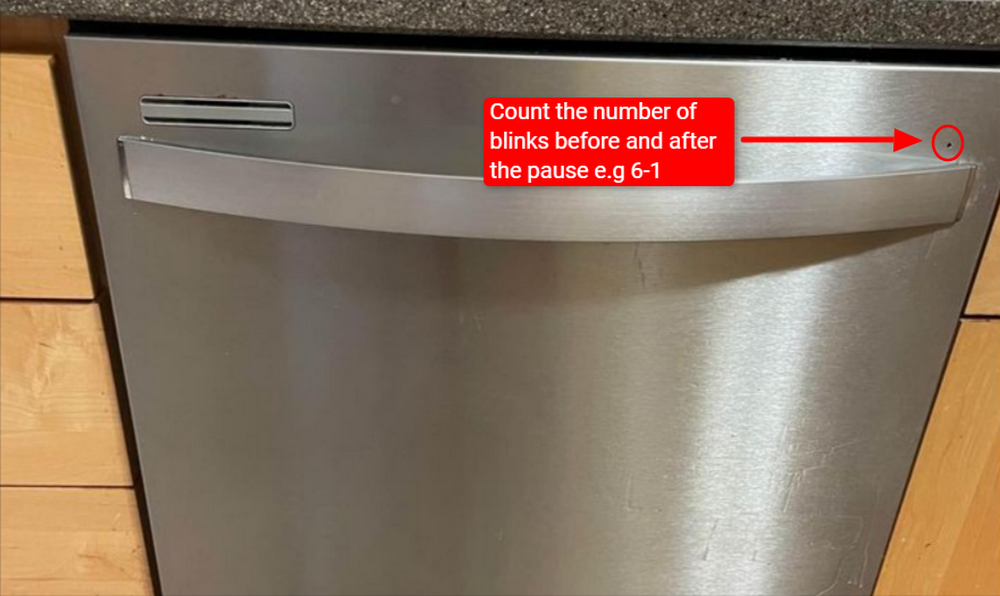
As Paul enlightens, “Each error code interval prompts the Clean LED to blink a specific number of times, followed by a pause for 2 seconds, and another set of blinks.” This pattern constitutes the error code.
For example:
A sequence of 7 blinks, a 2-second pause, followed by 1 blink translates to a 7-1 or (F7E1) error code. My experience with the tech sheet suggests this code relates to a potential issue with the heating element.
Here’s a helpful nugget:
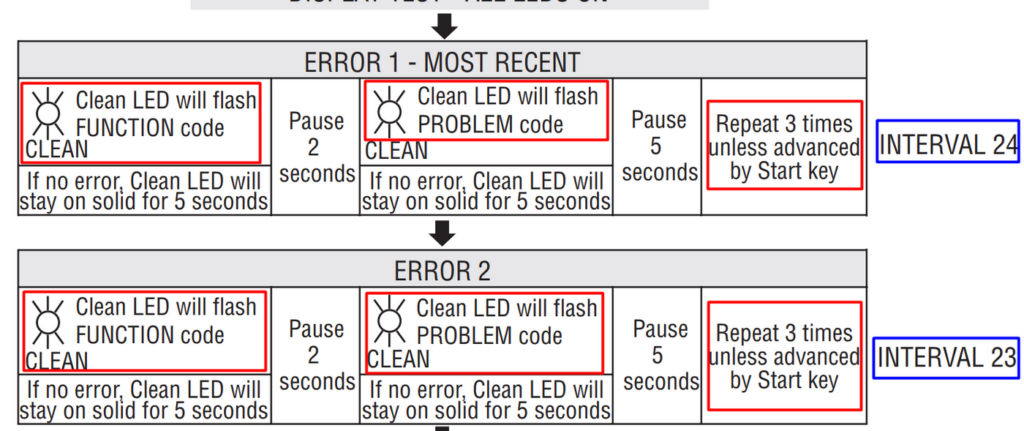
During each error interval, the dishwasher repeats the error code thrice, separated by either 2 or 5-second pauses. The pattern resembles this:
Interval 25: Error 1 |- Pause for 5 secs |- Error 1 |- Pause for 5 secs |- Error 1
Interval 24: Error 2 |- Pause for 5 secs |- Error 2 |- Pause for 5 secs |- Error 2
Interval 23: Error 3 |- Pause for 5 secs |- Error 3 |- Pause for 5 secs |- Error 3
Interval 22: Error 4 |- Pause for 5 secs |- Error 4 |- Pause for 5 secs |- Error 4
To sum it up:
Flash Function Code (F) – 2-second pause – Flash error code (E) – (Repeat 3 times)
But here’s the good news:
If you wish to skip the repetition of error codes, press the Start key to move on to the next code. In case there are no stored error codes, the Clean LED (or Completed LED) will remain lit for 5 seconds.
Take note:
At interval 21, post the 4th error, the Hi-Temp LED lights up, offering you a chance to reset all stored error codes by pressing it. If successful, the Hi Temp LED blinks twice.
One user employed this trick to recalibrate his Whirlpool WDT710PAHW1 dishwasher post a faulty element replacement. If the Hi Temp LED button isn’t responding, reboot the control panel by opening and closing the door, then try again.
Finally:
Let the dishwasher run until interval 1 to access any other error code detected during intervals 20–3. That’s exactly what this Redditor did with his Whirlpool WDT750SAHB dishwasher.
If the issues highlighted by the stored error codes aren’t resolved, they’ll reappear in the next diagnostic cycle.
Diving into the tech sheet:
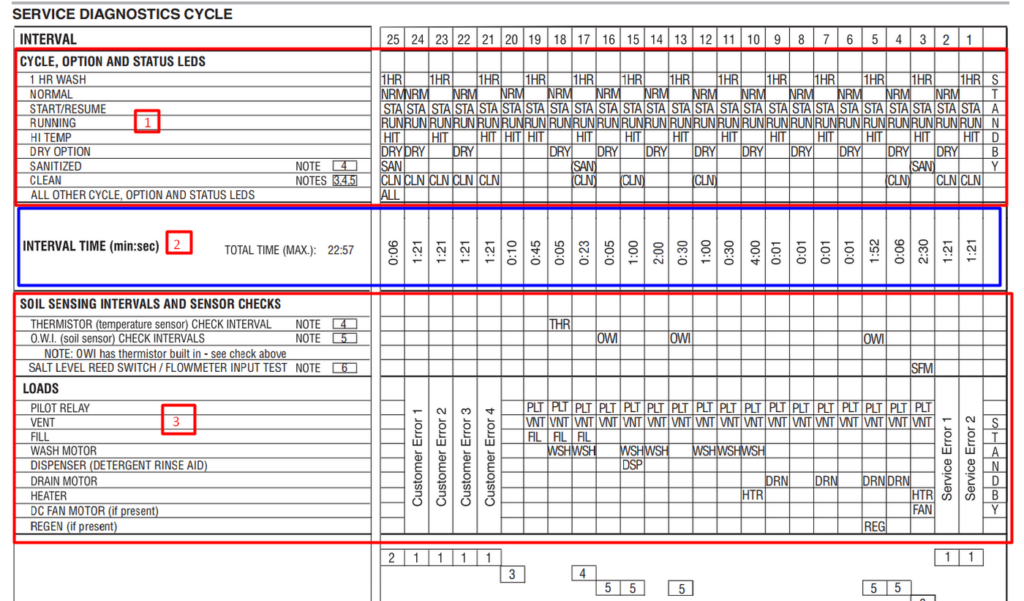
Most Whirlpool dishwasher tech sheets feature three main sections:
- The Lights Section: Displays the active lights during each interval. For example, the Start/Resume and Running lights will be on during all intervals.
- The Timing Section: Details the duration of each interval. For example, all error intervals last 1 minute and 21 seconds, while the 20th interval is just 10 seconds.
- The Components Section: Highlights the specific load and components active during each interval. For instance, the thermistor is activated during interval 18.
In Paul’s words, “One trick to know the current interval is to check the lights on the display, as guided by the tech sheet.”
Remember, understanding the error codes is the first step towards a comprehensive fix.
2. On/Off and Start/Pause Buttons
Picture this:
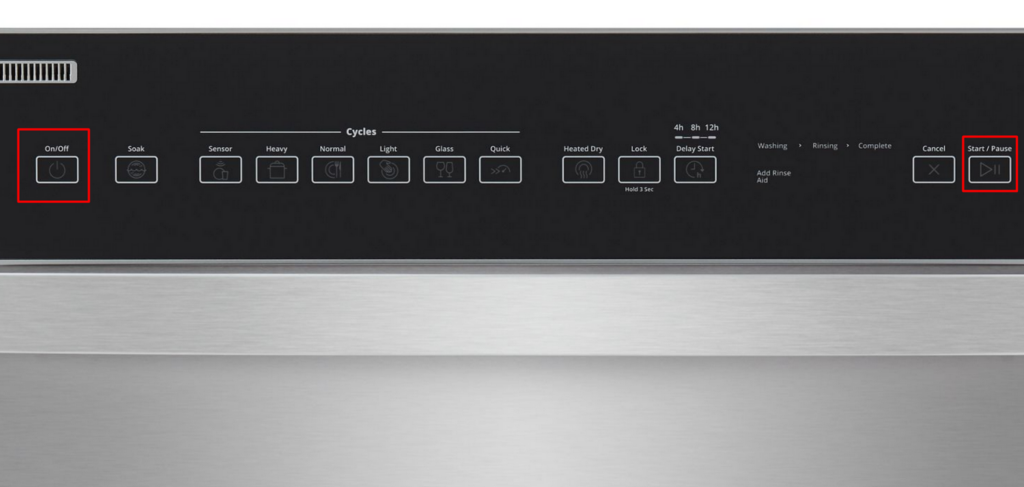
There’s a unique way to reach the diagnostic mode for certain Whirlpool dishwasher models, specifically the 24-Inch ADA-Compliant front display models. It involves a slight departure from the traditional three-button method.
Enter my friend, Paul:
He’s been in the appliance repair industry for years, and he once told me, “These specific models, Jason, rely on the On/Off and Start/Pause buttons.”
So, let’s break this down:
- Step 1: Power off the dishwasher.
- Step 2: Unplug the dishwasher from the power supply. If it’s hardwired, you’ll need to flip off the dishwasher’s circuit breaker.
- Step 3: Swing open the dishwasher door.
- Step 4: Bring the dishwasher back to life by plugging it into the power outlet, or if hardwired, flip the circuit breaker back on.
- Step 5: Once the power’s back within 60 seconds, press and hold the On/Off and Start/Pause buttons simultaneously.
- Step 6: Close the door. The dishwasher will instantly launch into service mode.
- Step 7: To exit service mode, disconnect the dishwasher from the power source.
3. Cycles and Start/Cancel Buttons

Let me share an experience:
When working with certain models, such as the Whirlpool 18” Front Display ADA-compliant dishwashers, the keys to accessing the service mode are the Cycles and Start/Cancel Buttons.
Here’s your step-by-step guide to navigating this:
- Step 1: Power down the dishwasher. I always suggest doing this first – safety, after all, is paramount.
- Step 2: Unplug the dishwasher from the power source, or if that’s not immediately accessible, flip off the circuit breaker.
- Step 3: Open the dishwasher door.
- Step 4: Reconnect the dishwasher to the power outlet or turn the circuit breaker back on.
- Step 5: Now, here’s the crucial part. Within one minute of restoring power, press and hold both the Cycles and Start/Cancel buttons.
- Step 6: Close the door. This action will kickstart the service mode.
- Step 7: Once you’re done, unplug the dishwasher to exit the service mode.
4. Rinse and Start Buttons
Here’s another trick up my sleeve:
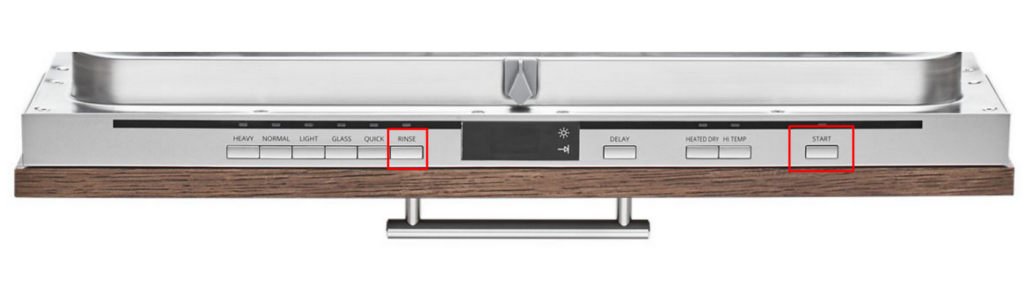
It’s about the Rinse and Start buttons. This particular method is commonly used for Whirlpool 18” and 24” top-display panel-ready dishwashers. For example, you’ll find it applicable for models like the UDT555SAHP.
Let’s break it down:
- Step 1: Begin by turning off the dishwasher. This first step is crucial for safety and effectiveness.
- Step 2: Proceed to unplug the dishwasher from its power source. Again, it’s all about safety first.
- Step 3: Next up, gently open the door of your dishwasher.
- Step 4: Now it’s time to reconnect your appliance to the power supply. You’re setting the stage for the actual reset.
- Step 5: From the moment you restore power, you have 60 seconds to press and hold both the Rinse and Start buttons. This quick response is key to triggering the service mode.
- Step 6: With the buttons engaged, close the door. Voila! Your dishwasher is now in service mode.
- Step 7: To wrap things up and exit the service mode, just unplug the dishwasher again.
I learned this technique through years of dealing with different appliance models. And let me tell you – it can be a real game-changer when it comes to troubleshooting your Whirlpool dishwasher.
5. High Temp Wash + Heated Dry
Now:
Here’s a method I hadn’t encountered until my friend Paul clued me in. He’d used it a few times and vouched for its efficacy, particularly for specific Whirlpool dishwasher models like DU915PWSQ0 and DU930PWST0.
This technique involves entering the service mode using the High Temp Wash and Heated Dry buttons.
Intrigued? Let’s delve into it:
Step 1: Ease your dishwasher into standby mode.
You might be wondering, “How?” Well, as Paul recommends, simply unplug the dishwasher and then plug it back in. But remember, don’t push any buttons just yet.
Step 2: Start the button dance with High Temp Wash and Heated Dry.
It goes like this: HIGH TEMP WASH → HEATED DRY → HIGH TEMP WASH → HEATED DRY. Repeat this sequence twice, in rhythm.
Keep in mind:
Step 3: Let your dishwasher enter the service mode.
Now, close the door. As Paul pointed out, your dishwasher will spring to life, lighting up all the LEDs to check the display. Then, it will move through a series of seven intervals.
Some dishwashers replace the High Temp Wash button with Power Scour. If that’s the case, adjust your dance steps to: POWER SCOUR → HEATED DRY → POWER SCOUR → HEATED DRY.
Give this technique a whirl the next time your Whirlpool dishwasher is acting up.
Who knows? You might find it as handy as Paul did.
6. High Temp + Air Dry
Look:
If you’ve spent as much time around dishwashers as I have, you’ll soon discover hidden features and tricks of the trade.
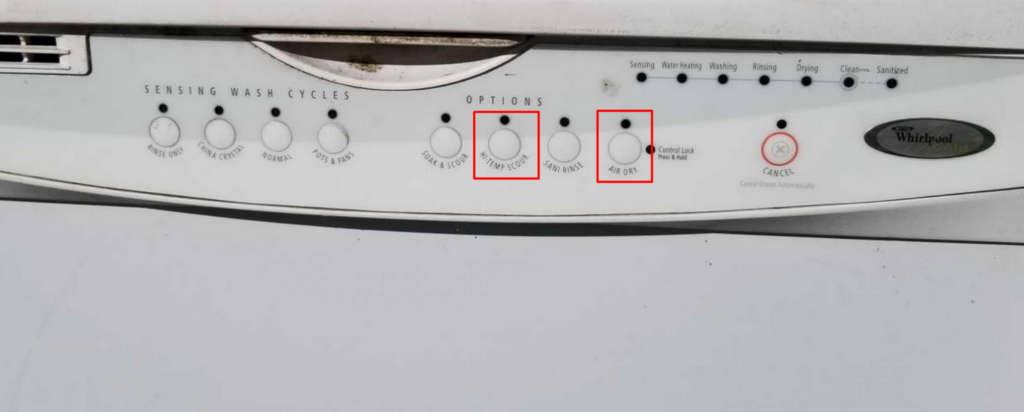
One such trick involves entering the service mode of certain Whirlpool models by using the High Temp and Air Dry buttons.
Here’s the deal:
This method works wonders on models like:
- Whirlpool GU1100XTLQ1
- Quiet Partner III GU1200XTLS0
- Whirlpool WDF320PADB3.
Let me walk you through it:
Step 1: Initiate Standby Mode
Start by setting the dishwasher in standby mode.
Step 2: Button Sequence
Next, perform the High Temp and Air Dry button sequence like this:
HIGH TEMP → AIR DRY → HIGH TEMP → AIR DRY
Bear in mind:
In some dishwashers, the High Temp Wash button is replaced with Power Scour. If you have such a model, the sequence will be:
POWER SCOUR ⇒ HEATED DRY ⇒ POWER SCOUR ⇒ HEATED DRY
Step 3: Close the Door
Finally, secure the dishwasher door.
Done right, you’ll witness all the user interface LEDs lighting up as the dishwasher performs a display test.
One last thing to remember:
This service mode puts the dishwasher through 11 testing phases, checking various components in the process. After running its course, the dishwasher will stop, and the lights will extinguish.
7. Heated Dry + Normal
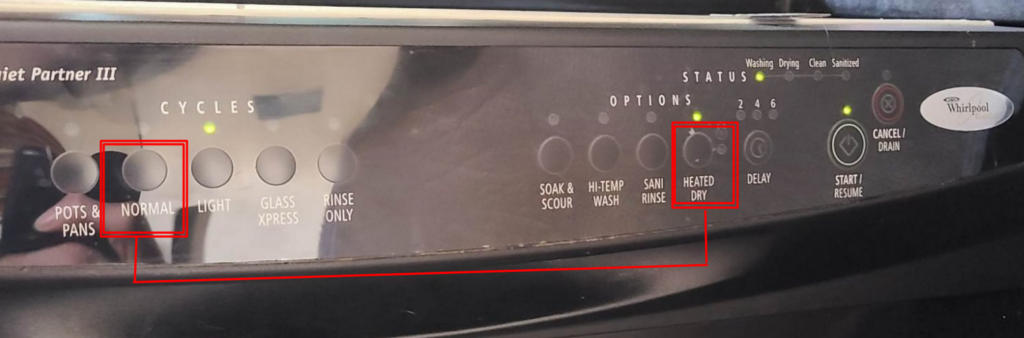
Listen up:
Certain Whirlpool dishwasher models like:
- Whirlpool GU2200XTSB3 Quiet Partner 3
- Whirlpool GU2300XTVQ1
- Whirlpool W10142800
- Whirlpool Dishwasher DU1055XTVQ1
- Whirlpool IUD9750WS4
and among others, use a unique combination of the High Temp and Normal buttons to kickstart the diagnostic mode.
Having repaired countless dishwashers, I’ve frequently employed this method.
Here’s how you do it:
- Step 1: Ensure the dishwasher is in standby mode.
- Step 2: Now, initiate the diagnostic mode by swiftly pressing the Heated Dry and Normal keys in the right sequence. Twice. And all within six short seconds. Remember, the sequence is crucial: Heated Dry ➙ Normal ➙ Heated Dry ➙ Normal.
- Step 3: Shut the door. If you’ve got it right, all the LEDs will illuminate as the dishwasher begins a thorough display test.
As an experienced appliance technician like Paul will tell you:
“The dishwasher will then proceed through 19 individual checks to test various functions and components. That’s how we ensure your machine is in tip-top shape.”
Common Whirlpool Dishwasher Error/Fault Codes
The table below compiles some of the most common error codes for Whirlpool dishwashers.
Remember:
As Paul advises, “The error codes and meanings may differ from one model to another. So, make sure to consult your model-specific tech sheet.”
| Error Code | Meaning |
|---|---|
| 1-1 | K2 pilot relay is stuck closed. |
| 1-2 | Corrupted or damaged memory on the control board. |
| 2-1 | Stuck key on the user interface |
| 3-1 | Open or faulty temperature sensor |
| 3-2 | Shorted or faulty temperature sensor |
| 3-3 | Failed calibration OWI failure |
| 4-3 | Wash motor not running |
| 5-1 | Door stuck open Door latch or switch issue |
| 5-2 | Door stuck closed |
| 6-1 | low or no water in the dishwasher |
| 6-2 | Fill valve electrical problem |
| 6-3 | Too much suds Air in pump |
| 6-4 | Float switch problem |
| 6-6 | Incoming water under 84°F (29°C). |
| 6-7 | Disconnected or damaged flowmeter |
| 6-8 | Regen valve electrical problem |
| 7-1 | No heat Heat circuit problem |
| 7-2 | Heater stuck on |
| 8-1 | Slow drain |
| 8-2 | Drain motor electric problem |
| 8-3 | Drain stuck on |
| 8-4 | Water in the drip tray |
| 9-1 | Diverter cannot find position |
| 9-2 | Diverter stuck on |
| 9-3 | Diverter disk missing |
| 10-1 | Dispenser electrical problem |
| 10-3 | Drying fan error |
| F1 | Temperature sensor |
| F2 | Water leak detected |
| F3 | Heating element not heating water or slow heating |
| F4 | Draining problem detected |
| F5 | Wash motor rotor may be blocked |
| F6 | Filling too slowly with water or no filling |
| F7 | Faulty flow meter |
| F8 | Water level – Too much water in the dishwasher |
| F9 | Filling with water continuously |
| F10 | Sensor failure |
| FA | Dirty water detected |
| FB | Faulty motorized diverter valve |
| FC | Faulty or malfunctioning water hardness sensor |
The Final Words
Here’s the bottom line:
Consider the diagnostic or service mode as your dishwasher’s hidden ace, always there to aid you when your machine goes rogue.
From my experience, this mode is a lifesaver when troubleshooting stubborn issues.
Remember:
Different techniques exist to activate this service mode, with the ‘3 buttons method’ stealing the show in popularity. Still, it’s crucial to check your tech sheet for the approach best suited to your model, as our expert Paul underscores.
The magic of the diagnostic mode doesn’t stop at identifying stored error codes. It’s also your go-to when you need to reset or recalibrate your dishwasher, especially after a component swap-out.
To sum it all up:
- The diagnostic mode is a handy tool for troubleshooting your dishwasher.
- There are various activation techniques, with the ‘3 buttons method’ leading the pack.
- Always check your tech sheet to ascertain the right technique for your model.
- The diagnostic mode allows you to access error codes, reset, and recalibrate your dishwasher.
Lastly, here’s my word of advice:
Should you stumble across any issues while trying to navigate your dishwasher into service mode or when deciphering error codes, don’t hold back on asking for help.
We’re always here to lend a hand in our free Facebook group.
Trust me, you’re never alone in this journey!