
Alright, here’s the thing:
There’s a particular conundrum I’ve encountered multiple times in my years as an appliance technician.
Picture this:
Your dryer is running hot, but those jeans? Still damp. You might wonder, “How can a dryer not dry clothes while still getting hot?”
Spot on, that’s the million-dollar question!
Drawing from years in the field, and with insights from Vincent Clark, a seasoned appliance guru from San Fernando Valley, LA, we’re about to dive deep into this mystery.
Brace yourself, let’s get to the bottom of it.

Table of Contents
Why Is Your Dryer Not Drying Clothes but Getting Hot?
Based on countless service calls I’ve made, it often starts with how the machine is loaded. Overloading or extremely wet clothes can be deceptive culprits. But if the load’s right and you’re still facing this issue, things like lint build-up, blocked vents, or a pesky faulty blower wheel might be at play.
Let’s dive in deeper:
I’m about to unpack these common issues, giving you a roadmap to troubleshoot effectively.
Before we start:
A quick shoutout to my mate Vincent: “Double-check your dryer settings. Opt for ‘automatic dry’ if it’s an option.”
Ready?
Safety first. Unplug your dryer, and let’s get down to the nitty-gritty.
5 Possible Reasons Why Your Heating Dryer Won’t Dry Clothes and How to Resolve Them
| Commonly Affected Parts | Estimated Cost |
|---|---|
| Lint trap | $15 – $55 |
| Dryer vent | $14 – $60 |
| Dryer vent hose | $7 – $32 |
| Heating element | $18 – $51 |
1. Overloaded Dryer
Problem:
Look, we all want to save time, but overloading your dryer is a shortcut to trouble.
Why?
Two reasons: First, packed clothes won’t dry well. Second, you’re inviting mechanical failure. Overloading strains your motor, drum bearing, and other vital components.
As one Reddit user found out, it’s easy to overlook this simple issue while searching for more “complex” problems. Don’t fall for it.
Identification:
Signs?
Well, if your clothes are coming out damp, it’s a dead giveaway. Hot air can’t circulate freely in an overcrowded dryer.
Solution:
Here’s the fix:
Ease up on the load. Check your user manual to find out your dryer’s capacity limits. Trust me, it’s there for a reason.
Vince chimes in: “A good rule of thumb is to fill the dryer to about 80% of its capacity. And avoid throwing in a pile of bulky items together.”
And that’s it. It’s simple, but it makes a world of difference. Keep your loads reasonable, and your dryer will thank you.
2. Excessively Wet Clothes
Problem:
Sometimes, your dryer’s woes begin with your washer.
Confused?
Bear with me. Clothes heading into the dryer should be damp, not dripping. If your washer isn’t spinning out the excess water effectively, your dryer has to work overtime.
Identification:
How can you tell?
If your dryer’s taking ages to dry while maintaining its usual heat, that’s a clue. Another giveaway? Having to lug sopping wet clothes from the washer.
Vince points out, “Most modern dryers have an energy-saving mode. It’s designed to be efficient, not to handle drenched laundry.”
Solution:
Take a cue from a fellow Reddit user with a Whirlpool LSR5232LQ1 washer. When the washer didn’t spin dry, it was time for some troubleshooting.
First things first:
Check your washer settings. Sometimes, it’s just a matter of tweaking a dial or pressing a button.
And a pro-tip?
When you’re dealing with super wet loads, disable the energy-saving mode on your dryer. Your user manual should guide you through it. Remember, it’s a team effort between your washer and dryer. Make sure both are pulling their weight!
3. Accumulated Lint in the Lint Trap
| Part | Lint trap |
| Location | For front-load dryers, you can find it inside the dryer door, in front of the dryer door. For top-load dryers, you’ll find it on the lid of the dryer in front of the control panel. |
| Ease of troubleshooting | Easy |
| Cost | $15 – $55 |
| Repairable | Yes – if it is blocked by accumulated lint. |
Problem:
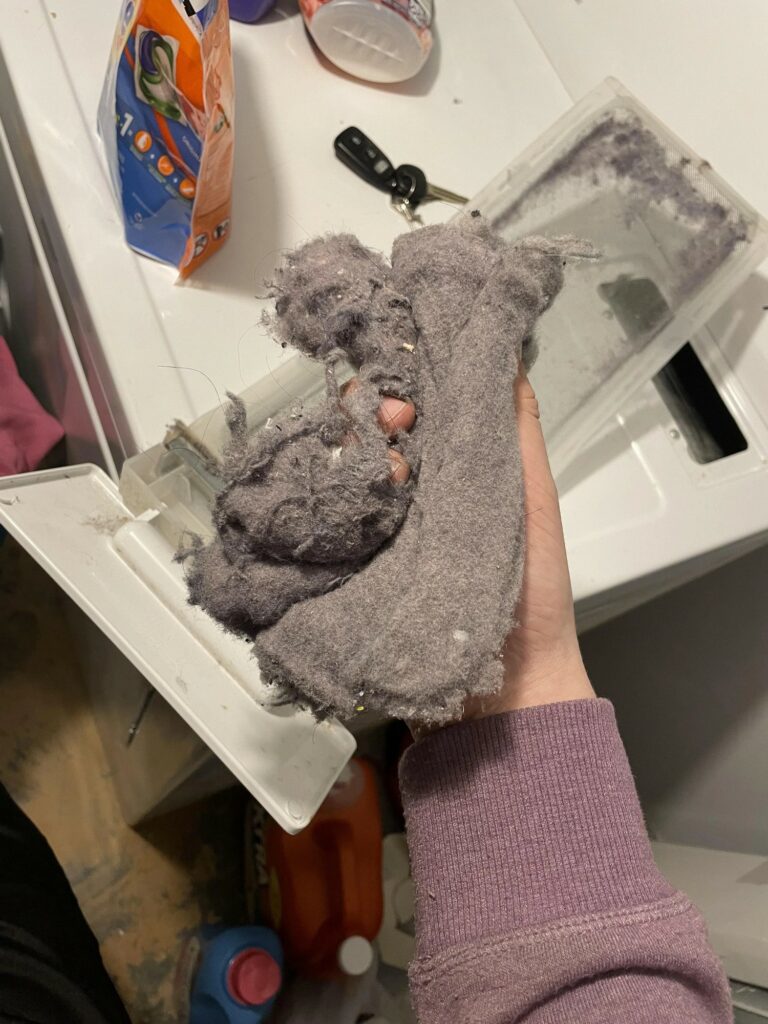
Here’s a scene I’ve witnessed countless times: Your dryer’s airflow is stunted. The culprit? More often than not, it’s that sneaky lint trap clogging up.
Its job?
To catch lint. But when it gets too full, it hampers the drying process. It’s like trying to breathe with a blocked nose.
Identification:
Now, if your dryer gives off a burning smell as if it’s preparing for a barbecue party, that’s a telltale sign right there.
And the humidity?
Like that Reddit user with a Whirlpool WED8500BC model, you’ll feel like you’ve accidentally walked into a sauna when you’re in your laundry room.
Just last month, Jordan from our Facebook group shared a tale. Clothes still damp, dryer heated up, yet a lint screen that just wouldn’t fit snugly. When he pried open the access panel, he was met with a snowstorm of lint. Well, not snow, but you get the drift.
Solution:
Vince put it best: “Clean that lint trap regularly. You’re not only combating drying issues but potential fire hazards too.”
So, here’s the drill:
- Step 1: Eject the lint screen.
- Step 2: Treat it to a warm, soapy bath.
- Step 3: Evict any remaining lint – a lint brush or vacuum should do the trick.
- Step 4: Make sure the coast is clear, then slide the screen back in.
Do this, and trust me, you’ll have a dryer that performs as it should. Dry clothes, happy home.
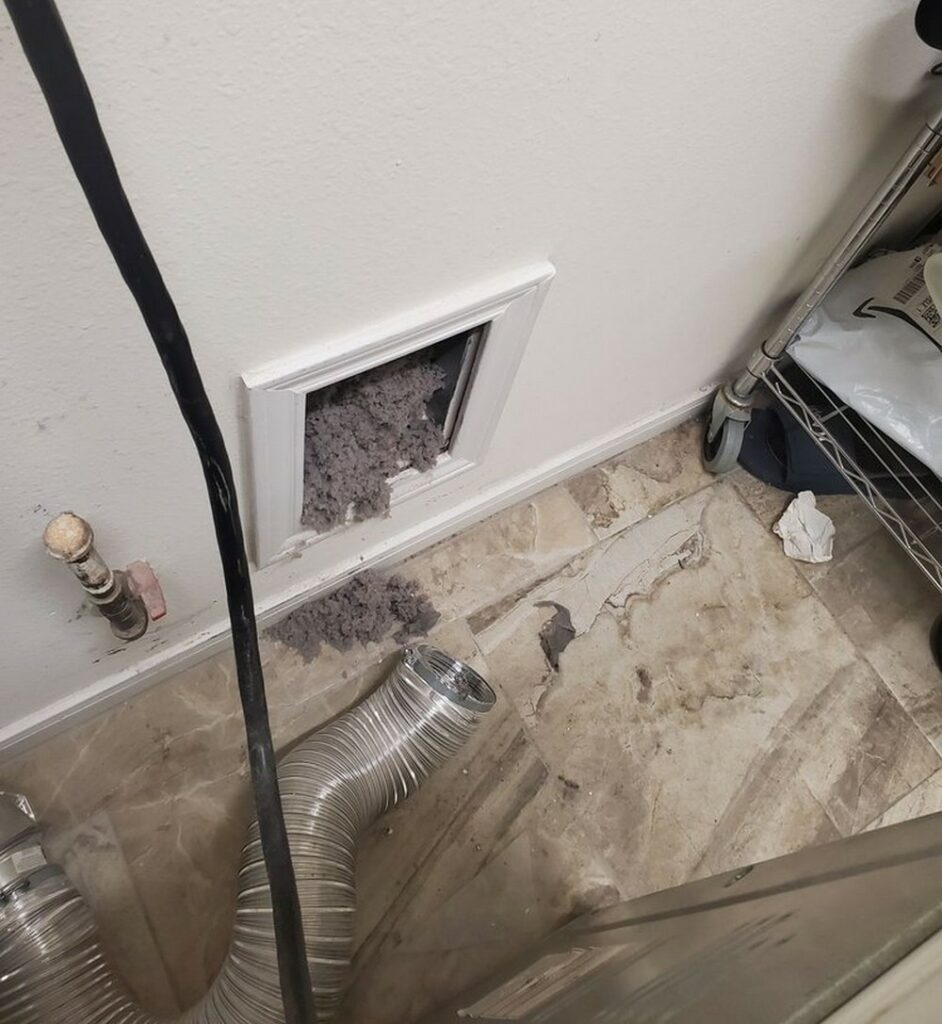
4. Clogged Dryer Vent
| Part | Dryer vent | Dryer vent hose |
|---|---|---|
| Location | It runs from the back of the dryer, through the wall, to an exterior vent outlet. | It connects the dryer to the vent. |
| Ease of troubleshooting | Moderate | Moderate |
| Cost | $14 – $60 | $7 – $32 |
| Repairable | Yes – if it is clogged with accumulated lint and debris. | Yes – if it is clogged with accumulated lint and debris. |
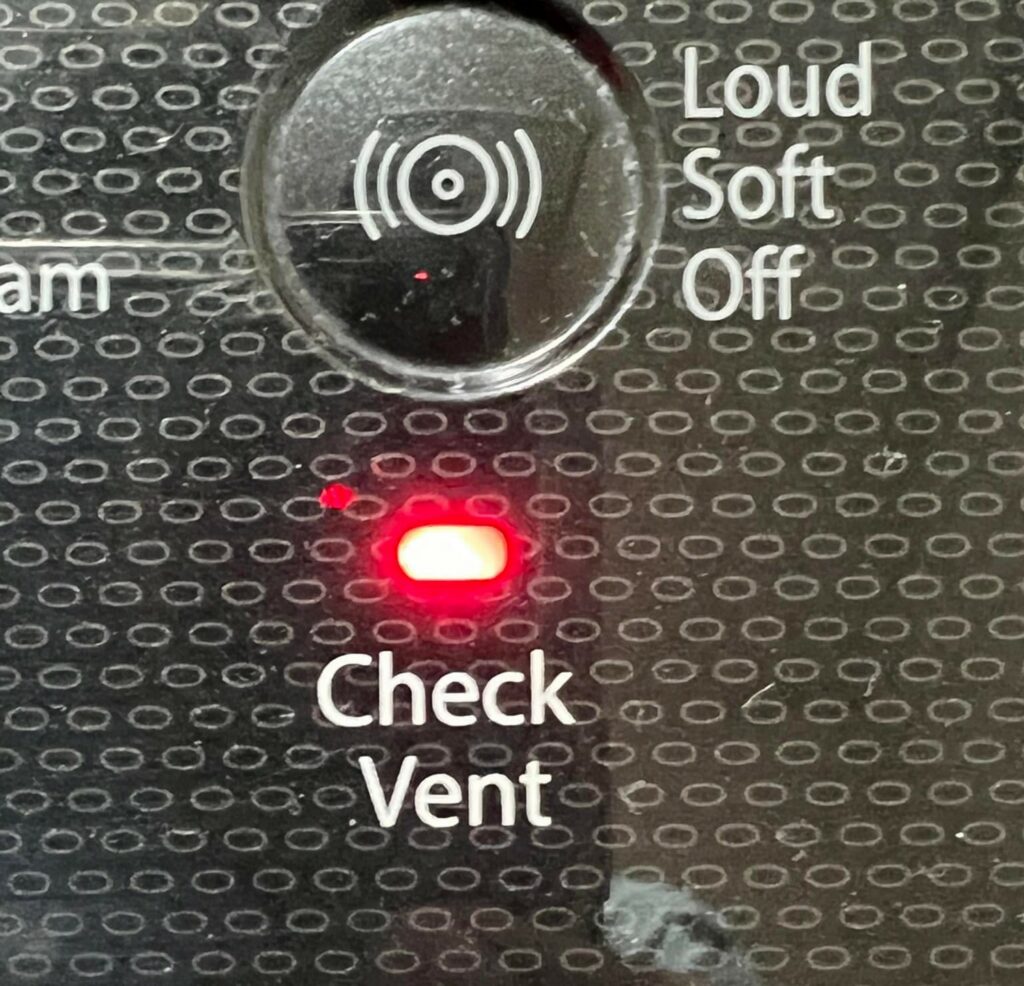
Problem:
Here’s something you might overlook – a clogged dryer vent. When lint accumulates beyond the lint trap, it migrates straight to your vent. Trust me, even the most diligent lint-trap cleaner can’t prevent all the lint from sneaking through.
Identification:
A tale from the field:
I recall the Reddit user with the Whirlpool dryer. Their clothes were hostage to extended drying cycles – sometimes taking five times longer. If you’ve spotted condensation on your dryer door, or pulled damp lint from the trap, alarm bells should ring.
Solution:
Despite religiously cleaning their Maytag dryer’s vent after each load, this user discovered a lint fortress at the vent’s exterior outlet.
Vince aptly suggests, “Annual professional vent cleaning is crucial. Pros use snake brushes with vacuums, ensuring deep cleaning.”
Want a quick DIY? Here you go:
- Step 1: Using a screwdriver, detach the vent hose.
- Step 2: Vacuum out lint and debris, especially around the hose’s entrance and exit.
- Step 3: Dive deeper; use a vent brush to scrub the inner and outer vent openings.
- Step 4: Reconnect everything, and give it a test run.
5. Faulty Heating Element
| Part | Heating element |
| Location | It is typically found inside the dryer’s heater housing, behind the front or rear access panel. |
| Ease of troubleshooting | Moderate |
| Cost | $18 – $51 |
| Repairable | No – if it is defective. Yes – if the wiring is flawed. |
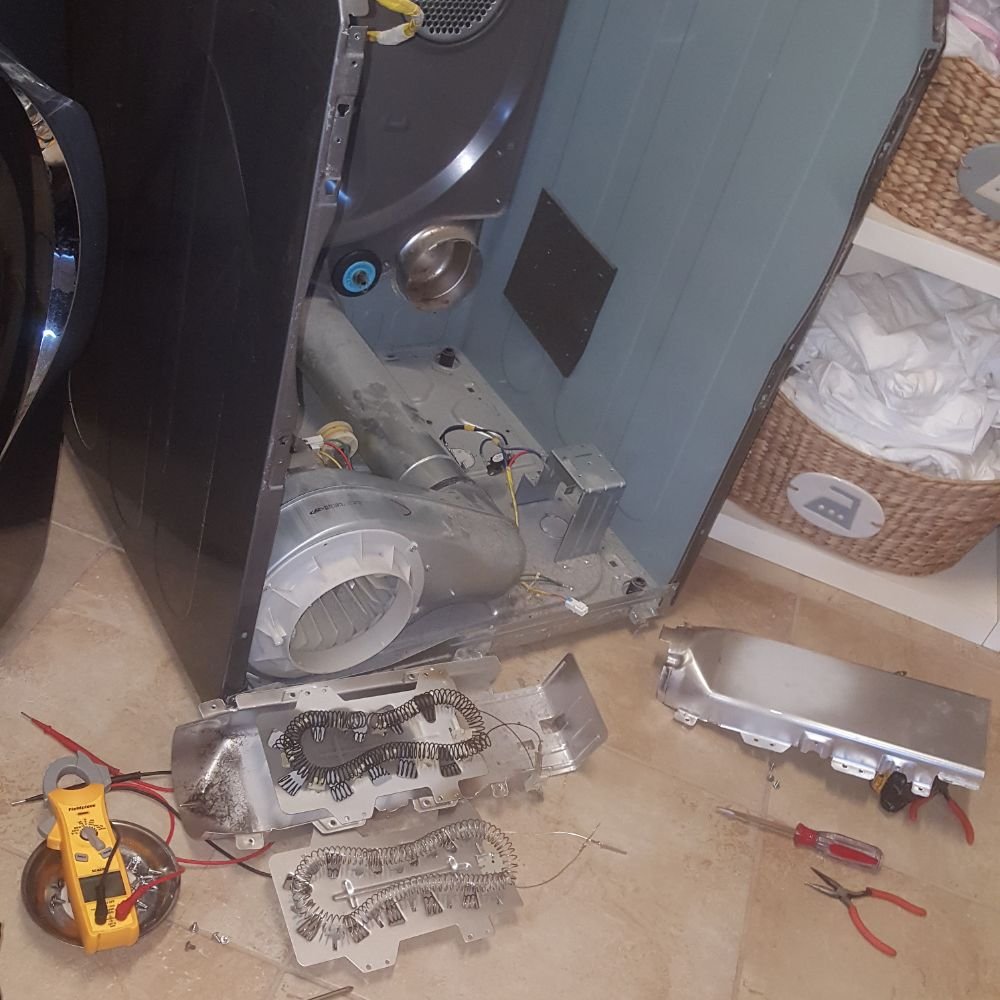
Problem:
Let’s dive in deep. In electric dryers, the heating element is like the heart – it pumps heat. Together with mates like the thermostat, thermal fuse, and thermistor, it ensures your clothes get a warm, even hug.
Now, picture this:
A glitch in the heating element throws this warmth off-balance. You’ll find your clothes still feeling a bit cold and damp after their tumble. I’ve seen it plenty of times, and so has the Reddit community. A simple wiring hiccup or a tripped breaker, and bam! Your dryer’s running on half power – 120V instead of the needed 240V.
Identification:
Symptom check – the dryer’s taking its sweet time. But to really pin the blame on the heating element, you’ve got to test those coils.
Solution:
First things first. Try a quick power reset. Flip the breaker off, count to ten, switch it back on, and see if your dryer warms up.

No luck? It’s time for some hands-on troubleshooting:
- Step 1: Get the access panel off and say hello to the heating element.
- Step 2: Multimeter in hand? Test the coils for continuity.
- Step 3: No continuity? Replace the heating element.
- Step 4: Put everything back, and run a test cycle.
Now, here’s a tidbit from the workshop:
Clients often ponder, “Is it worth replacing a heating element in a dryer?” My usual take? “If your dryer’s acting like a rebellious teen with endless issues, maybe it’s time for an upgrade.”
Lastly:
Tackling this isn’t everyone’s cup of tea. If you’re unsure, there’s no harm in ringing up a pro. We’re here to help.
In a Nutshell…
If your dryer gets hot without drying clothes, you are potentially looking at a loading mistake, lint accumulation, or malfunctioning heating element.
Thankfully, mistakes can be corrected, clogs can be cleared, and defects can be repaired. And you can do it all by yourself!
Stuck?
Summon me with the “Ask the Expert“ feature; I’ll help you out.
Then, when you’re all done, share your experience in the comment section below. Believe me, your input is invaluable!