

Listen up:
If you’re dealing with a dryer leaking water, you’re not alone. It’s a problem that I’ve seen far too often in my years as an appliance technician.
Quick story:
Just last month, I had three separate calls for the same issue. All were puzzled, asking, “Why is my dryer leaking water?” Sound familiar?
Good news:
You’re in the right hands. I’ve put together tried-and-true solutions for tackling this perplexing issue.
So, grab your toolkit.
Let’s get that dryer back to peak performance, shall we?
Table of Contents
Why Is Your Dryer Leaking?
Typically, culprits range from blocked ventilation hoses and problematic vent flaps to pesky condensation issues. Sometimes, it’s even as straightforward as a worn-out door seal or a botched installation.
The thing is:
A leaking dryer could ruin your gleaming floors, like this Reddit user who had to replace the hardwood floor entirely.
Let’s avoid that nightmare.
That’s why I collaborated with Austin Stokes, a seasoned appliance technician from Tennessee, to arm you with the know-how to tackle this issue.
Dive into this guide to diagnose and rectify your dryer’s leaks. Let’s get things dry again!
Top 4 Causes and Their Fixes
| Commonly Affected Parts | Estimated Cost |
|---|---|
| Ventilation Hose | $13 – $37 |
| Vent Flap | $97 – $278 |
| Door Seal | $17 – $68 |
Safety comes first, so before attempting any repairs, unplug the dryer and turn off the water supply.
Now, let’s get right to it.
1. Improper Dryer Installation
Problem:
First things first. If your dryer is leaking, the odds are high that it’s an installation issue.
Austin notes: “Often, it’s something as simple as a loose vent or a bent exhaust pipe that leads to these leaks.”
Identification:
Natalie, a concerned member of our Facebook group, reported her new Electrolux dryer was leaking. What did we find? A vent hose that had come loose. Quick and easy, we reattached it.
But wait, there’s more:
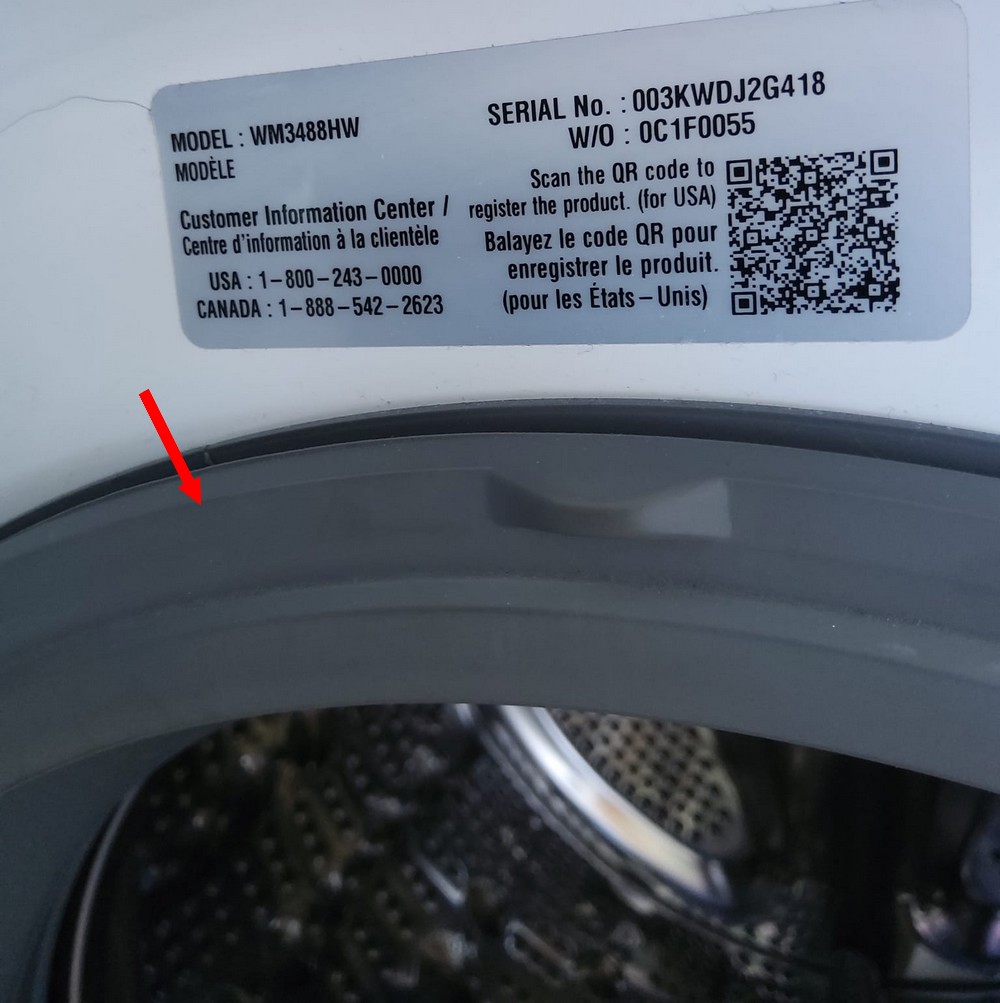
Just last week, Samuel reached out on Facebook, frustrated that his new Samsung dryer, model Wa45ht7200aw, was leaking.
“I’ve tried everything,” he lamented, “and it’s still leaking.”
Solution:
We swung into action. First on the checklist? Installation, specifically the exhaust vent assembly. Sure enough, the vent was bent.
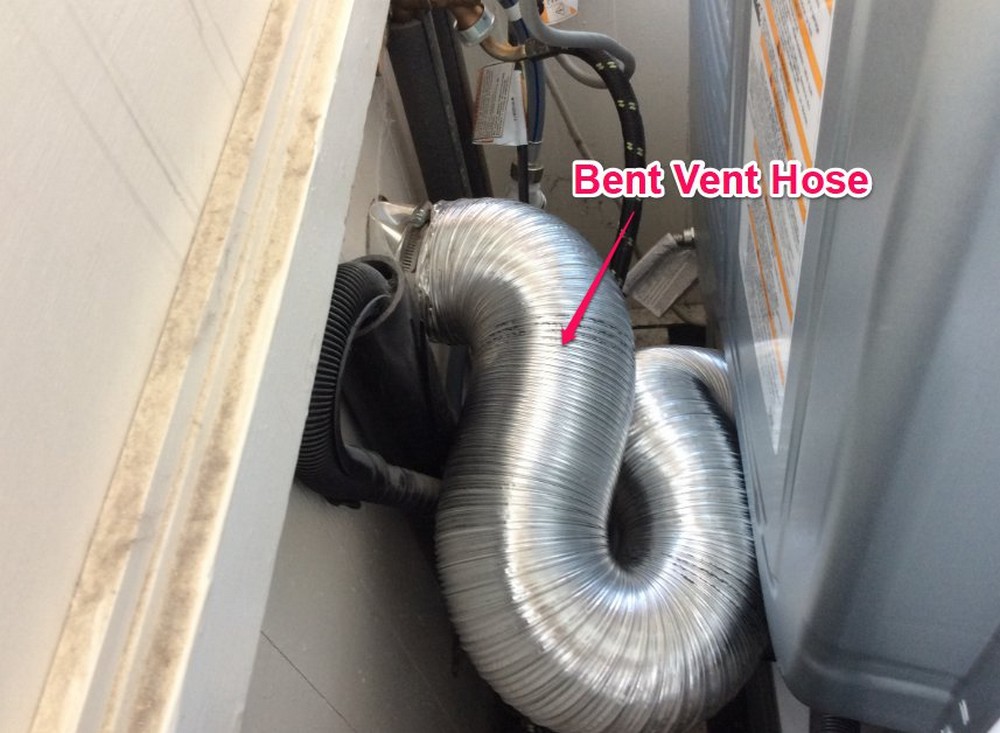
So what did we do?
We straightened it out, problem solved.
But listen:
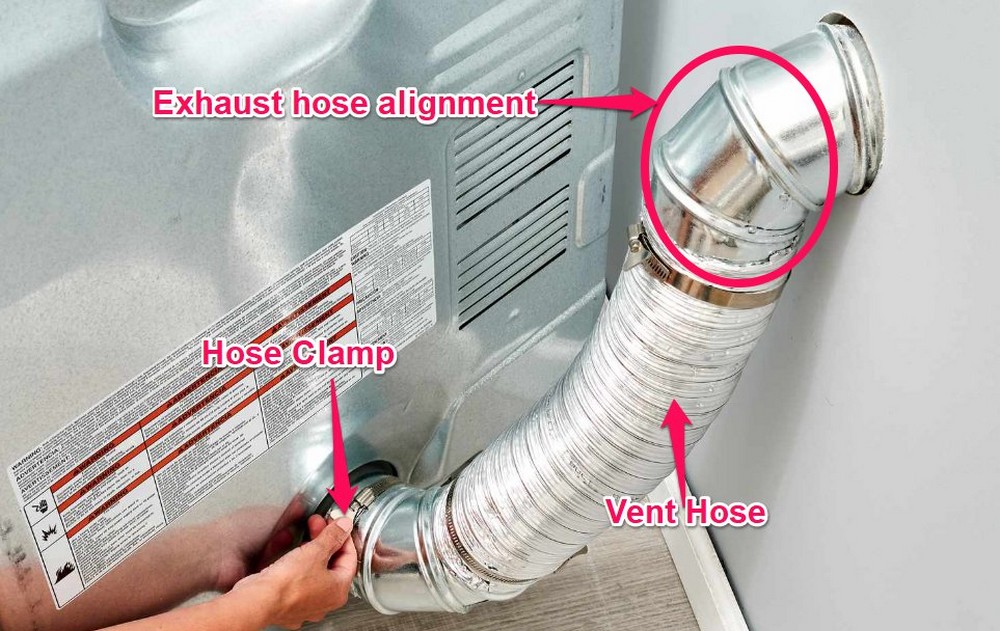
Sometimes, the vent hose doesn’t fit perfectly over the wall vent pipe. No worries. This is an easy fix.
Here’s the pro tip:
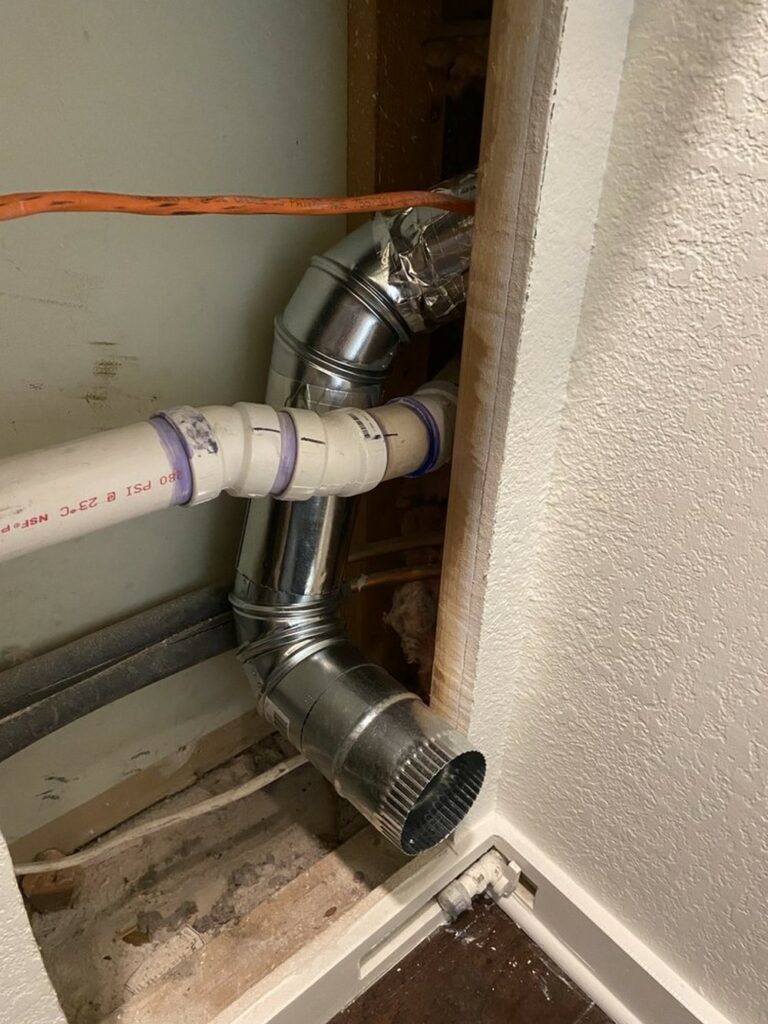
Ensure the exhaust hose runs straight and slopes downward for optimal airflow. Just like the example in the image below.
And Austin’s final wisdom: “Forget about PVC or plastic. Use durable materials like aluminum or galvanized steel for your ventilation ducts. It’s not just about preventing leaks; it’s about safety.”
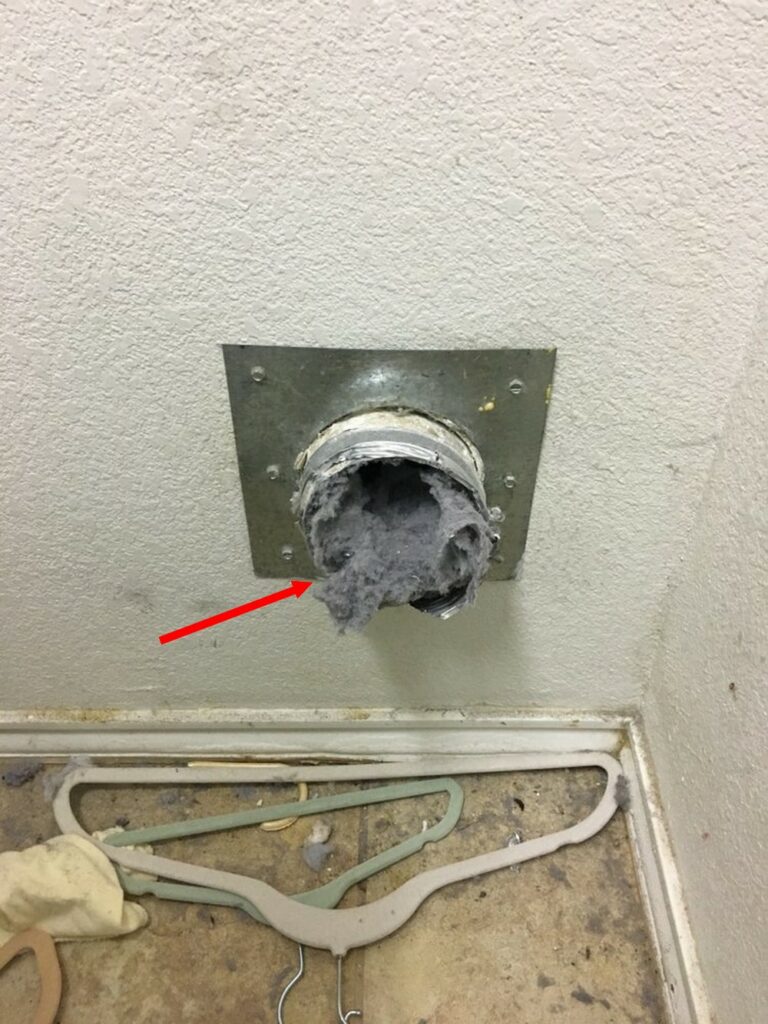
2. Clogged Vent Hose
| Part | Vent Hose |
| Location | It is located at the back of the dryer, connecting the vent duct to the dryer. |
| Ease of troubleshooting | Easy |
| Cost | $13 – $37, depending on the model |
| Repairable | Yes – If is merely clogged with lint or debris No – If it is damaged |
Problem:
So you’ve nailed the installation, but the dryer still leaks? Next on our troubleshooting list – the vent hose.
Austin chimes in: “Lint accumulates. It blocks the vent hose, traps moisture, and that’s when the drip-drip starts.”
Identification:
First, identify the source. If you notice the leak at the joint where the hoses meet, bingo, you’re onto something.
For context:
A Reddit user echoed this, saying, “I’ve got lots of dripping right where the hoses join.” Case closed.
But wait, there’s another clue:
Austin reminds us, “If your clothes aren’t drying as fast, or there’s a musty odor, you’re probably looking at a clogged hose.”
Case in point:
Sam, from our Facebook group, complained about long drying times and a peculiar smell from his Frigidaire dryer. Guess what? A clogged hose was to blame, causing condensation and, in turn, the leak.
The diagnosis? Clean that vent hose, ASAP.
Solution:
Here’s how:
- Step 1: Power off the dryer. Pull it out from the wall for better access.
- Step 2: Locate the vent hose on the back of the dryer.
- Step 3: Unhook the hose and check for lint or blockages.
- Step 4: Use a vacuum or brush to remove the lint. Stubborn clog? A drain snake might be your new best friend. Also, inspect the hose for cracks. If you spot any, it’s time for a new hose.
- Step 5: Reattach the hose, ensuring it’s securely clamped.
- Step 6: Test time. Run a cycle and make sure it’s leak-free.
Austin’s parting shot: “Regularly clean the vent hose. It’s not just about leaks; it’s about your dryer running efficiently.”
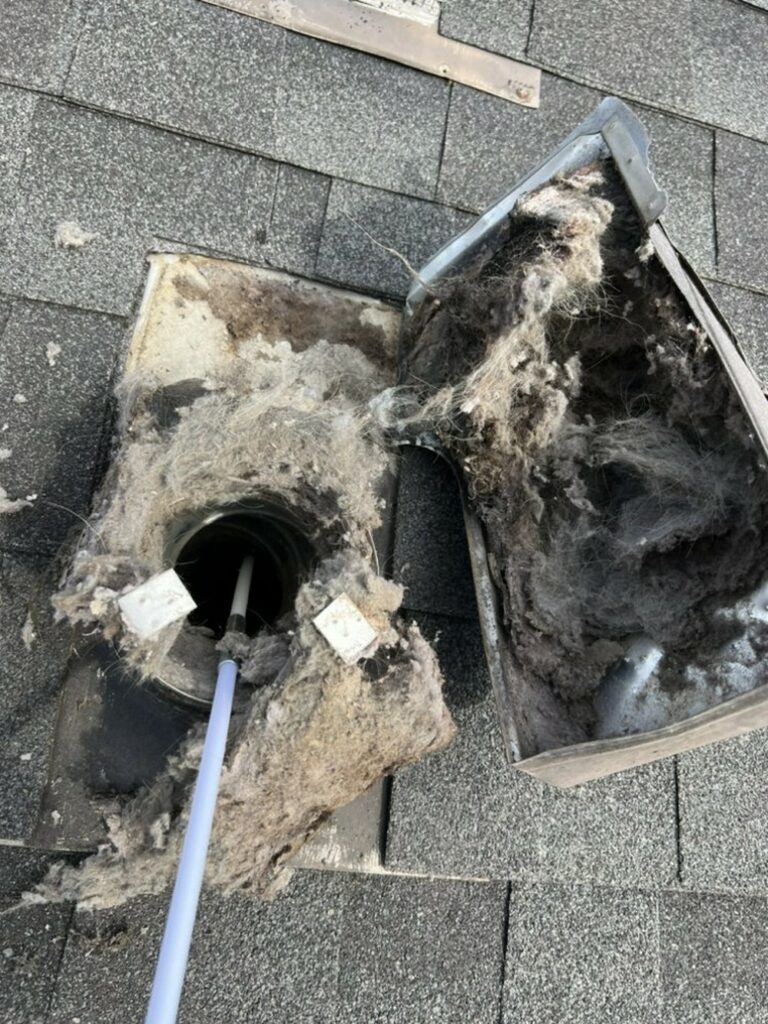
3. Faulty/Clogged Vent Flap
| Part | Vent Flap |
| Location | It is located at the end of the vent hose to the exterior walls or roof. |
| Ease of troubleshooting | Easy |
| Cost | $97 – $278, depending on the model |
| Repairable | Yes – If it is merely clogged with lint or debris No – If it is damaged |
Problem:
Now let’s dive into another frequent issue – a faulty vent flap.
Here’s the deal:
Whether you’ve got a Samsung, LG, Maytag, Bosch, or Whirlpool dryer, the vent flap serves a crucial role. It expels exhaust air and keeps cold air out. But when it malfunctions, you’re in for a world of trouble.

Identification:
Identifying a vent flap issue isn’t overly complex – it’s usually in an easy-to-reach spot.
But here’s the catch:
The vent flap can suffer from both the indoor exhaust and the outdoor cold air.
Case and point:
A Reddit user was confident the leak was due to a blocked exterior vent. They tried to clear it but still had leaks.
Austin nailed it when he said: “The user was only thinking about the inside air and completely overlooked the cold air from outside.”
I can attest to that.
In my years of troubleshooting, overlooking both sides of the vent flap is a rookie mistake. So, always check both ends.
Solution:
To set things straight, here’s your action plan:
- Step 1: Go to your dryer’s vent exit point—usually on an exterior wall or the roof.
- Step 2: Locate that pesky vent flap. Check its movement.
- Step 3: Examine the vent flap for obstructions from both the inside and the outside.
- Step 4: If clogged, a brush or vacuum can usually clear it out.
- Step 5: Check the flap for damage or wear. If needed, replace it.
- Step 6: If replacing, fit the new flap securely in place.
- Step 7: Final step? Test that new flap to make sure it opens and closes as it should.
4. Loose/Worn-out Door Seal
| Part | Door Seal |
| Location | It is located on the perimeter of the door opening inside the dryer’s door assembly. |
| Ease of troubleshooting | Easy |
| Cost | $17 – $68, depending on the model |
| Repairable | No |
Problem:
Here’s something you might not expect:
Sometimes the issue isn’t the vent or any other component – it’s the door seal. These seals are designed to lock moisture in, but when they start to slack, you’ll notice drips. And guess what? This can even cause your dryer to shut off prematurely.
Identification:
You might think checking a door seal is straightforward. Austin chimes in: “Not so fast. It’s more tricky than it appears.”
Take it from me:
I’ve seen this issue play out multiple times. You might think it’s a vent issue, only to discover that it’s actually the door seal that’s worn out.
For example:
A Reddit user cleaned their dryer’s exhaust vent because they thought that was the source of their leak. The issue persisted. After digging deeper? You guessed it—a worn-out door seal.
And here’s why:
Usually, door seals are your last line of defense against leaks. When they loosen or wear out, those slow, troublesome drips start.
Solution:
Alright, let’s roll up our sleeves:
- Step 1: Open your dryer door.
- Step 2: Undo the retaining screws and gently place the door on a floor mat.
- Step 3: Carefully peel off the old seal, starting at one corner and making your way around.
- Step 4: Take a good look. Any cracks or wear? Time for a replacement.
Austin throws in another tip: “Make sure you’re buying the right seal for your specific model. Check the manufacturer’s site or call customer service if you’re unsure.”
- Step 5: Pop the new seal into the groove on the dryer door.
- Step 6: With the new seal in place, shut the door and run a test cycle.
One last word:
Not all dryer door seals are the same. Make sure you refer to your manufacturer’s guidelines to get it spot-on.
Simply Swider’s 4 Proactive Maintenance Tips to Prevent Dryer Leaks: A Tech’s Perspective
Listen up, folks:
Keeping your dryer leak-free isn’t just a game of repairs. Maintenance plays a huge role too. As someone who’s been on countless service calls, I can tell you—most of these issues can be avoided. Here’s how:
1. Don’t Skip the Lint Filter
First things first:
Lint filters aren’t there for decoration – they serve a crucial purpose. A blocked filter restricts airflow, and you know what that leads to? Leaks.
Here’s the drill:
Take out the lint filter and brush off the lint. For the stubborn stuff, a vacuum attachment is your friend.
2. Keep an Eye on Those Water Lines
Moving on:
Loose water supply lines are more common than you’d think. This is where leaks often start to creep in.
What to do?
Give those water inlet hoses a good tightening. Regular checks will save you from unexpected mishaps.
3. Don’t Ignore the Dryer’s Feet
Alright:
Ever notice your dryer rocking back and forth or tilting? That’s a red flag. Water accumulates and you’ve got a mini-flood in the making.
Quick fix:
Adjust the dryer feet. Make sure they’re level. If needed, relocate your dryer to a more even surface.
4. A Clean Drum is a Happy Drum
Last but not least:
Fabric residue and debris love to hang out in your drum. Over time, this can lead to moisture, and guess what follows? Yep, leaks.
So, after each cycle:
Wipe down that drum. A simple cloth does wonders for preventing buildup.
In Conclusion…
Here’s the scoop:
A leaking dryer can be a real nuisance, potentially damaging your appliance and causing a mess. The usual suspects are clogged vents, faulty vent flaps, worn-out door seals, or installation blunders.
No worries!
Austin and I have provided all the expert advice to help you diagnose and fix these issues. Remember to follow our maintenance tips for prevention.
After using our guidance, enjoy leak-free drying cycles with extra peace of mind.
But:
If you need more troubleshooting help, don’t hesitate to use our “Ask the Expert” feature.
Finally, we’d love to hear about your experiences. Share which tip made the biggest difference for you, and your success can inspire someone else!
Nice job! Thanks!