
Alright:
The unmistakable sound of a “dryer squeaking” can quickly turn laundry day into a game of “find that noise”.
Here’s the deal:
Over the years, I’ve encountered a multitude of dryers, each chirping in its unique way. And while the sources of these squeaks can vary, most often, they circle back to a handful of usual suspects.
So, take a deep breath:
Matt Davis, a seasoned appliance whiz from Winnipeg, and I are here to guide you. We’ll help you silence that pesky dryer once and for all.
Ready to dive in? Let’s roll!
Table of Contents
Why Is My Dryer Squeaking?
The usual suspects? A weary idler pulley, malfunctioning drum support wheels, a stuck roller shaft, or even a rebellious motor. But sometimes, the noise might come from an off-kilter drum glide, an unhappy top bearing, or a fractured blower wheel.
Now, let’s peel back the layers:
Spotting the origin of the squeak isn’t always straightforward. Zeroing in on the exact mischief-maker? That’s where expertise kicks in.
Dive in with me:
Over the years, my colleague Matt and I have encountered every squeak and squeal a dryer can muster. And in the next sections, we’ll walk you through our troubleshooting roadmap.
But first, a quick pitstop at what I dub “Squeak Central.”
Every time a call comes in about a noisy dryer, I have a set of questions up my sleeve. It’s like my detective toolkit for homing in on the noise source.
You’d be surprised, but sometimes, just by the answers, I can pinpoint the culprit without even laying a hand on the dryer. Ready to dive deeper?
| Dryer Noise Assessment 101 | |
|---|---|
| Check common oversights | Is the dryer level? Is there a loose leg? A loose object in the drum? |
| Where is the noise coming from? | Bottom (unlevel installation, loose legs) Front (worn-out idler pulley) Back (Drum bearings and roller shaft) Near the top (Drum glides/slides) |
| When is the noise happening? | When starting When running When rotating When spinning With a heavy load |
| How long does the noise last? | Does it stop, or is it continuous? |
| What’s the nature of the noise? | A loose object Metal on metal Rubbery sound Is there a burning smell? |
| Can you replicate the noise? | For instance, by moving the drum? |
Top 5 Causes & Solutions
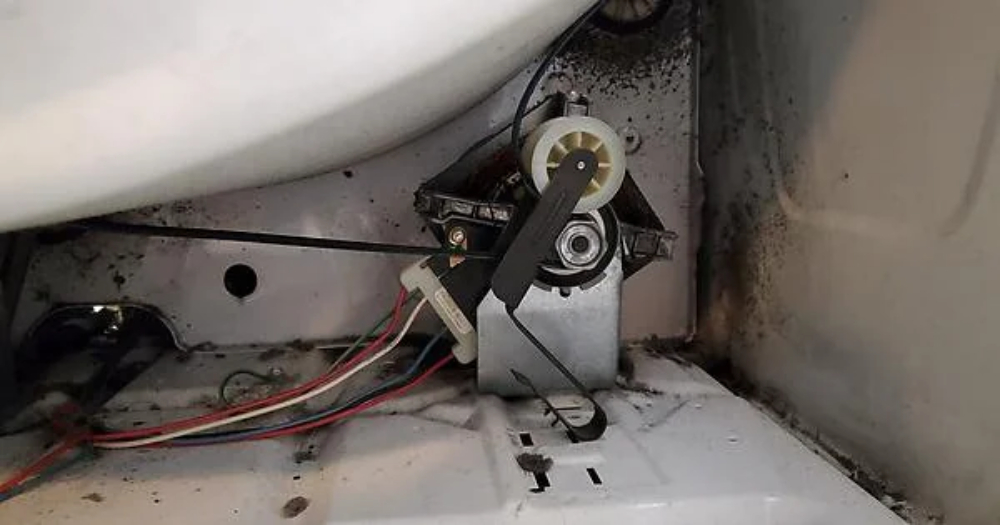
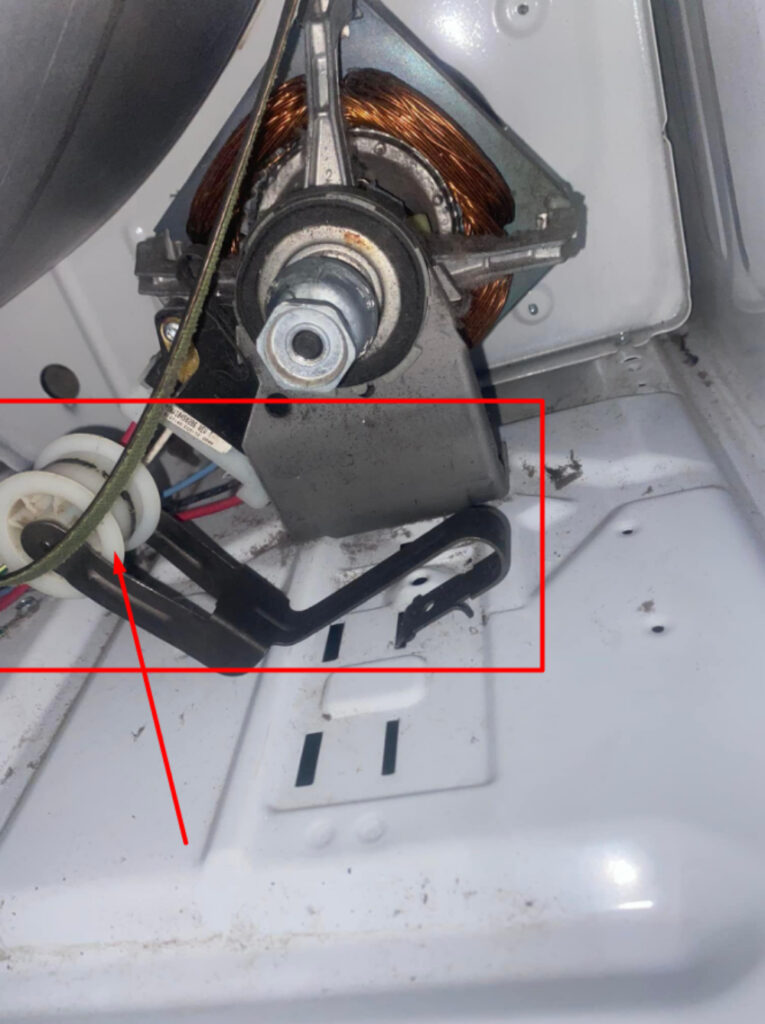
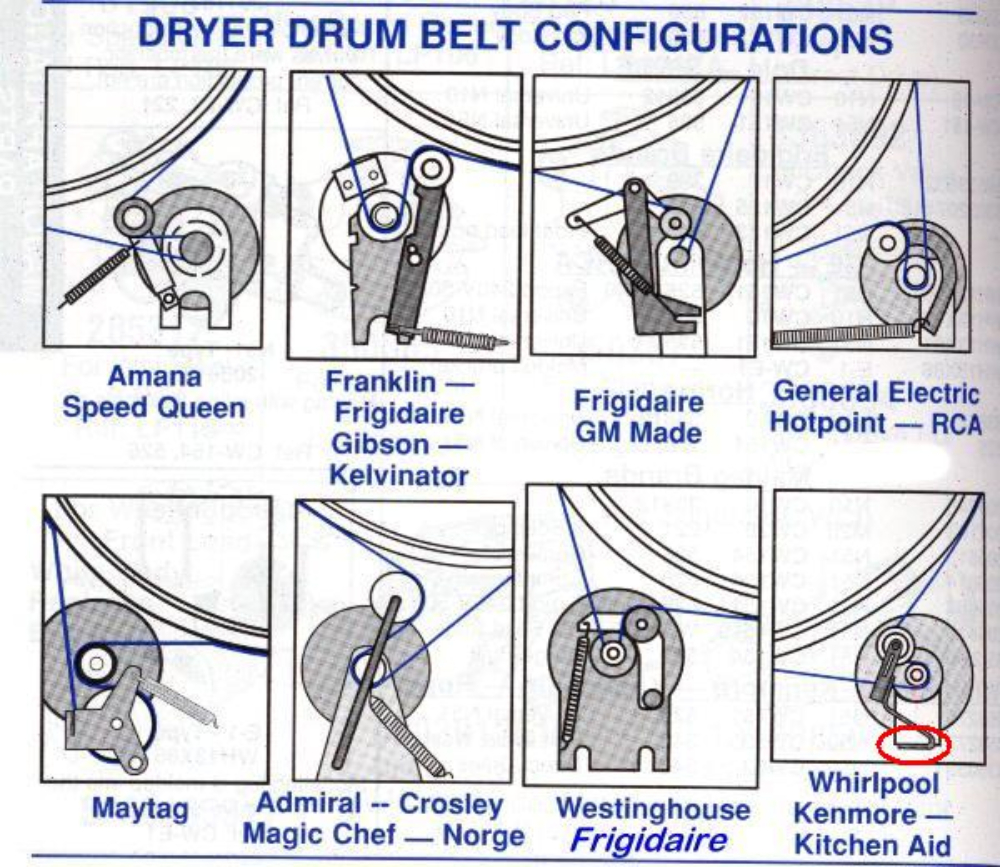
1. Idler Pulley
| Part | Idler pulley |
| Location | Bottom of the dryer |
| Ease of troubleshooting | Medium |
| Replacement cost | $20-$100 |
| Repairable | No |
Problem:
Here’s the thing. All belt-driven dryers, regardless of brand or model, rely on a little hero – the idler pulley.
Matt clarifies, “Situated right beside the motor, the idler pulley, attached to a spring-loaded arm, plays a pivotal role. It tensions the belt to ensure a tight wrap around both the drum and motor.”
But, as with all heroes, it has its Achilles heel:
Wear and tear. Lint jams. Even a misbehaving bearing. Any of these can push your pulley off its groove, leading to those dreaded squeaks or an alarming thumping.
Like this Redditor, who had a run-in with a stuck tensioner pulley on his Samsung.
Identification:
So, how do you deal with this?
- Step 1: Safety, always. Disconnect your dryer from the power source.
- Step 2: Find the idler pulley.
Given its tucked-away location beneath the drum, this will involve some disassembly – removing both top and front panels.
Matt chimes in: “Expect a lint party. Have a vacuum on standby.”
- Step 3: Time for the drum.
Here’s a trick:
Detach the belt by nudging the pulley to one side, and use the belt to gently heft out the drum.
Matt’s two cents? “Snap a quick photo of the belt’s arrangement. It’s an easy-to-miss detail that can stump you during reassembly.”
- Step 4: Examine the pulley. And I mean, closely.
Visually check the idler pulley first. Signs of wear? Damage? Spin it manually. If it’s not smooth or feels sticky, you might be dealing with a bearing hiccup. Wobbling is another red flag.
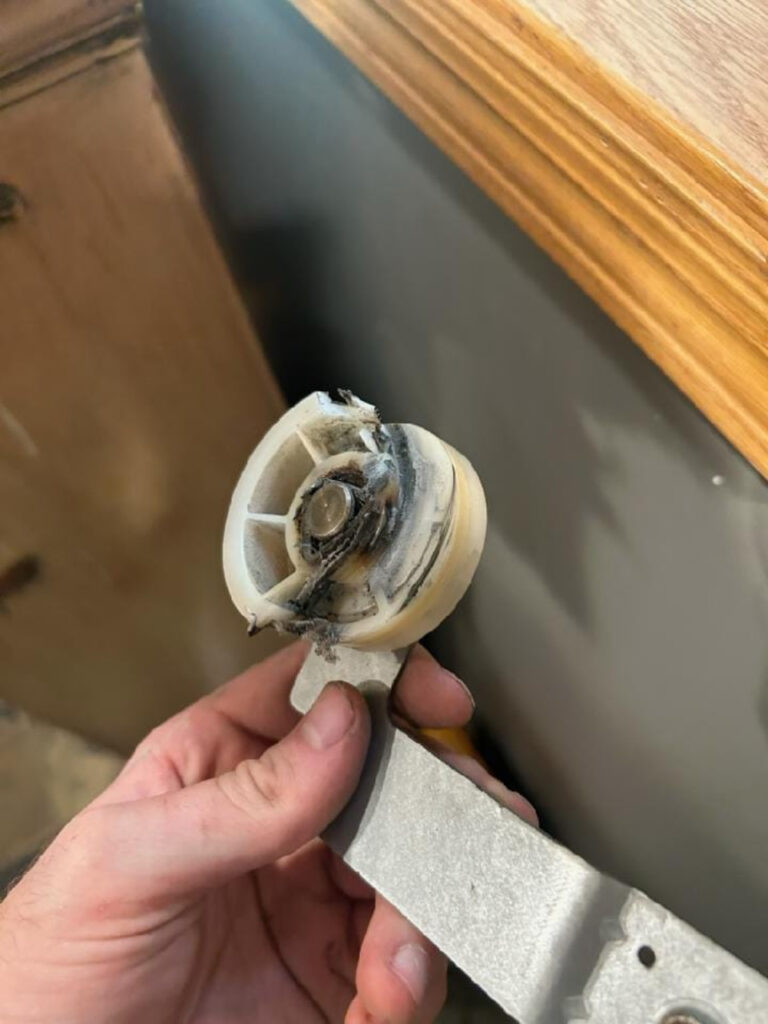
Matt emphasizes, “Also, give the spring and pulley arm a good once-over.”
- Step 5: Solution
So, if things look south:
A damaged pulley, shaft, or spring calls for replacements. Matt recommends, “If you’re replacing the idler pulley, it’s wise to refresh the belt simultaneously.”
Always remember:
For replacements, quality matters. Like this Redditor, who silenced his GE dryer’s squeaks only after opting for an OEM belt.
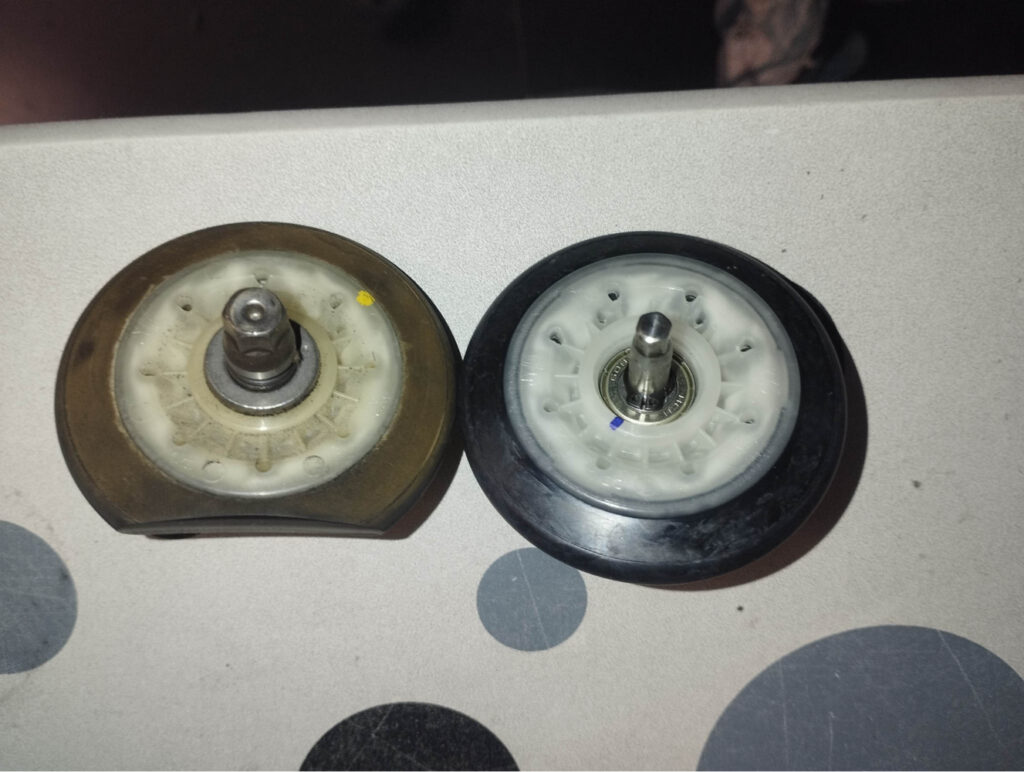
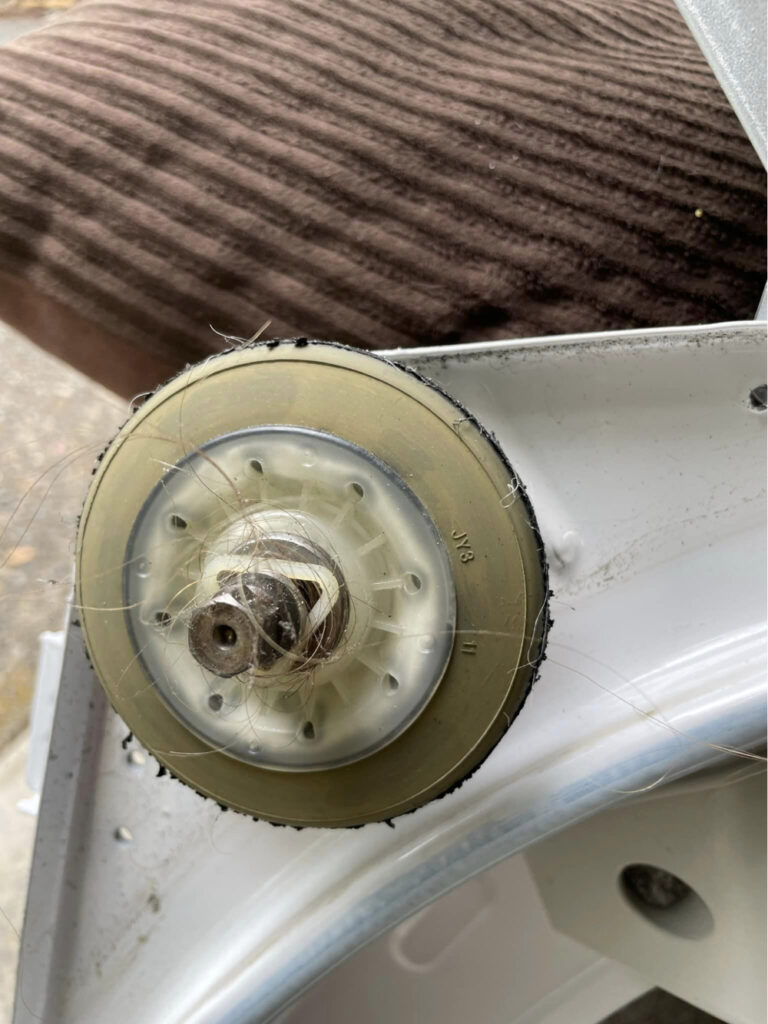
2. Rollers or Shafts
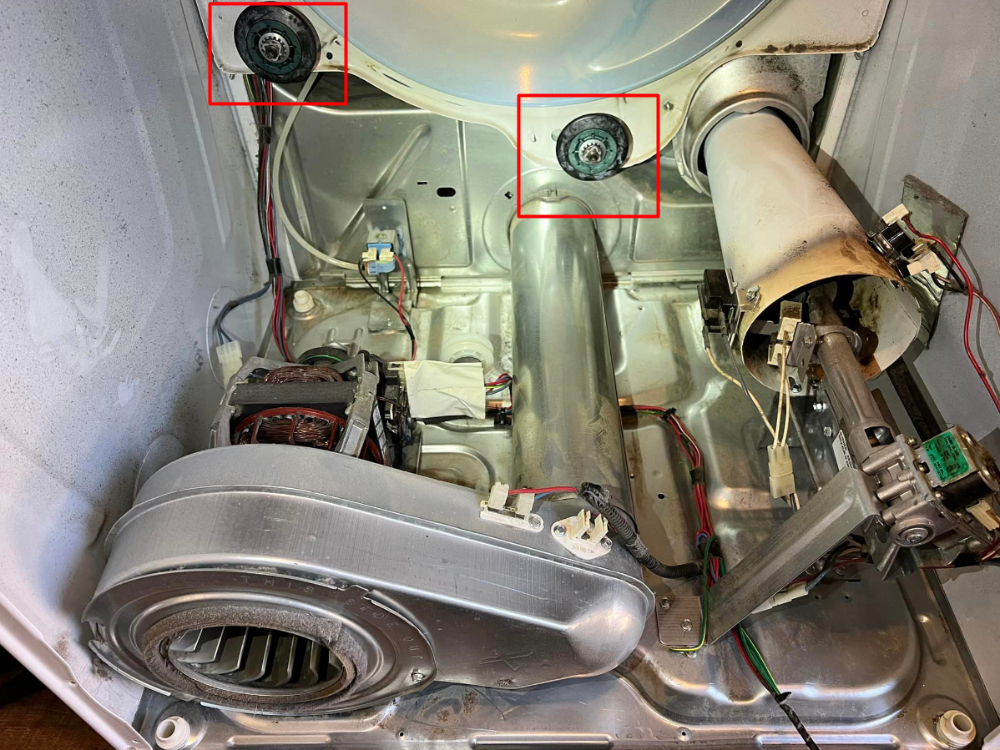
| Part | Rollers Rear drum bearings Drum support wheels | Roller shaft Roller axle |
| Location | Usually attached to the rear bulkhead. Some models have front rollers attached to the front panel. | Holds the roller |
| Ease of troubleshooting | Medium | Medium |
| Replacement cost | Up to $50 per piece, depending on the model. | Up to $80 per piece, depending on the model. Sometimes sold together with the roller. |
| Repairable | No | No |
Problem:
Nestled at the rear of many dryers, you’ll encounter two rollers. Some models? They sport an extra pair upfront.
Now, these rollers? Not just any component. Together with the belt, they ensure your drum rotates smoothly. Matt breaks it down: “Essentially, these rollers hold the drum, allowing it to move as needed.”
But there’s a catch:
They’re not immortal. Over time, they can wobble, wear out, get jammed, or even face axle issues. And if you own a Samsung? Double trouble, as this technician vouches.
An insider tip from Matt: “It’s not always the roller that’s at fault. Sometimes, it’s the shafts they sit on. These can get clogged with dirt, lint, or hair, causing that maddening squeak.”
Identification:
- Step 1: Safety is paramount. Unplug your dryer.
- Step 2: Access the rollers.
You’ll have to do some disassembling—removing top and front panels, then getting the drum out. And remember to account for all the rollers.
- Step 3: Roll with it. Spin each roller. Feel any resistance? Wobble? You’ve got your suspect.
- Step 4: Inspect the shafts, too.
Solution:
Stumbling upon a problematic roller? It’s time for a switch.
Here’s Matt weighing in: “Replace all rollers at once, even if just one’s acting up. It ensures a balanced, smooth operation.”
Note:
Shaft issues? A gentle scrub with steel wool can free it from debris. And if it’s straight, leave it be.
Matt’s last bit? “Avoid oiling those rollers. It might seem logical, but the oil only attracts more dirt and lint. That’s just a fast-track to more wear and tear.”
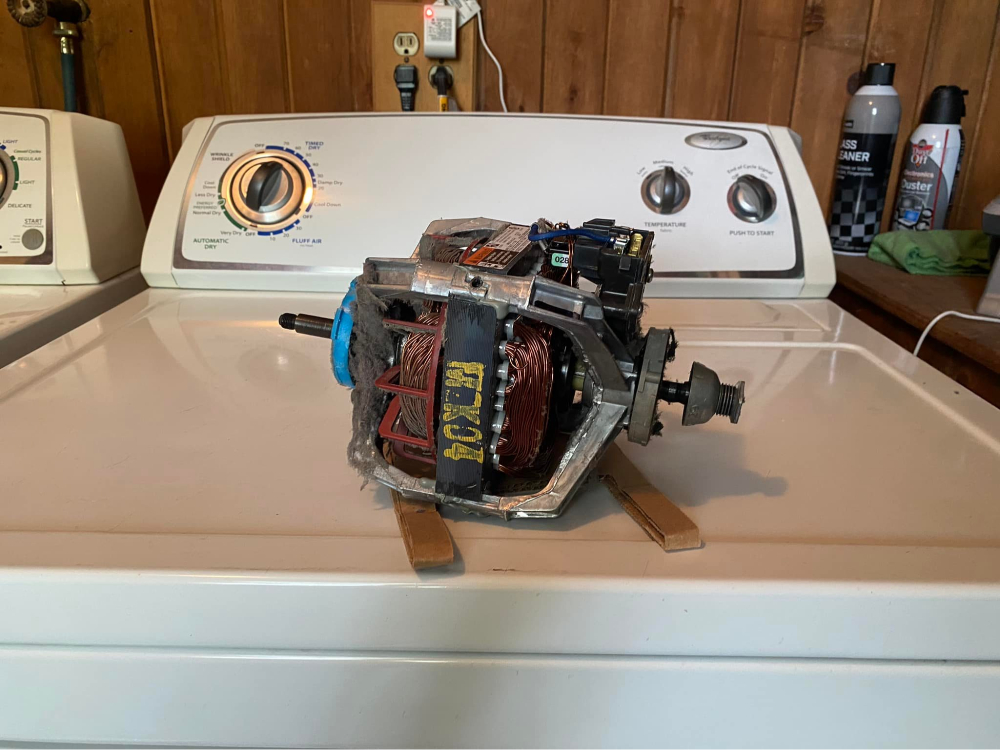
3. Motor
| Part | Motor |
| Location | At the bottom of the dryer |
| Ease of troubleshooting | Medium |
| Replacement cost | $100-$500 |
| Repairable | Yes |
Problem:
Let’s unpack this. A crucial component often overlooked when diagnosing dryer squeaks is the motor. As Matt points out, “The motor typically nestles at the dryer’s base, often leaning towards the rear, though this varies with make and model.”
And here’s the thing:
Whether from regular wear, age, or occasional manufacturing hiccups, the motor can falter.
Drawing from my toolbox of experiences, I recently wrestled with a GE dryer. The culprit? Bearings in the motor, worn to the point of emitting ear-piercing squeaks.
Identification:
- Step 1: First and foremost, ensure your safety. Disconnect the dryer.
- Step 2: Let’s hunt down the motor.
Usually positioned below the drum, accessing the motor demands a bit of elbow grease. Prepare to remove the top, followed by the front panels. Once done, it’s time to unhook the belt and gently extract the drum.
- Step 3: Hand-test time. Rotate the motor shaft manually. Any signs of grinding, resistance, or general difficulty signal a potential bearing issue.
- Step 4: The sound test. With caution, reconnect your dryer and fire it up, minus the belt. Your mission? Pinpoint any unusual sounds stemming from the motor.
- Step 5: Solution:
Did the motor flunk the tests? It’s time to consider a replacement. But remember:
Matt puts it succinctly: “Motors can be a blow to your wallet. Compare the price tag of a spanking new dryer to merely switching out the motor. That should steer your decision.”
Considering a budget-friendly alternative?
Scour platforms like eBay or Facebook Marketplace. There’s often a used motor, in good shape, just waiting for a second spin.
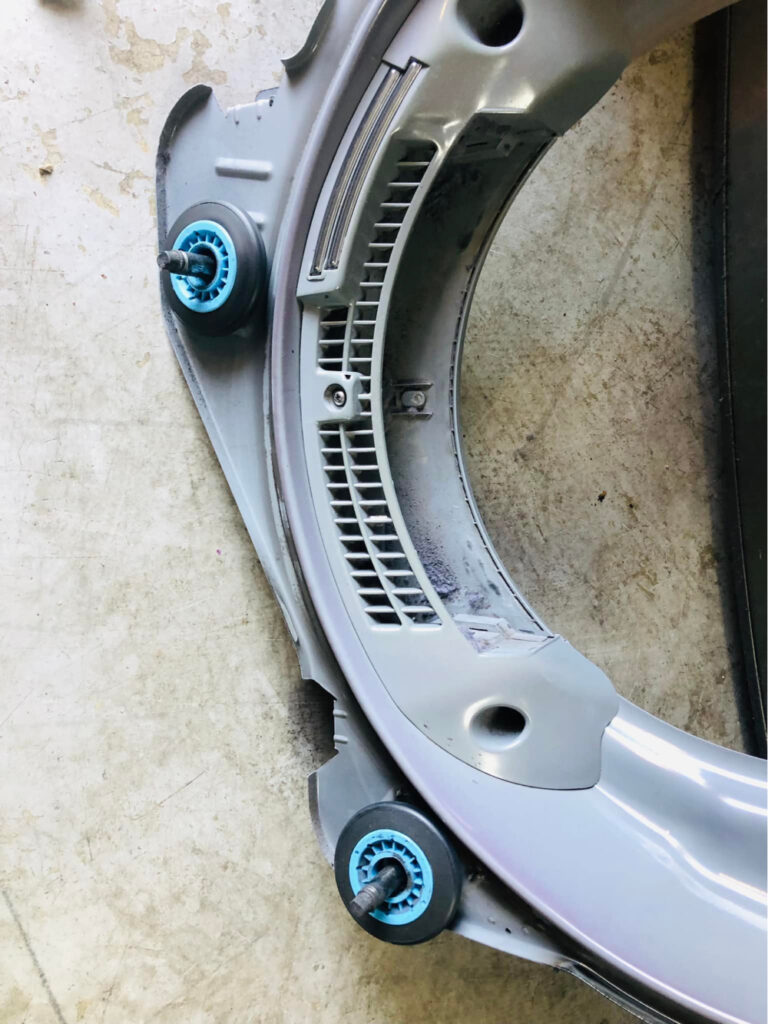
4. Drum Glides/ Drum Slides/ Drum Support Pads
| Part | Drum glides Drum slides |
| Location | Front or rear bulkhead |
| Ease of troubleshooting | Medium |
| Replacement cost | $20-$100 |
| Repairable | No |
| Note | Some dryer models don’t have drum glides. Instead, they have front roller wheels. |
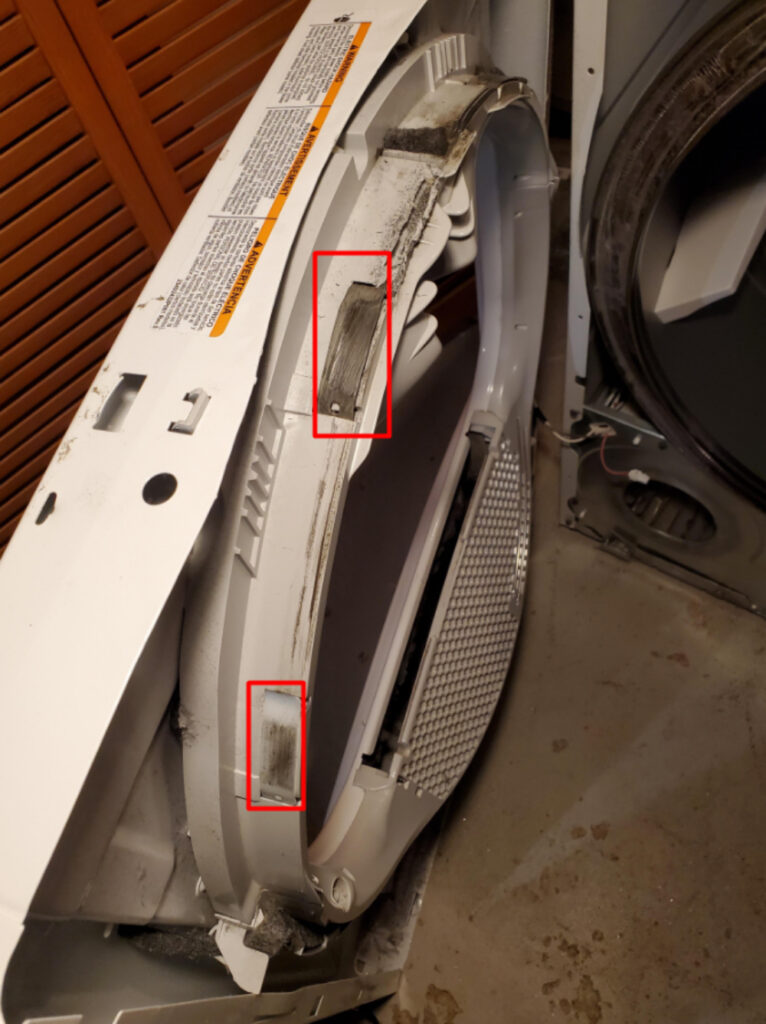
Problem:
Here’s a glimpse inside your dryer’s mechanics:
While some dryers opt for both rear and front rollers, others take a different route, choosing drum glides for drum support.
Constructed from materials like fabric, Teflon, or even plastic, these glides play a pivotal role in ensuring your dryer’s smooth operation.
But as with all parts:
The persistent drum friction eventually takes its toll on these glides. As Matt succinctly puts it, “As glides wear down or roughen, the drum might scrape against them, leading to that all-too-familiar squealing.”
Identification:
To check these little heroes:
- Step 1: Safety first – disconnect your dryer.
- Step 2: Take off the front panel of your dryer.
- Step 3: Eyes on the drum glides.
For a majority, like with GE models, expect to find 3-4 rectangular components neatly fitting into bulkhead slots.
However:
There are exceptions. Some, like a few Frigidaire models, sport one lengthy glide.
- Step 4: Close inspection is key.
Look for wear signs, damages, or crumbling. Additionally, ensure no lint or debris surrounds the glides.
While you’re at it, give the felt seal a once-over.
- Step 5: Time for action.
Notice worn or missing glides? They need to go.
Take this Redditor’s tale:
Their Maytag SDE2606AYW dryer was functional but ear-piercingly squeaky. Diagnosis? A worn-out drum glide pad.
Their fix?
“After replacing both pads and giving the insides a thorough vacuuming, my dryer’s back to its quiet self,” they shared.
Heads up:
Certain dryer models might need you to rivet the slides/glides if standard slots are absent, akin to what another user did with their Maytag.
Wrapping up:
While you’re examining, don’t just stop at the glides. Take in the whole top bearing kit – this means both felt and top bearing. If they appear worn, consider replacing them.
Matt’s golden tip?
“Opt for a bearing kit that’s all-inclusive. It’s efficient and saves time.” Just like the kit this Redditor chose for his GE Front Load DSWR463EG1WW Dryer, resulting in a peace-filled laundry room.
5. Blower Wheel
| Part | Blower wheel |
| Location | Behind the front panel Behind the rear panel |
| Ease of troubleshooting | Medium |
| Replacement cost | $10-$100 |
| Repairable | No |
Problem:
The blower wheel, although not the usual suspect, demands attention. Matt sheds light, “Sometimes, a small, sneaky object finds its way into the blower wheel, triggering those scraping or squeaking symphonies as the wheel turns.”
He adds, “And then there’s the scenario where the wheel loosens up. A wobbly wheel rubbing against its housing? That’s an orchestra of squeaks.”
On top of that:
A cracked wheel isn’t silent either. As it rotates, the broken bits can make quite a racket.
Identification:
Want to tackle the blower wheel issue? Here’s the drill:
- Step 1: Safety comes first. Disconnect the power.
- Step 2: Zone in on the blower housing.
Remember:
For some machines, like the Whirlpool Electric Dryer Duet/HE3, it’s tucked behind the front panel. But if you own something like the GE GTD42EASJ2WW Dryer, you’ll find it nestling behind the rear panel.
- Step 3: Dive deep into the blower wheel.
Start simple. Look for any stray objects.
Then:
Cast a critical eye over the wheel. Check for wear and tear, or any unsettling wobble.
- Step 4: Solution
Spotted a cracked wheel?
Your next move is clear: source a matching replacement for your dryer model.
And remember, when it comes to parts, quality counts. Stick to recommended brands or OEM parts.
Conclusion
There you have it—a comprehensive look into the major culprits behind that pesky dryer squeak.
A quick rundown:
The top culprits for a squeaking dryer include
- Worn-out drum support wheels.
- Jammed roller shaft.
- A defective motor.
- Worn-out idler pulley.
- Thinning drum glides/slides.
- Issues with the blower wheel
To pinpoint the exact cause, disassemble your dryer and inspect each of these components.
Luckily:
The majority of these parts are both affordable and straightforward to replace – with the notable exception of the motor.
If you can’t pin down the culprit, don’t hesitate to call in a professional or ask for support in our Facebook group.