
Over the years as an appliance technician:
I’ve seen my fair share of Samsung dryers stubbornly clinging to their cooling mode. Trust me, that’s not how it’s supposed to work! Ideally, this safety feature should wrap up within 30 minutes.
Here’s the deal:
With hands-on experience under my belt and wisdom from Matthew Davis, a top-notch appliance guru from Winnipeg, we’ll dive deep into addressing this issue.
Let’s get to it.

Table of Contents
Why Is Your Samsung Dryer Stuck on Cooling?
If your Samsung dryer is stuck on cooling mode, it means there’s an issue that needs troubleshooting. This problem is usually caused by blocked dryer vents, a damaged heating element, a faulty moisture sensor, or a defective control board. It could also occur when your dryer needs to be reset.
Thankfully:
These issues are easy to detect and correct by following the step-by-step guide I will provide. Without further ado, let’s get right into it!
5 Common Reasons and Troubleshooting Steps for a Samsung Dryer Stuck on Cooling
| Commonly Affected Parts | Estimated Cost |
|---|---|
| Lint filter | $15 – $45 |
| Dryer hose | $10 – $20 |
| Heating element | $25 – $40 |
| Moisture sensor | $10 – $15 |
| Control Board | $170 – $220 |
1. Blocked Dryer Vent

| Parts | Lint filter | Dryer hose |
| Location | It is located at the base of the entrance to the dryer | It is located at the back of the dryer and extends to an outlet outside the house |
| Ease of troubleshooting | Easy | Easy |
| Cost | $15 – $45 | $10 – $20 |
| Repairable | No – if there are large holes on the lint filter | No – if the hose wiring is broken or damaged |
Problem:
Here’s the thing:
One of the common reasons your dryer will begin an endless cooling cycle is when there’s an obstruction in the vent. This obstruction is caused by lint accumulation in the hose.
Now:
When this happens, air circulation in the dryer will be obstructed. This causes your dryer to overheat and immediately turn on its cooling mode to prevent a fire hazard.
Identification:
You see:
While the dryer is operating, lint from your clothes tends to find its way into the dryer hose and lint filter.
Over time, this lint can completely clog your venting system and could cause your dryer to keep shutting off.
Solution:
For instance:
Stacy, a member of our Facebook community, reached out when her Samsung DV218AGW/XAA dryer remained in cooling mode for half an hour.
After listening to her complaint, Matthew asked her to clean out her dryer’s vent system before attempting other troubleshooting techniques.
Amazingly:
Her dryer was finally able to stop its endless cooling mode after she removed the lint in the vent.
After turning off your dryer and unplugging it, I recommend cleaning your dryer’s venting system thus:
- Step 1: Open the dryer and remove the lint filter from the drum.
- Step 2: Open up the lint filter with its latch.
- Step 3: Remove the lint on the surface of the filter. You can run under cold water to remove smaller particles.
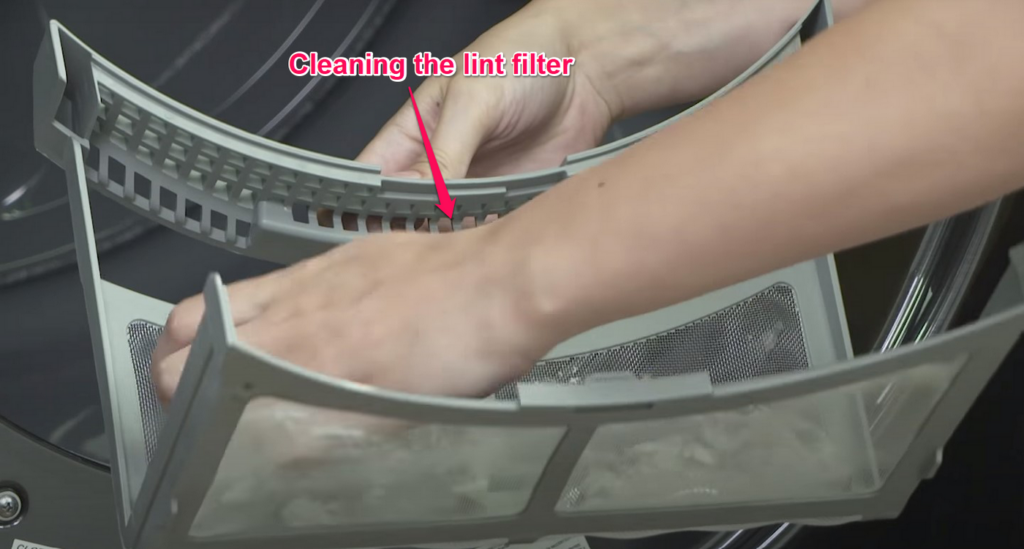
- Step 4: Allow the filter to dry properly before placing it back into the drum.
- Step 5: Move the dryer away from the wall to access the hose at its back.
- Step 6: Detach the hose and remove any lint found on the hose and opening of the dryer.
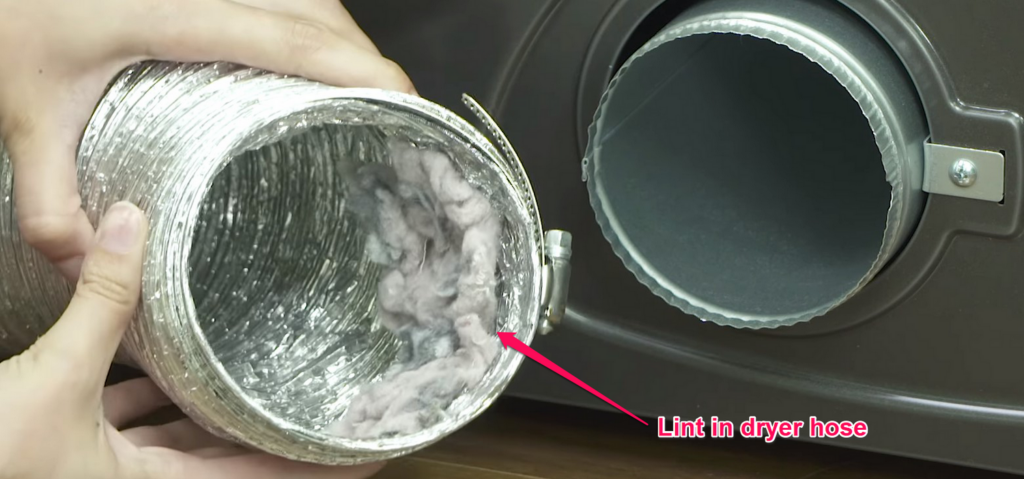
- Step 7: Remove the lint clogging the hose outside the house.
- Step 8: Reattach the hose and confirm that the lint filter is appropriately inserted into the drum.
Finally:
After completing these steps, turn the dryer back on.
Matthew adds:
“By removing the lint, air circulation in your dryer will resume as expected, and the cooling cycle should end.”
2. Faulty Heating Element

| Part | Heating element |
| Location | It is located on the right side of the dryer’s drum, above the mounting bracket |
| Ease of troubleshooting | Difficult |
| Cost | $25 – $40 |
| Repairable | No – once damaged or broken, it must be replaced |
Problem:
Get this:
Your dryer’s heating element could also be the reason it’s been stuck on cooling mode for far too long.
Here’s how:
The heating element generates heat, making it possible for your dryer to remove moisture from wet clothes.
Hence:
Once this element is faulty or damaged, its ability to generate heat will be negatively affected.
Identification:
As a result, your dryer will experience a long cooling cycle and could even produce a burning smell.
Recently:
I read a Reddit user’s complaint about how his Samsung D40J3000EW/A2 dryer was stuck in cooling mode even after he’d tried other troubleshooting procedures.
Considering all the other steps he’d taken, I suspected his heating element was the culprit, and Matthew agreed.
Matthew added:
“Once the connections to your heating element are damaged, or the coils are corroded, your dryer’s bound to experience several issues. Being stuck on cooling is one of them.”
Solution:
In my experience:
Once damaged, replacing the heating element with a new one is advisable. To do this, follow these steps:
- Step 1: Turn off the dryer and unplug it from the socket.
- Step 2: For easy access to the back panel, move the dryer away from the wall.
- Step 3: Take out the screws on the back, securing the top panel.
- Step 4: Remove the top panel.
- Step 5: Gently remove the control panel and disconnect the attached wire harness.
- Step 6: Remove the front panel and disconnect the door switch wire.
- Step 7: Disconnect the wires attached to the moisture sensor.
- Step 8: Take out the screws on the metal case housing the heating element.
- Step 9: Detach the heating element housing from the mounting bracket.

- Step 10: Remove the screws securing the mounting bracket to the base of the dryer.
- Step 11: Remove the bracket and the heating element housing.
- Step 12: Detach the connectors on the heating element.
- Step 13: Remove the high-limit thermostat and thermal limit.

- Step 14: Remove the screws holding the two halves of the heating element housing.
- Step 15: Remove the heating element from the housing after separating the two halves.
- Step 16: Secure the new heating element in the housing.
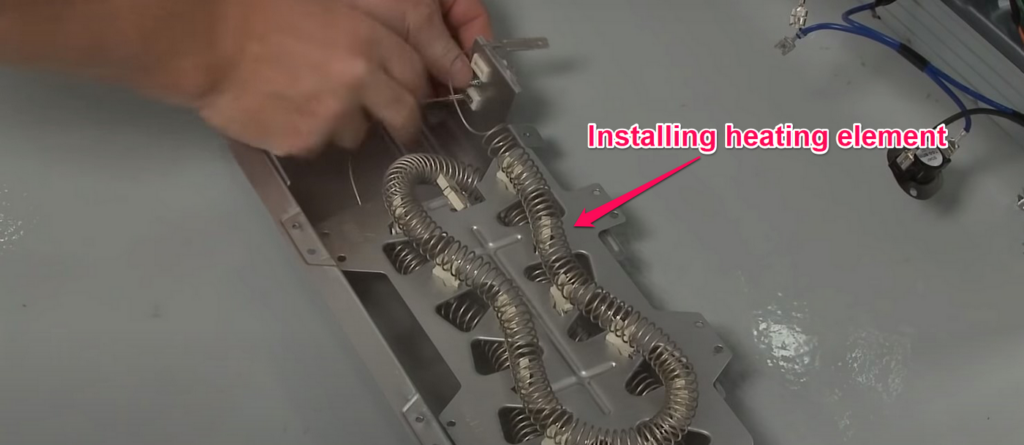
- Step 17: Reassemble the heating element housing and reattach the high-limit thermostat and thermal limit.
- Step 18: Reassemble the dryer.
Now:
Once you have reassembled the dryer, turn it back on. By now, your dryer should be ready for use.
3. Damaged Moisture Sensor
| Part | Moisture sensor |
| Location | It is located at the base of the entrance to the dryer, inside the filter housing |
| Ease of troubleshooting | Easy |
| Cost | $10 – $15 |
| Repairable | No – once corroded, it must be replaced |
Problem:
Amazingly:
Your dryer’s moisture sensor is one of the fundamental causes of the persistent cooling cycle. Typically, most Samsung dryers are equipped with this sensor to improve efficiency.
You see:
The moisture sensor detects how wet your clothes are. This helps your dryer operate effectively and ensures your clothes are bone-dry at the end of the drying cycle.
Of course:
Over time, the moisture sensor could get corroded, faulty, or damaged due to prolonged use.
This leads to reduced efficiency and could cause it to instruct the dryer to keep cooling longer than necessary.
Identification and Solution:
For instance:
One of our Facebook community members reached out when his Samsung dryer got stuck in cooling mode for close to an hour.
Matthew recommended inspecting the moisture sensor since he’d cleaned his vent and had recently installed a new heating element.
Sure enough:
The sensor was corroded and needed immediate replacement. Thus, I recommend inspecting and replacing your moisture sensor by following these steps:
- Step 1: Begin by unplugging the dryer from the power outlet.
- Step 2: Remove the lint filter.
- Step 3: Remove the screws securing the lint filter’s housing.
- Step 4: Take out the lint filter housing.

- Step 5: Disconnect the wires on the moisture sensor bars.

- Step 6: Remove the sensor bar from the lint filter housing and inspect for damage or corrosion.
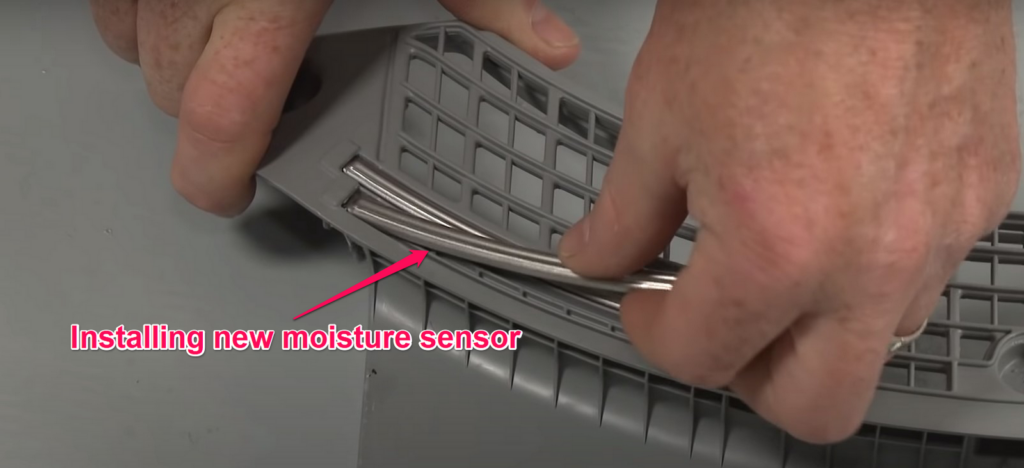
- Step 7: If the sensor is corroded, install a new moisture bar and snap it into place.
- Step 8: Reinstall the lint filter housing and connect the wires to the sensor bars.
- Step 9: Secure the lint filter housing with the screws.
- Step 10: Place the lint filter back into the dryer.
However:
If the old moisture sensor is neither damaged nor corroded, it doesn’t need to be replaced, as another element most likely caused the issue.
In this case, proceed to the following troubleshooting procedure.
4. Control Board Malfunction
| Part | Control board |
| Location | It is located beneath the dryer’s top panel, inside the control panel cabinet |
| Ease of troubleshooting | Difficult |
| Cost | $170 – $220 |
| Repairable | No – it is advisable to replace the control board once it is damaged |
Problem:
Here’s the thing:
If you’ve cleaned the vent and inspected the sensor and heating element but are still stuck with cooling, it’s time to check the control board. It’s usually one of the major culprits that causes the long cooling period.
You see:
The control board oversees and controls all the operations in the dryer—from the drying time to the cooling mode.
As such, once it malfunctions, it will affect the overall performance of the dryer.
Identification and Solution:
To illustrate this:
Anthony, a member of our Facebook community, reached out to Matthew when his Samsung dryer started malfunctioning and began a never-ending cooling cycle.
After conducting preliminary tests on the dryer, Matthew suspected the control board was the problem.
Of course:
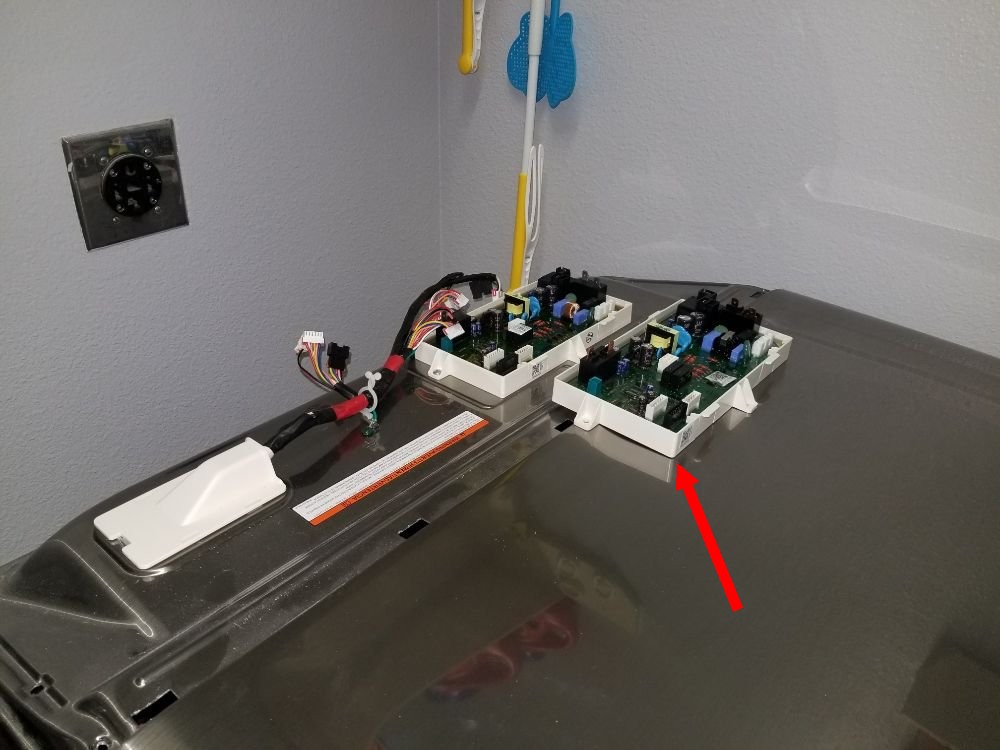
Upon inspecting the control board, Matthew noticed some wires were burnt, and others had weakened over time. After replacing the control board, the cooling cycle ceased to be a problem.
From my experience:
You can replace your dryer’s control board by following these steps:
- Step 1: Move the dryer away from the wall to access the back panel.
- Step 2: Remove the screws securing the top panel and gently remove the panel.
- Step 3: Remove the screws holding the control board in place.

- Step 4: Take out the control board housing and detach the wire harness.
- Step 5: Take a picture of the wires on the control board.

- Step 6: Disconnect the wires on the control board.
- Step 7: Remove the screws securing the old board.
- Step 8: Take out the old board from the control board housing.
- Step 9: Install the new control board and secure it with screws.
- Step 10: Reconnect the wires on the new board.
- Step 11: Reposition the control board housing in the cabinet.
- Step 12: Reassemble the dryer.
Finally:
Switch on the dryer and say goodbye to the long cooling mode!
5. Dryer Requires Reset
Problem:
Now:
If you’ve tried all other troubleshooting procedures and are still stuck with the cooling mode, it’s time to reset your dryer. This is usually the last step you should take after trying all the other techniques.
Here’s why:
Resetting your dryer will only be efficient if you’ve fixed the underlying issue causing it to act out.
If the heating element is faulty, resetting it won’t fix the issue. You’ll still be stuck with the same problem after resetting, unless you replace the heating element first.
Identification and Solution:
For instance:
This Reddit user’s Samsung dryer began to experience multiple issues after it had been used thrice that day. After reviewing his complaint and the troubleshooting actions he’d taken, I believed his dryer needed to be reset. Matthew supported this claim.
Matthew added:
“If you’ve verified that everything else is intact, but you’re still stuck on cooling, you’ll most likely need to reset your dryer to get it back in shape. At this point, your dryer needs to be reset to clear error codes.”
Luckily:
Resetting your dryer is themost straightforward troubleshooting technique in this guide. All you need to do is turn off your dryer and unplug it from the outlet for 5 minutes. Then, turn it back on.
Pretty easy!
Most Affected Models
| Model Number | Model Name | Model Specific Reason |
|---|---|---|
| DV42H5000EW/A | Samsung 7.5 Cu. Ft. Stackable Electric Dryer with Sensor Dry | The heating element has relatively low longevity and often develops faults that lead to a long cooling time. |
| DV220AEW/XAA | Samsung 7.3 Cu. Ft. 7-Cycle Electric Dryer | This model doesn’t possess a visual indicator to remind users to change the lint filter. |
| DV40J3000EW/A2 | Samsung 7.2 Cu. Ft. Electric Dryer with Moisture Sensor | The heating element is fragile and typically develops faults. |
| DV42H5000EF/A3 | Samsung 7.4 Cu. Ft. Electric Dryer with 11 Dry Cycles | The lint filter and exhaust vent of this model are prone to getting clogged pretty quickly. |
Conclusion
As I’ve explained:
Quite a few factors can cause your dryer to begin a ceaseless cooling cycle.
This often occurs when your dryer’s vent is clogged with lint or when the heating element, moisture sensor, or control board is faulty.
It could also occur when your dryer needs to be reset to clear error codes.
However:
You can rectify these problems by:
- Cleaning the dryer’s vent and lint filter
- Replacing the heating element
- Replacing the moisture sensor
- Replacing the control board
- Resetting the dryer
All the same:
We’re more than happy to answer your questions and provide further clarifications for you. All you need to do is use our “Ask our Expert” feature to speak to our appliance technicians.
In conclusion:
Which one of our troubleshooting procedures did the trick? Let us know by leaving a comment in the section below!