
Over the years:
I’ve seen countless kitchen appliances, each with its distinct hums and murmurs. But, if there’s one sound that always makes me raise an eyebrow, it’s a refrigerator’s jarring rattle.
Here’s the thing:
As an appliance technician, I’ve spent years diagnosing these unsettling noises. And with insights from Dean Andrews, a respected technician from Briston, we’ve crafted solutions you can trust.
Eager to bring back the quiet? Dive in with me.

Table of Contents
Why Is Your Refrigerator Making Rattling Noises?
A rattling refrigerator can stump even seasoned technicians. From fridge placement, and the arrangement of items, to internal parts like the evaporator fan or drain pan, numerous culprits could be behind that irksome noise. Heck, even the compressor or condenser fan could be playing tricks on you.
Now, from personal experience:
The key? Finding exactly where that noise is coming from before diving into fixes or replacements.
In this guide, I, Jason, will walk you through the steps to pinpoint and silence that persistent rattle.
Ready to bring the peace back to your kitchen? Let’s dive in!
7 Common Causes and Troubleshooting Hacks for a Rattling Refrigerator
| Commonly Affected Parts | Estimated Cost |
|---|---|
| Evaporator fan | $25 – $50 |
| Defrost timer | $10 – $25 |
| Drain pan | $5 – $10 |
| Condenser fan | $20 – $30 |
| Compressor | $230 – $480 |
1. Refrigerator Placement
Problem:
Get this:
If the rattling noise is coming from inside the fridge, the first thing to check is your refrigerator level and position.
Here’s why:
If your fridge isn’t properly leveled, it will tilt and eventually rest on the floor. As the fridge vibrates during operation, it will continuously hit the floor, causing a rattling noise.
Also:
If the fridge is too close to the wall, the water line and back panel will keep coming in contact with the wall, causing it to rattle loudly.
Identification and Solution:
Last month:
One of our Facebook community members reached out when her newly installed Samsung refrigerator started rattling after she plugged it in.
Dean suspected the fridge was too close to the wall and advised her to check her fridge level and move the fridge forward slightly.
Sure enough:
The noise stopped afterward. Thus, I’d recommend adjusting your fridge’s position by moving it forward. If this doesn’t stop the noise, you’d need to adjust the fridge level.
After getting a plank, a flathead screwdriver, and a crowbar, unplug your refrigerator and proceed to check the fridge level by following these steps:
- Step 1: Take out the contents of your fridge to make it as light as possible.
- Step 2: Locate the leveling leg notches beneath your fridge and identify the side that’s lower than the other.
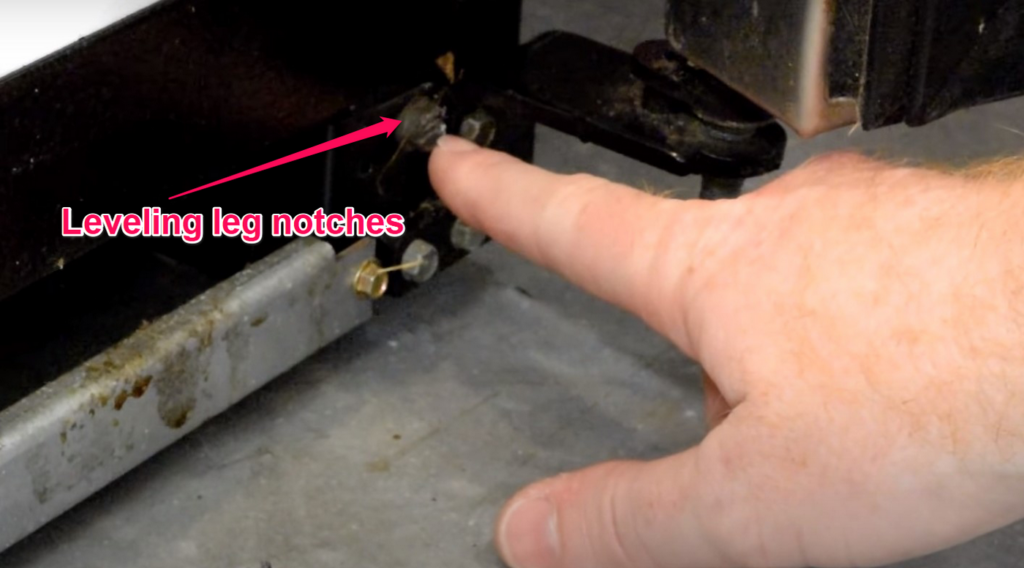
- Step 3: Slide the plank under the fridge to protect your floors, and use the crowbar to lift the fridge slightly.
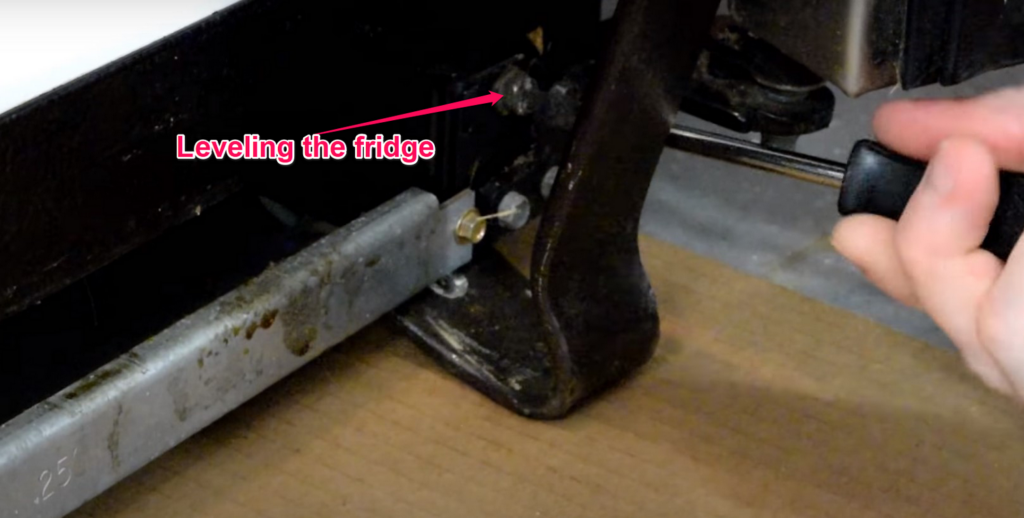
- Step 4: Raise the fridge by rotating the notch with the screwdriver to the left, and lower the fridge by rotating the notch to the right.
Of course:
You’d need to keep rotating the fridge level until it is balanced. Once this is done, your fridge’s rattling noise will finally end.
2. Items Placed in or on the Fridge
Problem:
Now:
If you’ve adjusted your fridge and checked its level, but the rattling noise hasn’t ceased, you’d need to check the contents inside or on top of your fridge.
You see:
If you’ve got containers arranged closely inside your fridge, chances are they’d collide with each other and the walls of the fridge, causing a loud rattle.
Also, if you pile ceramic or glass plates on top of your fridge occasionally, they’d also collide and cause your refrigerator to rattle.
Identification and Solution:
For instance:
I recently helped a member of our Facebook community silence his rattling refrigerator by asking him to remove the plates he’d kept on top of the fridge and rearrange the containers inside the fridge.
Hence:
I recommend checking the items you’ve placed on top or inside the fridge.
Dean chips in:
“If you store items on top of your fridge, you could solve this problem by making space for these items in your cabinet or kitchen drawers. In addition, you can rearrange your fridge, ensuring there’s sufficient space between each container and the walls of your fridge.”
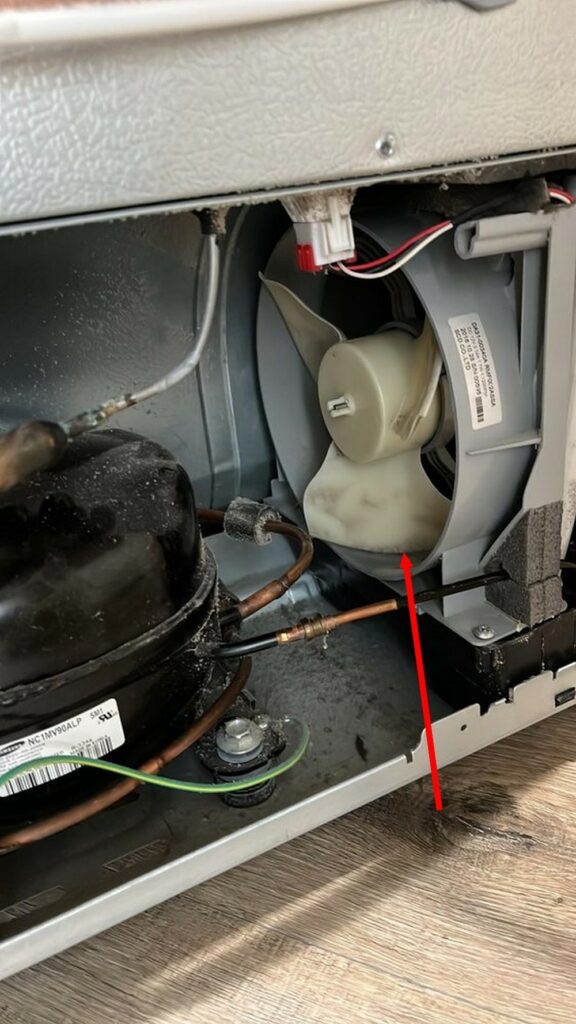
3. Clogged Evaporator Fan

| Part | Evaporator fan |
| Location | It is located on the inner wall of the back panel inside the fridge |
| Ease of troubleshooting | Easy |
| Cost | $25 – $50 |
| Repairable | No – once broken, it is advisable to replace the evaporator fan |
Problem:
Here’s the thing:
If you notice the rattling noise stops when you open your fridge, it means the likely culprit is the evaporator fan inside your refrigerator.
You see:
Over time, frost will begin to accumulate inside the back panel and eventually obstruct the motion of the evaporator fan.
As the fan tries to rotate and circulate cold air, it collides with frost in the back panel, which produces the rattling sound you hear.
Recently:
I came across a Reddit user’s complaint about his Whirlpool refrigerator’s rattling noise. Asides from the rattling noise, he also noticed there was ice buildup at the back of the freezer.
Based on his comments, I believe the problem was caused by frost accumulation near the evaporator fan.
Identification:
A great way to verify this is by pushing the light switch in the freezer. If the noise gets louder, you’d need to inspect the evaporator fan.
Now:
Frost accumulation in the back panel shouldn’t be taken lightly. If left unattended, it could damage your fridge’s evaporator fan and cause more significant problems for you.
Solution:
Luckily:
You can easily troubleshoot this problem by letting the ice thaw naturally. If you’ve got a backup refrigerator, all you need to do is transfer your food items and turn off your fridge for at least 24 hours.
Remember to place a towel under your refrigerator to soak up the water from the melting ice. Once the ice has thawed, you can return your food items to the fridge.
However:
If you don’t have a backup refrigerator and can’t afford to turn your fridge off for 24 hours, Dean recommends manually defrosting the ice by unplugging and emptying your fridge before carrying out these steps:
- Step 1: Remove the compartments inside the fridge.
- Step 2: Use a screwdriver to take out the screws holding the back panel.

- Step 3: Carefully remove the back panel. Exercise caution to avoid damaging the wires connected to the back panel.
- Step 4: Detach the connectors attached to the back panel.

- Step 5: With a hair dryer set at low heat, defrost the ice affecting the evaporator fan. Do not keep the hair dryer in one spot for too long.

- Step 6: Mop up the water puddles made by the melting ice.
Dean adds:
“When you’re done, reconnect the wires on the back panel and screw the panel back into place. Once you turn on your fridge, you’ll no longer be disturbed by its rattling noise.”
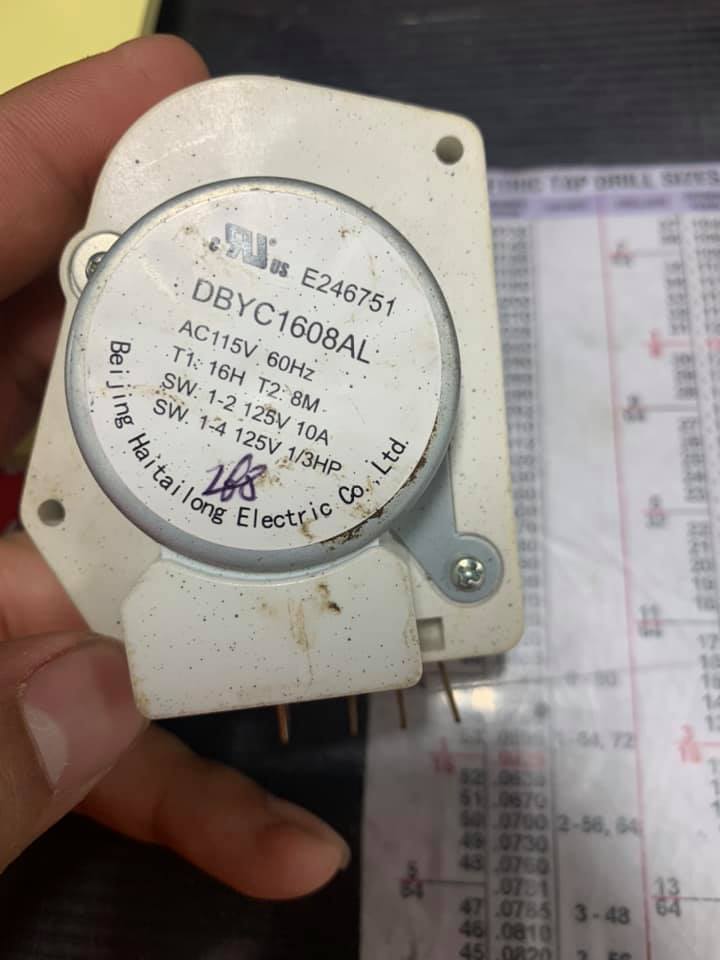
4. Faulty Defrost Timer
| Part | Defrost Timer |
| Location | Depending on the model, it can be located inside the control panel, behind the kick plate, or behind the refrigerator |
| Ease of troubleshooting | Easy |
| Cost | $10 – $25 |
| Repairable | No – it must be replaced once damaged |
Problem:
As the name implies:
The defrost timer motor controls and oversees the defrost cycle in your refrigerator.
When your fridge is defrosting, it’s responsible for preventing electric current from getting to the evaporator fan motors and the compressor.
However:
The timer can develop faults over time, which prevents it from conducting the defrost cycle effectively. This could also lead to the rattling sound you’re currently experiencing.
Identification:
If frost buildup in your refrigerator and freezer increased significantly when the rattling or clicking sound began, it’s time to replace your defrost timer motor.
To illustrate this:
A Reddit user complained about his fridge’s rattling noise, which didn’t stop even after he let the ice in the back panel thaw.
Based on this, I suspected the defrost timer motor was the culprit, and Dean agreed.
In Dean’s words:
“If the noise persists even after you’ve defrosted the ice obstructing the evaporator fan, Dean recommends replacing the defrost timer motor.”
Of course:
You’d also need to consult your fridge’s manual to find the precise location of the timer.
Solution:
Typically, the GE refrigerator’s defrost timer is prone to this issue. Thus, I will explain how to replace the timer using this fridge as a guide.
Firstly:
Begin by unplugging your refrigerator before proceeding to carry out the following steps:
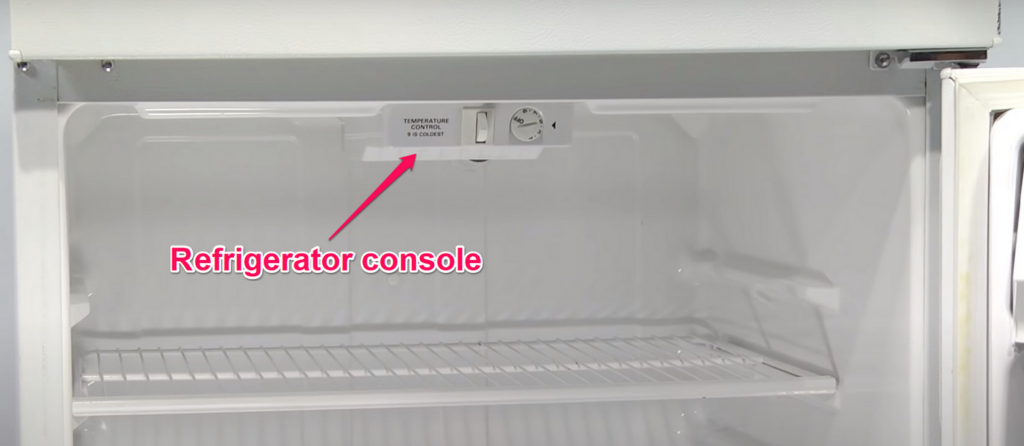
- Step 1: Open your refrigerator and locate the defrost control in the refrigerator console.
- Step 2: Remove the screws holding the console.
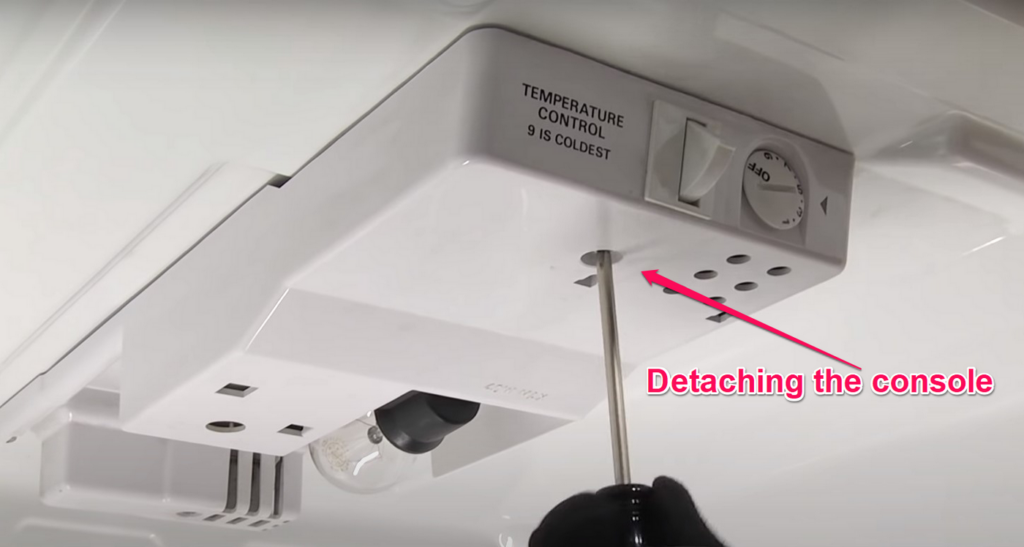
- Step 3: Lower the console and locate the defrost timer inside it.
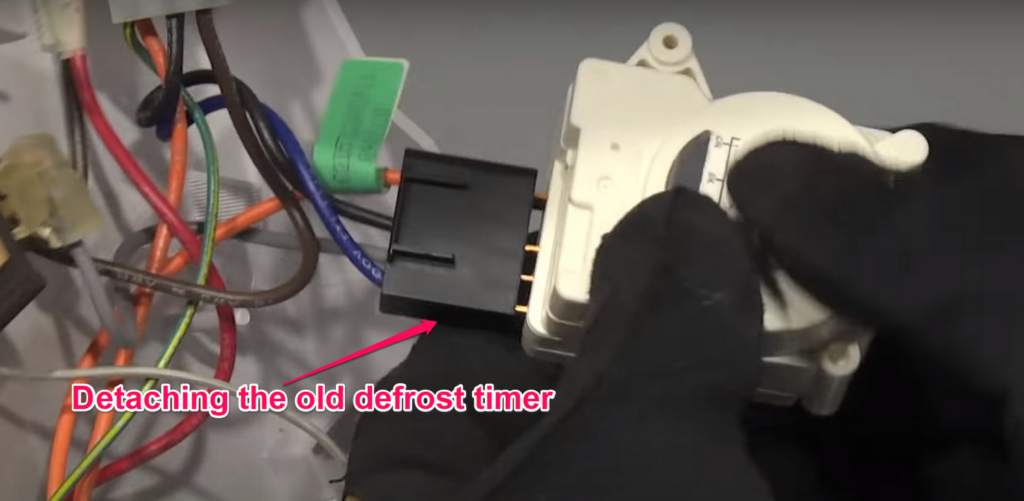
- Step 4: Detach the clips and harness, securing the faulty timer.
- Step 5: Install the new timer into the console.
Finally:
Secure the console back in place. By replacing the timer, you’ve been able to kill two birds with one stone.
In my experience:
This ends the rattling noise and increases your refrigerator’s efficiency in conducting the defrosting cycle.
5. Loose Drain Pan
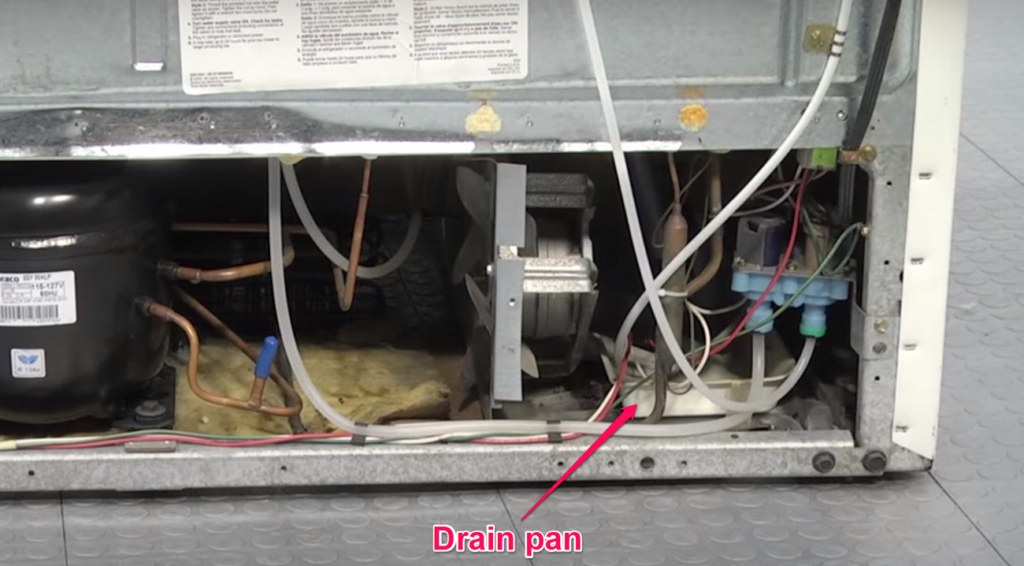
| Part | Drain pan |
| Location | It is located underneath the refrigerator |
| Ease of troubleshooting | Easy |
| Cost | $5 – $10 |
| Repairable | No – if the pan is broken or leaking |
Problem:
Typically:
The drain pan is positioned near the bottom of your refrigerator to catch water droplets from thawing ice. It also prevents your fridge from leaking and forming water puddles on your floor.
Of course:
As your fridge operates, it vibrates gently, which can slowly dislodge the drain pan over time. Once the drain pan is loose, it will create the rattle noise you’re currently hearing.
Identification:
So:
If the rattling noise is coming from the bottom of the refrigerator, the issue is most likely caused by a loose drain pan.
For instance:
This Reddit user was concerned about the rattling noise from underneath his fridge. From his complaint, I could immediately tell the problem was caused by a loose drain pan, and Dean agreed.
In Dean’s words:
“Once you realize the sound is coming from the bottom of your fridge, you’ve got a loose drain pan. Adjust the drain pan beneath the fridge, and the rest is history.”
Solution:
To fix this, carry out the following steps:
- Step 1: Unplug your refrigerator and pull it away from the wall.
- Step 2: Take out the access panel at the back of the fridge.
- Step 3: Adjust the drain pan on the tracks until it is seated properly.
Afterward:
Secure the access panel and return the fridge to its original position. In less than five minutes, you can silence your rattling refrigerator.
6. Dusty Condenser Fan
| Part | Condenser fan |
| Location | It is located next to the compressor, inside the access panel behind the refrigerator |
| Ease of troubleshooting | Easy |
| Cost | $20 – $30 |
| Repairable | No – once broken, it must be replaced |
Problem:
The condenser fan is located in the access panel at the back of your fridge. As it rotates, dust, dirt, and debris will gradually coat its blades and the coils near it.
After a while, the debris and dirt will begin to impede the condenser fan’s motion and eventually cause it to rattle.
In fact:
I’ve experienced this issue several times while repairing a client’s Frigidaire refrigerator that had issues cooling.
Identification:
If the rattling noise is coming from the back of your refrigerator, the first thing you should inspect is the condenser fan.
Last month:
Rob, one of our Facebook community members, reached out when he noticed a peculiar rattling noise coming from the back of his fridge.
After he told me he hadn’t cleaned his condenser fan blades for close to a year, I was certain this was the cause of the problem.
Unsurprisingly:
The rattling noise ended as soon as he’d cleaned his condenser fan.
Solution:
As such, Dean recommends you clean the condenser fan once every six months by following these steps:
- Step 1: Unplug your refrigerator and move it away from the wall.
- Step 2: Remove the screws securing the access panel at the back of the fridge.
- Step 3: Locate the condenser coils and fan.
- Step 4: With the aid of a vacuum cleaner with a brush attached to its end, remove the dust around the coil and condenser fan.
Finally:
Reinstall the access panel and turn your refrigerator back on.
7. Compressor Problems
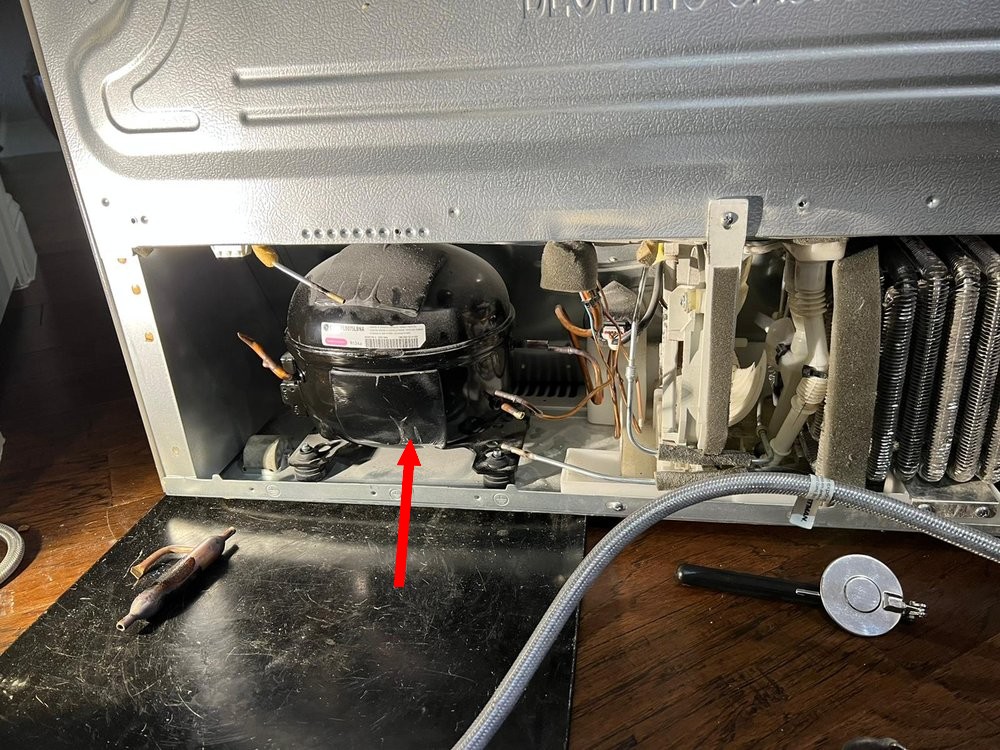
| Part | Compressor |
| Location | It is located inside the access panel at the back of the refrigerator |
| Ease of troubleshooting | Difficult |
| Cost | $230 – $480 |
| Repairable | No – once it fails, it must be replaced |
Problem:
Here’s the thing:
The compressor is the heart of your refrigerator and is responsible for the gentle humming sound your fridge makes.
However, it can also be responsible for the loud rattling noise coming from the back of your refrigerator.
Identification:
Now:
Your compressor circulates refrigerant in your fridge. Once it begins to fail, the gentle humming sound it typically makes will eventually become a loud rattle.
For instance:
A member of our Facebook community reached out to me when she couldn’t stop the noise her LG refrigerator began to make after ten years of use.
After inspecting her refrigerator, I realized the noise was coming from the compressor.
Solution:
Unfortunately:
A bad compressor isn’t as easy to troubleshoot as all the other components mentioned in this post.
Dean adds:
“Once your compressor begins to fail, you have two options. You can either save up to buy a new refrigerator or spend hundreds of dollars trying to buy and install a new compressor.”
Luckily:
It will take a while for the compressor to fail completely. During this time, you could decide if you’d like to replace the compressor or invest in a new fridge.
If you decide to replace the compressor, it’s advisable to enlist the help of a licensed appliance technician.
Conclusion
As I’ve explained:
The location your refrigerator’s rattling noise emanates from will give you an idea of what the problem is.
Typically, the mysterious noise is caused by your fridge level and placements, items arranged inside or on top of the fridge, the evaporator fan, and the drain pan.
Also:
This problem can be caused by the condenser fan, defrost timer motor, and compressor.
All the same, you can rectify this problem by:
- Adjusting fridge level
- Adjusting fridge placement
- Rearranging items inside the fridge
- Removing objects from the top of the fridge
- Melting frost around evaporator fan
- Adjusting the drain pan
- Replacing the defrost timer
- Cleaning the condenser fan and coils
- Replacing the compressor
Of course:
We’re willing to provide any further guidance you need. You can reach our team of appliance professionals via our “Ask the Expert” forum.
Finally:
Do you know any other clever tips to stop a refrigerator’s rattling noise? Let us know in the comment section below!