

When your Maytag washer won’t drain, it’s very tempting to surrender and make that familiar call to the appliance repair service.
However, don’t succumb to the frustration yet.
This article will take you through how to diagnose and fix any non-draining Maytag washing machine.
You will be pleasantly surprised to find that the cause and fixes are not as complicated as anticipated.
Table of Contents
Why Is My Maytag Washer Not Draining Water?
The major causes of a Maytag washer not draining are issues with the drain hose. It could be clogged, kinked, or installed too high. Other culprits include a clogged drain filter, a jammed-up/faulty drain pump, or a bunged up standpipe.
That said:
To tackle these mysteries, I sought the expertise of Justin Duby.
Justin is a Grants Pass, OR-based appliance repair technician who has been in this field for over two decades. He had a lot to share.
Now:
Before getting into the causes, let’s talk about how the draining problems manifest in most Maytag washers.
8 Warning Signs Of A Draining Problem in Maytag Washers
Now:
There are a variety of symptoms that can be indicative of a draining problem on a Maytag washer.
For instance:
- Not draining during and after a wash cycle.
- Displaying draining error codes such as F9, E1, Sd, F9, and E1.
- Ending up with a wet load even after a spin cycle.
- Water sitting in the bottom of the washer after a wash cycle.
- The machine not finishing the drain cycle.
- Failing to drain on a specific cycle.
- When the spin cycle is taking longer than usual.
- The washer getting stuck on the spinning cycle.
Note:
While most of the parts involved in draining are similar between top-load and front-load Maytag washers, the design and location of these parts may differ.
For instance, according to Maytag, most of their top load washers made after 2001 don’t have a drain filter.
10 Reasons Why Your Maytag Washer Is Not Draining & How to Troubleshoot Each
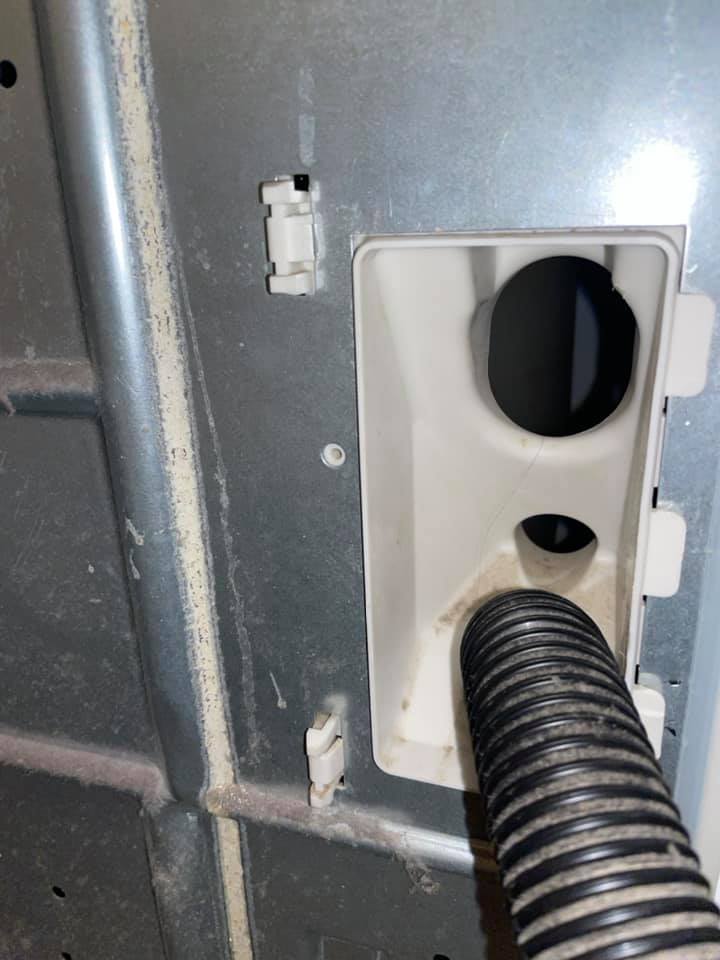
1. The Drain Hose Is Clogged
| Part | Drain Hose |
| Location | At the back of the machine |
| Ease of troubleshooting | Easy |
| Replacement part cost | $30-$70 |
According to Justin, “The drain hose is the tube that drains wastewater from the washing machine.“
Typically, it’s flexible and made of plastic or rubber so that it’s easy to route to the drain, standpipe, or laundry sink.
Now, get this:
During a drain cycle, the drain pump is activated to drive water out of the tank through the hose.
Problem:
So:
Over time, a buildup can form inside the hose and then slowly start to restrict the flow of the wastewater. The most common drain hose buildups include,
- Lint,
- Dirt,
- Debris,
- Soap scrum,
- Mineral deposits, and
- Small objects.
If a section of the hose is partially or fully blocked by the buildup, then the wastewater won’t flow out of the machine.
Identification:
To assess if there is a blockage inside the drain hose, start by detaching it from the washer. There are three ways to inspect the drain hose for a clog.
- Straighten the hose and peep from one end and see if you can see through it.
- Connect one end of the hose to a tap and run water through it.
- Blow air through the hose and check if it gets to the other side unhindered or if there is debris coming out.
Solution:
“If the hose is clogged, use a plumber’s snake to remove the clog, then connect it to a tap under pressure to wash out the dirt.” Justin says.
However:
If something is stuck inside the hose and won’t come out, it’s better to replace it.
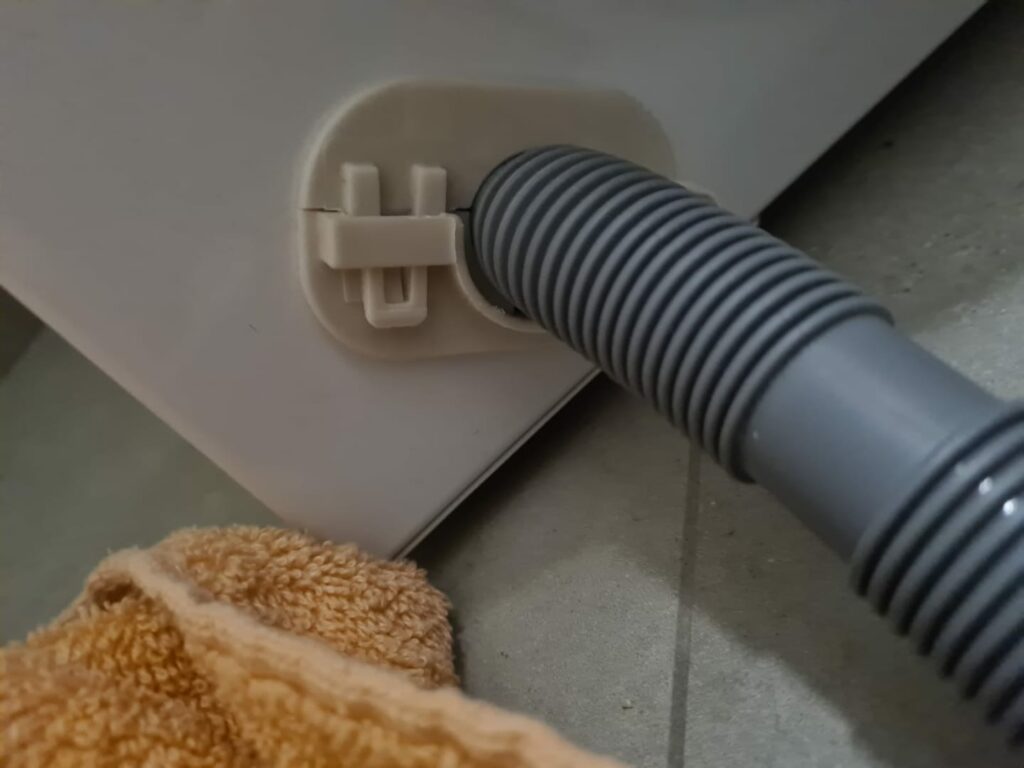
2. The Drain Hose Is Kinked or Tangled
Problem:
The second thing to check while you are diagnosing a Maytag washer that won’t drain is if the hose is kinked. This is common with long drain hoses since they get tangled easily.
Kinking also happens when the hose is pressed against the wall by the machine. Or when the washer shakes violently during washing.
Sometimes:
It could be a result of frequent dragging of the appliance.
Identification:
Unlike a clog, a kinked hose is easy to notice. Simply pull the washer away from the wall and examine the hose.
Solution:
“If the hose is tangled or kinked, straighten it using your hands or pliers and check if the issue has been resolved.” Justin advises.
What if the kink doesn’t resolve?
Well, you can try softening the section carefully with a heat gun to straighten it.
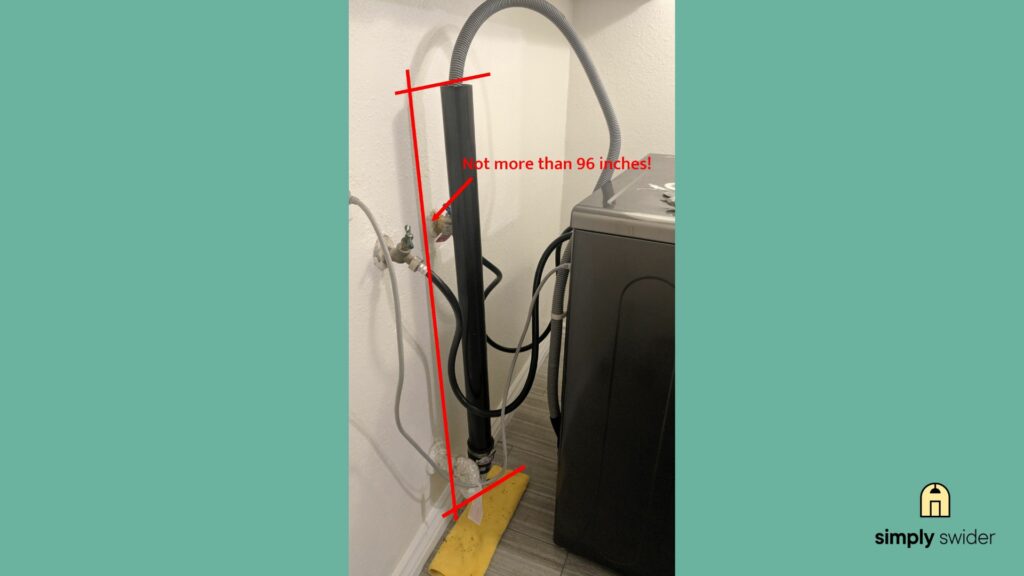
3. The Drain Hose Is Too High
Problem:
Washing machine manuals have very specific instructions for the installation of the drain hose.
“Every model specifies the minimum and maximum height of the drain hose from the ground,” Justin explains.
According to Maytag, the top of the standpipe must be at least 30 inches from the ground. And not higher than 96 inches to prevent siphoning of the water.
This applies to floor standpipe, laundry tub, or wall standpipe drainage systems.
Note:
Extending the hose too far into the drainpipe or laundry tub can cause the drained water to siphon back into the machine.
That’s why Maytag specifies that the drain hose shouldn’t extend more than 4.5 inches into the drainpipe.
Identification:
It’s easy…
Measure the height of the drain hose from the ground and see if it’s less than 30 inches. If it’s less, that might be the cause of the draining problem.
Also, check how far the drain hose extends into the drain pipe.
For example:
In our Simply Swider Appliance Repair Community, one of our members, had a problem with the standpipe spitting water back up.
Luckily:
From the photo they shared, Nick, our stand-by expert technician, was able to quickly spot that the standpipe was not installed correctly.
Nick advised to extend the standpipe to at least 30 inches. They hired a plumber to do the job, which resolved the issue.
Solution:
If identification proves that this is the problem you’re facing, you just need to tweak your installation a bit.
Simply reinstall your drain hose, ensuring it is at least 30 inches from the floor. Secondly, make sure the hose does not exceed 4.5 inches inside the drainpipe.
“Also, there should be a gap where the standpipe connects to the drain hose to allow the flow of air. Don’t tape the two pipes together,” Justin says.
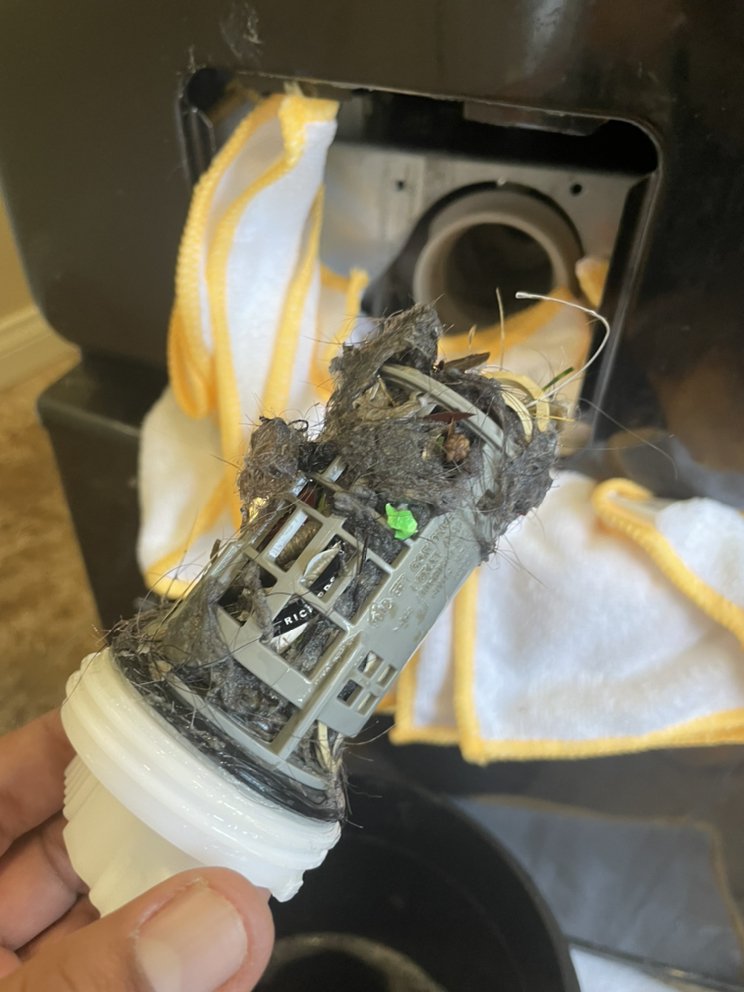
4. A Clogged Filter or Drain Pump
Are you missing one of your socks or other small clothing items from your load? One of the suspects should be your washing machine.
Problem:
When you wash small items such as socks, lingerie, shoelaces, or handkerchiefs, they can get swallowed through the rubber gasket.
These items mostly get stuck on the filter or drain pump, which affects the draining process.
Note:
Some of the latest Maytag washing machines have a basket or filter where these small items collect.
Experts advise that you remove and wash this filter at least once a month.
Identification:
On most Maytag washers, the filter is located near the bottom of the machine, behind a small access panel or flap.
Locate this cover and unscrew the filter to check if it’s clogged.
Next, check the drain pump. To access the drain pump, you will need to open either the front or back panel of the washer to locate it.
So, is the pump clogged?
One user on Reddit found a bobby pin in the drain pump, while another found a shoe insole.
Solution:
Clearing a clog on the pump is a matter of removing anything that is stuck on it.
For the drain filter, rinse the filter under running water to remove any debris, lint, or dirt.
Use a soft brush or toothbrush to scrub away any stubborn residues. If the filter is particularly dirty, soak it in warm, soapy water for a few minutes before rinsing.
Note:
Most Maytag top-load washers manufactured after 2001 don’t have a washer filter.
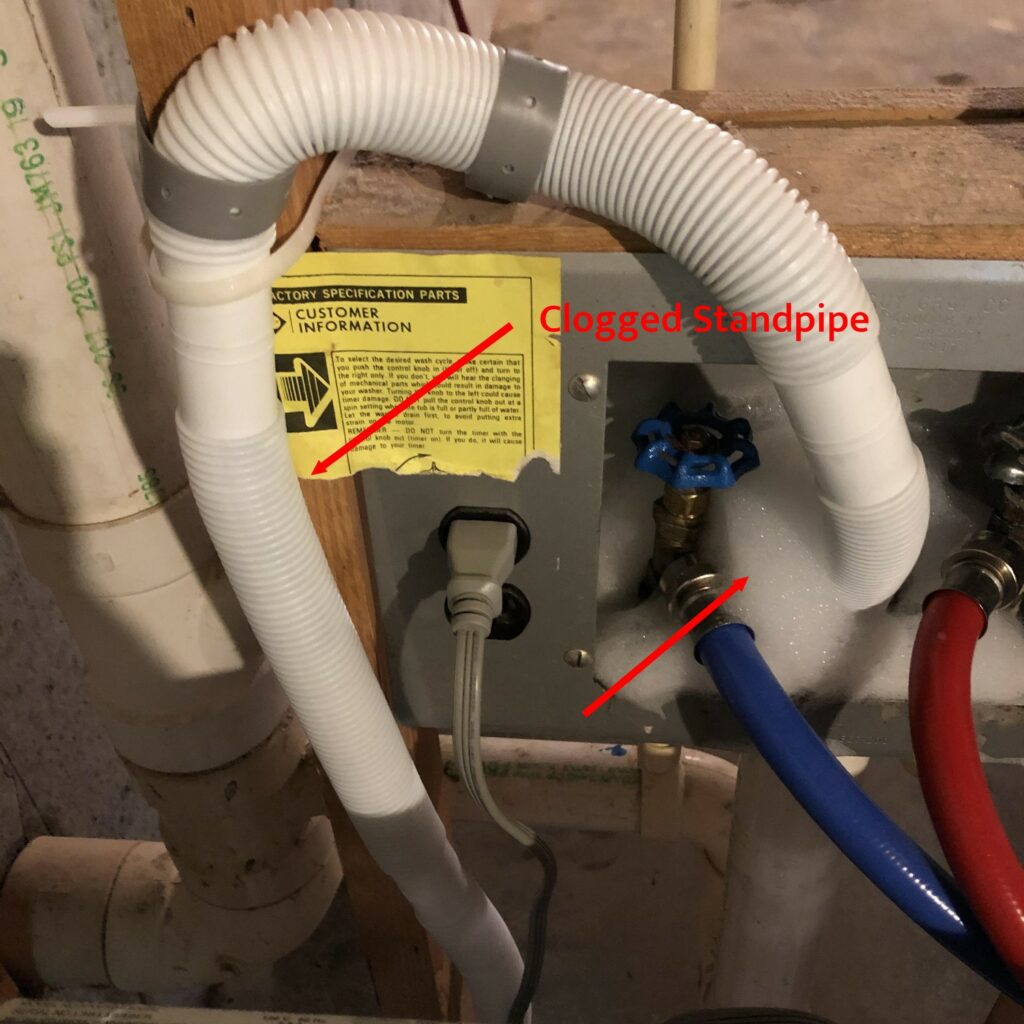
5. Clogged Standpipe or Sewer Line
Problem:
A draining problem may also occur if the standpipe is blocked. This is whether the washer is draining into a floor drain, floor standpipe, or wall standpipe.
The most common causes of a blocked standpipe include
- Accumulation of clumped lint and debris.
- Buildup of soap scum and detergent.
- When small objects such as hairpins and buttons get stuck.
- Accumulation of mineral deposits from the water.
When the standpipe is partially or fully blocked, the washer won’t drain properly.
Note:
Sometimes the problem isn’t with the standpipe but rather the main sewer line, which is an even bigger problem.
Identification:
Justin says…
“The giveaway sign that the standpipe has a problem is if it’s overflowing. That’s a clear sign that the wastewater is backing up and hence the washer won’t drain”
Solution:
Start by manually removing any visible clog using pliers or gloved hands.
Then use a plunger to loosen and dislodge any clogs.
If it’s not clearing, use a plumbing snake to dislodge the obstruction, but make sure you’re not pushing the clog further into the standpipe.
According to Justin…
“If you are not able to resolve the issue using the plumbing snake, the main sewer line may have a problem.”
In that case, call a professional plumber who is best suited to handle complex clogs.
Also:
Make sure the drain hose does not extend past 4.5 inches inside the standpipe and that there is an air gap where the two connect.
5. Poor Load Distribution
Problem:
For a washer to drain properly, the load in the washer must be well balanced. Poor load distribution can cause excessive vibration and make the wash cycles last longer.
Identification:
Look through the door and see how the load is positioned.
If the load is pulled to one side and there is excessive vibration, that could be the cause of your draining woes.
“Excessive vibrations indicate that the washer is attempting to balance the load. When that happens, you end up with a wet load and detergent residuals on the clothes,” Justin says.
Poor load distribution issues are very common when washing bulky items such as blankets, comforters, and pillows.
Solution:
If the washer is shaking or vibrating excessively during the spin cycle, pause the cycle and balance the load.
But…
If the cycle has already ended and the load is still wet, reload the clothes into the washer and run a rinse and spin cycle.
6. The Washer Is Overloaded
Problem:
Here is the thing…
When the washer is overloaded, there is very little space for water to flow between the clothes.
More so, a stuck load can sometimes block the drain hose.
From Justin’s point of view:
“Overloading doesn’t just cause draining issues; it also strains the motor and pump, increasing the risk of other forms of damage.”
Identification:
Check…
If the clothes are tightly packed and pressed against each other, that’s a sign that the washer is overloaded.
Another solid indicator is difficulty closing the door after loading the washer.
That said:
An overloaded machine can be excessively noisy with unusual vibrations. And most likely, your laundry load will come out wet even after a spin cycle.
Solution:
The fix here is to pause the cycle and divide the load into manageable batches. Then ensure it’s well-balanced before running a fresh cycle.
7. You Used Too Much Detergent
Problem:
The issue with using too much detergent is that it creates excessive foam and suds during a wash cycle.
The foam and suds then stick to the inside of the tank and clothes and do not rinse away. This is very common if you are not using a high-efficiency detergent that is easy to rinse off.
Justin asserts, “When there is too much foam, there is reduced agitation and rinsing, and hence you will end up with a wet load.”
Why?
The foam traps water within the fabric fibers, making it difficult to extract it during spinning.
Identification:
If the cycle is in progress, check if there is excessive foam inside the washer.
Also check if there is sud overflowing from places such as the detergent dispenser, door, or overflow outlet.
If there is too much foam, it could be the reason why your washing machine won’t drain.
Sometimes, you’ll notice this when the load feels wet and sticky after a cycle or there are detergent residues.
Bear this in mind…
Knowing where to put detergent in your washer isn’t enough, you also have to ensure you use the right amount per wash.
Solution:
Remove the clothes from the washer and dip them in a basic tub filled with plain water. Swish them around for the excess detergent to dissolve.
Then:
Use a dry piece of cloth, such as a towel, to wipe off the foam stuck on the walls of the tub. Manually press or squeeze each laundry item to remove excess water, then load them back into the washer.
Then choose a rinse and spin cycle.
8. A Faulty Shift Actuator
| Part | Shift Actuator |
| Location | Underneath the washer |
| Ease of troubleshooting | Hard |
| Replacement part cost | $20-$50 depending on the model |
| Repairable | No |
While a washing machine actuator switch does not control the draining function, it can be the reason your Maytag washer isn’t draining.
The actuator switch is the part that tells the washer when to shift from agitating to spinning mode.
Problem:
Justin explains, “If the actuator fails to activate the spinning function, the machine won’t drain.”
Why?
Well, if the actuator switch doesn’t engage the drum, the machine won’t spin.
Draining happens when the centrifugal force generated by the spinning drum forces water out of the washer.
Identification:
There are a few signs that would indicate the actuator has a problem.
First, if the washing machine isn’t completing the spin cycle. The washer will either start and stop abruptly or display unusual cycle durations.
Secondly, if there’s irregular spinning and unusual noises coming from the bottom of the washer.
Thirdly, if there is an actuator-related error message displayed.
Solution:
According to Justin, “Certain components of the actuator, such as the motor, can be repaired or replaced.”
However, the most that most people can do is replace the entire actuator.
Now:
To access the actuator switch, carefully tilt the washer and remove the bottom panel. It’s usually located near the motor and transmission assembly.
Then unscrew and uninstall the affected actuator switch and replace it.
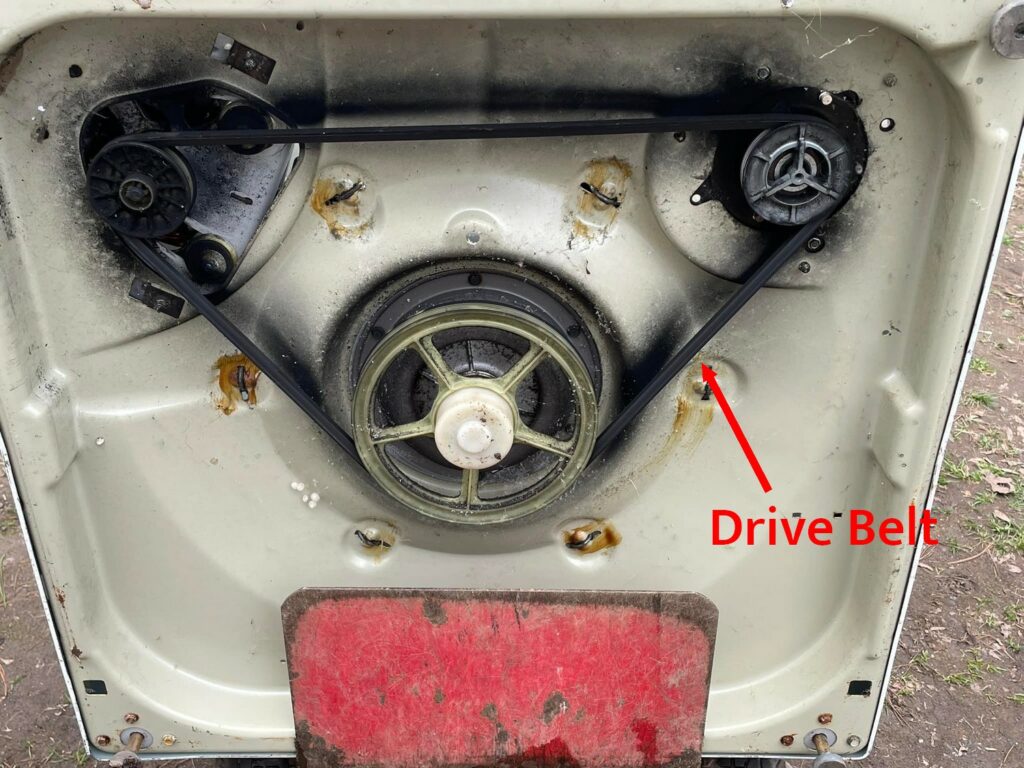
9. Loose or Damaged Drive Belts
| Part | Drive belts |
| Location | Connected to the motor and the drum |
| Ease of troubleshooting | Easy |
| Replacement part cost | $20-$70 depending on the model |
| Repairable | No |
Problem:
In belt-drive washers, the drive belts help transfer power from the motor to other components; such as the drum and agitator.
The belts are looped around the motor pulleys and another pulley that is connected to the drum or agitator.
When the motor is running, the belts move the drum or agitator.
Identification:
Over time, dishwasher drive belts wear out, get loose, or get damaged; which can affect draining.
According to Justin, other issues that result from faulty belts include:
- Poor spinning
- Excessive noise and vibration
- Incomplete cycles
- Stress on other components such as the bearings
He add, “All these are guiding indicators that the problem might be with the drive belts. You just have to be keen enough to notice them.”
But:
For a physical check, you can locate the belts beneath the drum or tub.
Solution:
“If the belts are loose, check if there is a way to adjust the tension. Some washers have a belt tension adjustment mechanism”, Justin advises.
Unfortunately…
Drive belts cannot be repaired, only replaced. On the plus side, they are cheap and easy to replace.
Tip:
Before replacing the belts, clean the pulley to remove any lint, debris, or detergent that has accumulated.
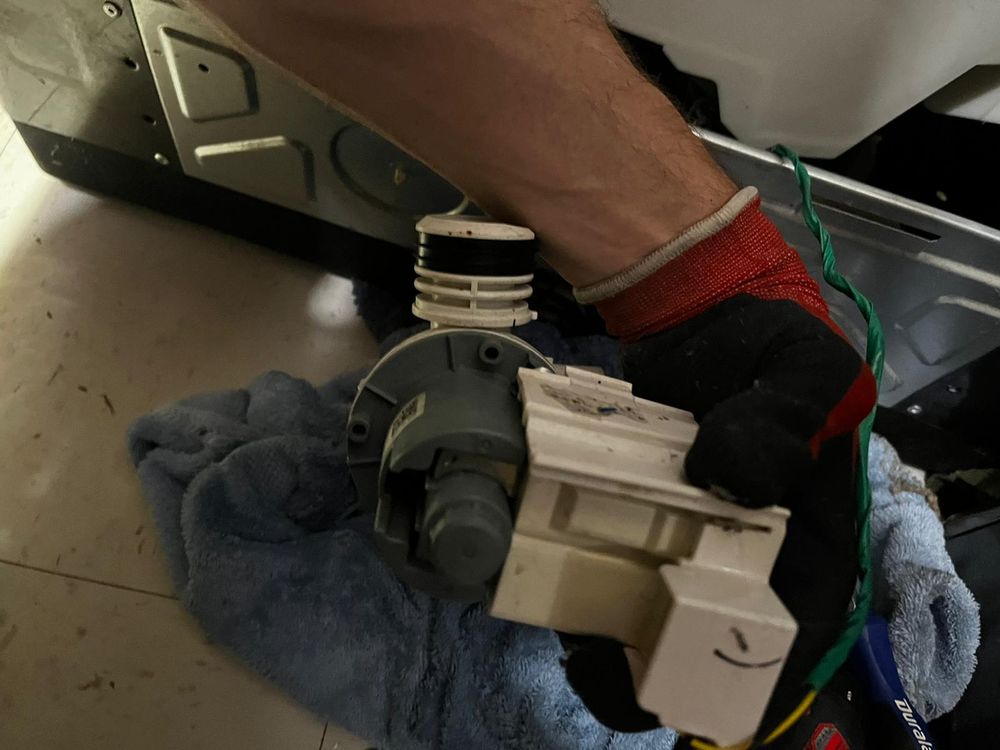
10. A Problem With the Drain Pump

| Part | Drain pump |
| Location | At the bottom of the machine |
| Ease of troubleshooting | Hard |
| Replacement part cost | $50-$200 depending on the model |
| Repairable | Only by a professional |
The drain pump is responsible for pumping water from the machine’s tub during and after a wash cycle.
How?
Simply put, it creates a suction force that draws the water from the tub and pushes it through the drain hose.
Problem:
The drain pump usually has an electric motor and impeller. The motor powers the impeller, which rotates rapidly, creating the necessary suction force.
That said:
The washer won’t drain properly if the pump is clogged or damaged. Draining will also be affected in case of any of the following…
- The Impeller is damaged
- The pump motor fails
- There exists damaged wires connections
Identification:
There are different symptoms of a broken or damaged drain pump.
- The washer not draining at all,
- Slow draining,
- Incomplete draining,
- Washer showing drain pump error, and
- Unusual sounds coming from the pump.
To access the drain pump, consult your user manual to know where it is located. On most Maytag washers, it is often situated near the front or back of the machine.
Visually inspect the drain pump for signs of damage, such as mangled wires.
Solution:
“Just like the actuator switch, a faulty drain pump can only be repaired by an appliance repair expert”, Justin says.
Here, the most you can do is replace the pump.
Most Affected Maytag Models
Now:
Just like with other washer brands, such as GE washers, all Maytag washers are susceptible to draining issues.
This is because draining problems arise from common causes that are not specific to a particular model or brand.
However:
I have observed that some Maytag washer models are more susceptible to draining issues than others.
Below are several models that have been frequently mentioned in our Simply Swider Appliance Repair Community as having draining problems:
| Name | Model Number | Type |
|---|---|---|
| Maytag Centennial | MVWC6ESWW | Top load |
| Maytag Neptune | MAH9700AWM | Front load |
| Maytag Bravos Xl | MVWB850YG | Top load |
| Maytag Atlantis | MAV7600AWW | Top load |
| Maytag Performa | PAV2300AWW | Top load |
| Maytag 2000 Series | MHWE200WW | Front load |
| Maytag Maxima | MHW6000XW | Front load |
| Maytag Ensignia | MAV6458AWW | Top load |
| Maytag Centennia | W10140921 | Top load |
| Maytag MVWC565FW1 | MVWC565FW1 | Top load |
| Maytag Washer | MHW4000BW2 | Top load |
| Maytag Washing Machine | MHW6630HW0 | Front load |
| Maytag Washer Top Loader | MVW7232HC0 | Top load |
| Maytag Atlantis® | MAV6200AWW | Top load |
| Maytag MVWX655DW1 | MVWX655DW1 | Top load |
| Maytag LAT8214AAE Washer | LAT8214AAE | Top load |
Conclusion
And there you have it…
Ten of the most common reasons why a Maytag washer won’t drain. The trick here is a step-by-step diagnosis of the common culprits until you identify the cause.
Luckily:
Most of the causes are easy to troubleshoot and fix. For instance, most drain hose problems, poor load distribution, and using too much detergent.
However:
If the cause is a faulty part such as the actuator switch or drain pump, it will be harder to troubleshoot and fix. In this case, it’s best to consult a professional.
And that’s it for this post!
If you have any questions, leave them in the comment section below. I’d love to hear about your experiences.
Also, check our ‘Ask the Expert’ page if you need one-on-one assistance and free advice.
Frequently Asked Questions
If your Maytag washer isn’t draining properly, several factors could be at play.First, the most common cause is an issue with the drain hose. Secondly, you could have used too much detergent or the load is not well distributed.
Other causes include a faulty drain pump and a faulty actuator switch. To pinpoint the specific cause, you will have to troubleshoot all the possible culprits one by one. You can also consult a professional who is experienced with such issues.
Yes. Much like any other form of clogging, the presence of obstructions in the drain hose tends to block the flow of waste water through it.
Absolutely. A professional appliance repair expert is more experienced in troubleshooting and fixing a washer that won’t drain.
Remember, there are risks associated with fixing a washer if you’re not a professional. This includes voiding the warranty, potential damage, and safety risks.
A professional may also help you repair a faulty part, saving you some money instead of buying a new replacement part.
Maytag bravos xl
Getting codes f7, e9 i cant find these codes would you know what they are