
Listen up:
There’s nothing quite like that sinking feeling when you open your fridge to find your food’s gone bad—especially when your freezer is still keeping things icy cold. Trust me, I’ve been in your shoes, and I’ve seen the frustration on countless clients’ faces.
Here’s the good news:
As an appliance technician with years of experience, I’ve tackled the “Fridge Is Warm, Freezer Is Cold” dilemma more times than I can count. And guess what? We’re going to sort this out.
Ready? Let’s dive in.

Table of Contents
Why Your Fridge Is Warm Even Though the Freezer Is Cold
Several factors can prevent your fridge from getting cold even though the freezer’s working fine. This occurs due to restricted airflow, loose door gaskets, and frozen evaporator coils. It also occurs when there’s a problem with the defrost heater, evaporator fan motor, condenser coil, damper control, or thermostat.
Over the years:
I’ve learnt several nifty tricks for dealing with the warm fridge, cold freezer problem. In addition, I’ve enlisted the help of my friend Todd Jenkins, a licensed appliance technician from Brampton.
With his guidance and my input, you’ll surely get your fridge running again.
Roll up your sleeves and let’s get to work!
8 Common Reasons and Troubleshooting Procedures
| Commonly Affected Parts | Estimated Cost |
|---|---|
| Air vents | $100 – $120 |
| Door gasket | $20 – $200 |
| Evaporator coil | $100 – $300 |
| Defrost heater | $15 – $25 |
| Evaporator fan motor | $15 – $60 |
| Condenser coil | $25 – $200 |
| Damper control | $50 – $120 |
| Thermostat | $15 – $40 |
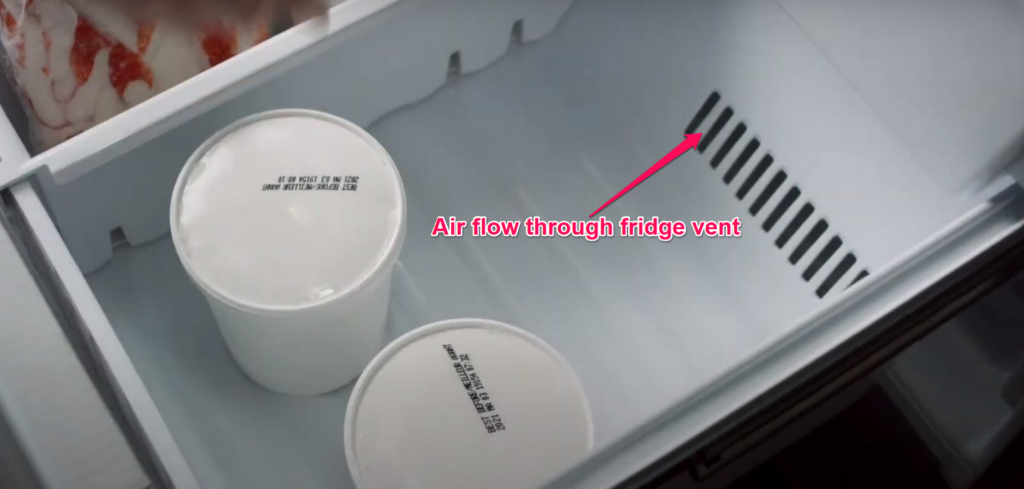
1. Restricted Air Flow
| Part | Air vents |
| Location | It can be found on the sides of the fridge and freezer compartments |
| Ease of troubleshooting | Easy |
| Cost | $100 – $120 |
| Repairable | Yes – if airflow through the vents is restricted by containers or frost |
Problem:
Get this:
The moment you realize your fridge is much warmer than usual, the first thing you should inspect is the air flow in your refrigerator.
Here’s why:
Your refrigerator’s ability to cool depends on its ability to circulate cold air via its vents. Once the air flowing from your fridge to the freezer is restricted, your fridge will begin to get warm.
Identification:
There are two possible ways by which air flow in your refrigerator can be restricted.
The first occurs when you overstuff your fridge. By overstuffing your fridge, you’d inevitably place containers in front of the air vents.
Once the vents are blocked, air will not circulate freely in your fridge, resulting in an unwanted temperature rise.
Secondly:
Air flow will be restricted in your fridge when the air vents are frozen. In this case, ice will block the air flow and prevent your fridge from cooling.
For instance:
This Reddit user discovered the fridge portion of his 15-year-old Whirpool refrigerator had stopped getting cold even though the freezer was working fine.
After reading his comments, Todd believed the air vents in the fridge were frozen, preventing the fridge from cooling.
Solution:
In my experience:
The only way to ensure proper airflow in your fridge is by clearing obstructions blocking the vents.
Hence:
If your fridge is currently overstuffed, you’ll need to reorganize it. Always ensure there’s enough space between the containers and the air vents in the fridge.
Todd adds:
“Inspect the air vents for frost accumulation. If the vents are frozen, turn off the fridge for a few hours to thaw the ice.”
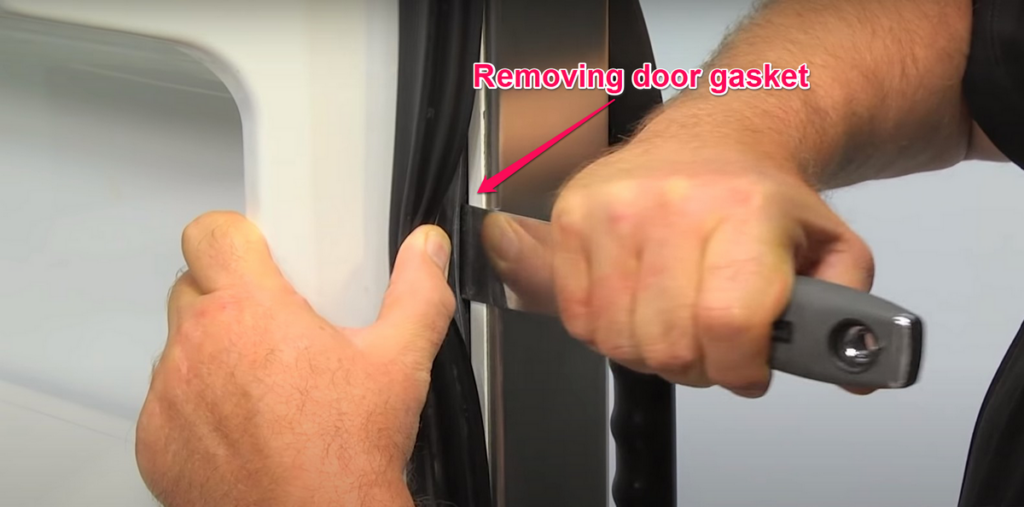
2. Loose Door Gasket
| Part | Door gasket |
| Location | It can be found around the groove of your refrigerator’s door frame |
| Ease of troubleshooting | Easy |
| Cost | $20 – $200 |
| Repairable | No – once the gasket has lost its magnetic ability, it must be replaced |
Problem:
Once you’ve ensured proper air flow in your refrigerator, the next thing you’ll need to check is the fridge door gasket.
This is particularly important if your fridge and freezer compartments have different doors.
You see:
If the door to the fridge portion isn’t closed properly, cold air will escape, and warm air will enter the fridge, causing the temperature to rise. It could also cause your fridge to keep running.
This often occurs when the door gasket loses its magnetic ability, preventing the fridge from closing properly.
Identification:
Once you notice your fridge isn’t closing properly, open the door and inspect the door gasket around it.
Now:
If the door gasket is loose, you’ve found the cause of your warm fridge, cold freezer problem.
Last summer:
A member of our Facebook community reached out to me when she noticed the contents in her fridge were slightly above room temperature.
After inspecting her Samsung refrigerator, I noticed the door gasket was loose. This prevented the fridge from closing properly and allowed warm air to enter.
Solution:
If the gasket has become slack with age, you’ll need to replace it. You’ll need a putty knife, some petroleum jelly, a blow dryer, and a plastic hammer.
After gathering these tools, proceed to replace the door gasket using the steps below:
- Step 1: Unplug your refrigerator from the socket.
- Step 2: Open the fridge and remove the old gasket from the door frame using a putty knife.
- Step 3: Place the new gasket around the door frame.
- Step 4: Use your fingers and the plastic hammer to gently install the new gasket into the groove on the fridge door.
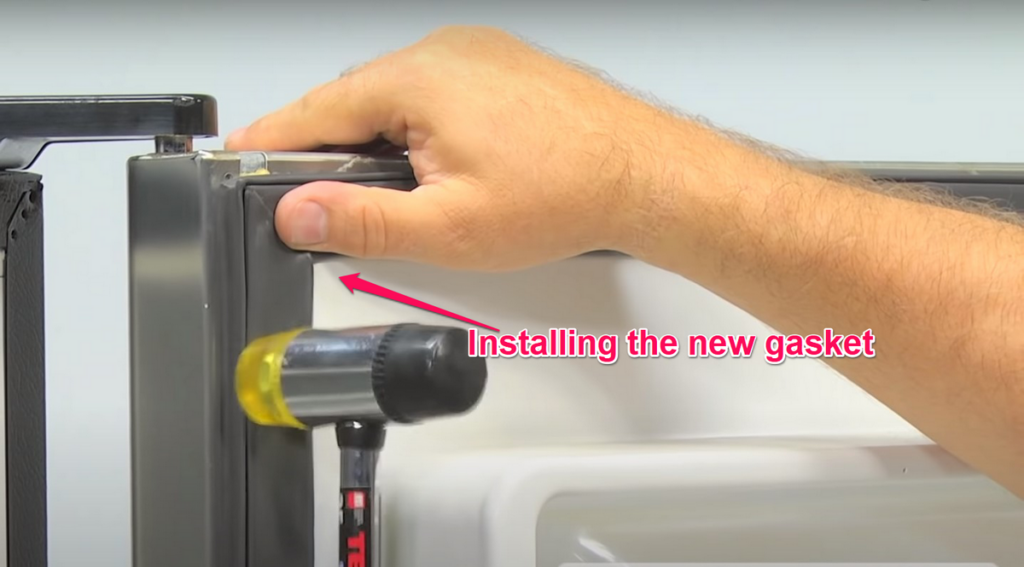
- Step 5: Close the fridge and check for gaps in the door gasket.
- Step 6: With the fridge still closed, swiftly swipe the blow dryer to heat the uneven areas on the gasket. Be careful not to burn the gasket in the process.
- Step 7: Open the fridge and apply a thin layer of petroleum jelly around the door gasket.
- Step 8: Close the fridge and run your fingers along the gasket for a few minutes.
Finally:
Once the gasket has been installed properly, it will prevent warm air from entering your fridge. Your fridge should begin to cool down afterward.
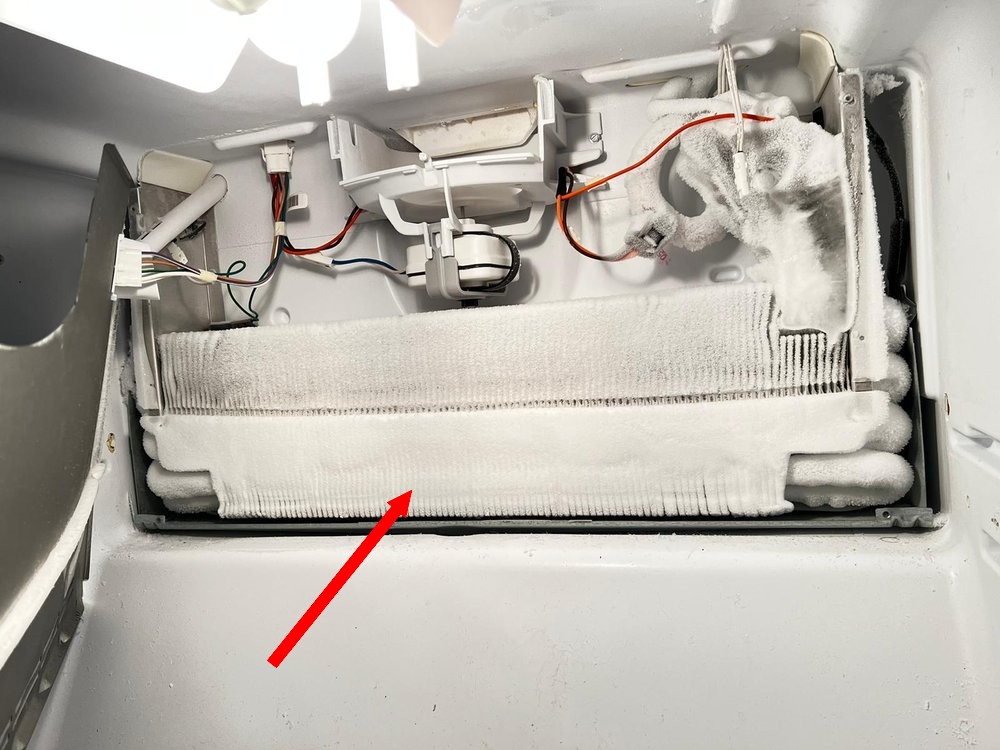
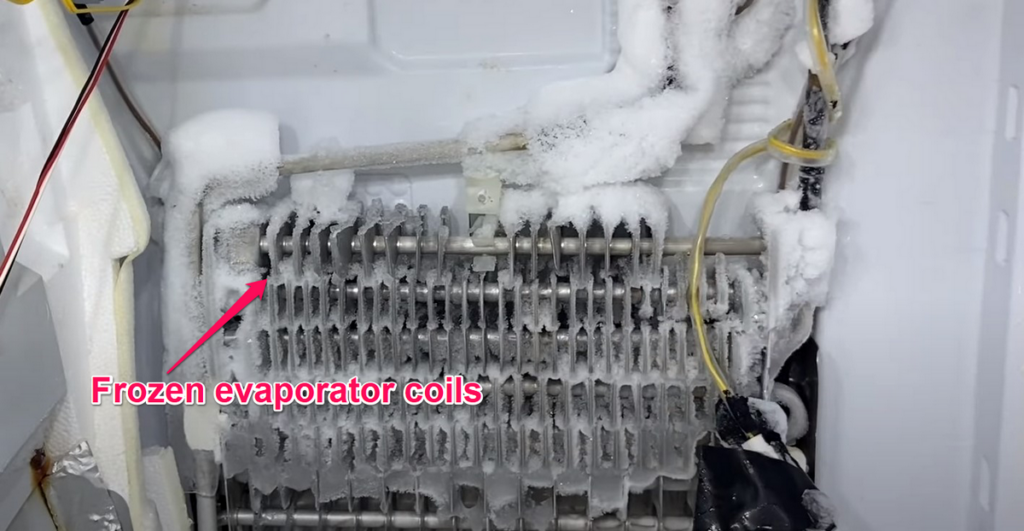
3. Frozen Evaporator Coils
| Part | Evaporator coils |
| Location | It can be found behind the back panel of the refrigerator |
| Ease of troubleshooting | Easy |
| Cost | $100 – $300 |
| Repairable | Yes – if the coils are covered by frost |
Problem:
One of the major factors that will prevent your fridge from cooling is the refrigerator’s evaporator coils.
Here’s why:
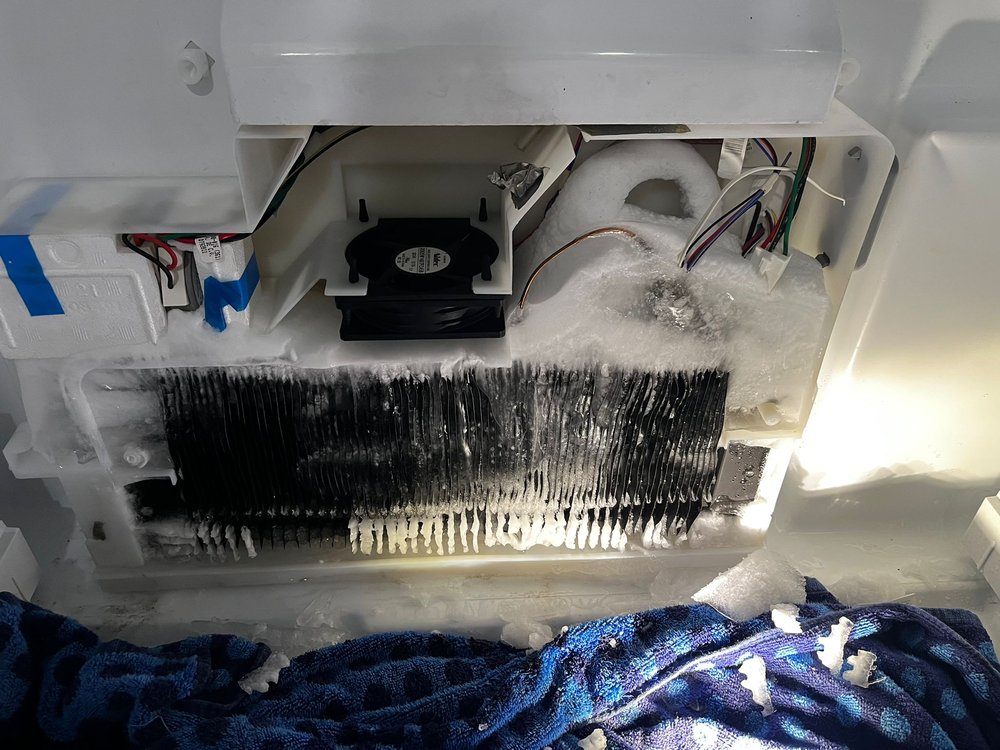
The evaporator coil ensures your fridge stays cold by removing heat from the air inside. Once the coils are covered with frost, they will not be able to absorb heat, which willresult in the temperature rise you’ve observed in your fridge.
Identification:
Recently:
A member of our Facebook community reached out when he noticed his fridge was not getting cold even though the freezer was running.
When I inspected her evaporator coils, I discovered they were frozen.
Now:
To confirm if your freezer’s evaporator coils are frozen, you’ll need to take out the back panel inside the refrigerator to inspect the coils.
After unplugging the refrigerator, follow the steps below:
- Step 1: Empty the refrigerator and take out its shelves.
- Step 2: Remove the mounting screws securing the back panel.
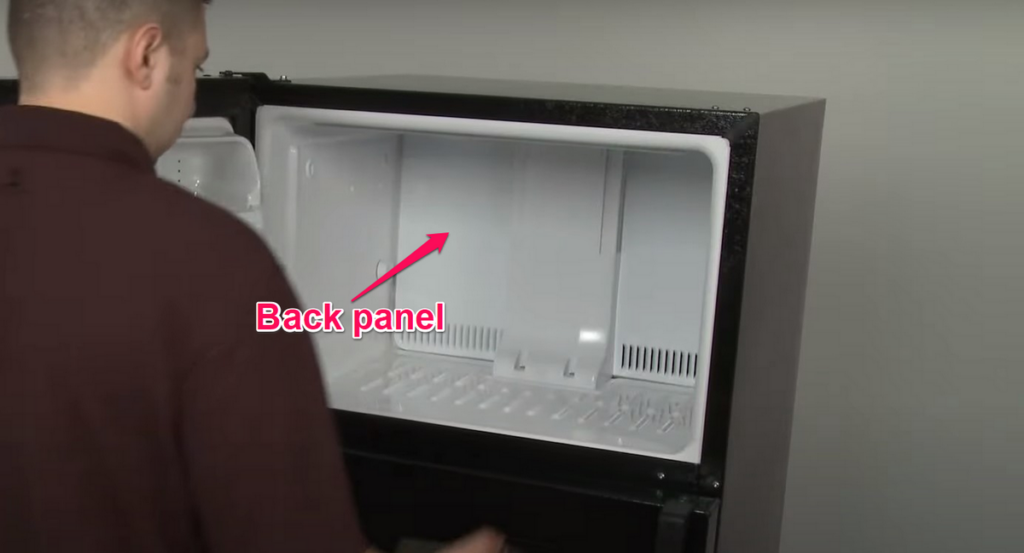
- Step 3: Carefully remove the back panel and detach the wires connected to it.
- Step 4: Inspect the evaporator coils for ice accumulation.
Solution:
If you notice there’s a lot of frost on your evaporator coils, you’ll need to defrost the coils. To thaw the ice on the coils, leave your fridge unplugged for a few hours.
Todd adds:
“To make things faster, I’ll advise leaving the fridge door open as well. Also, be sure to place a towel under the fridge to soak up the water from the melting ice.”
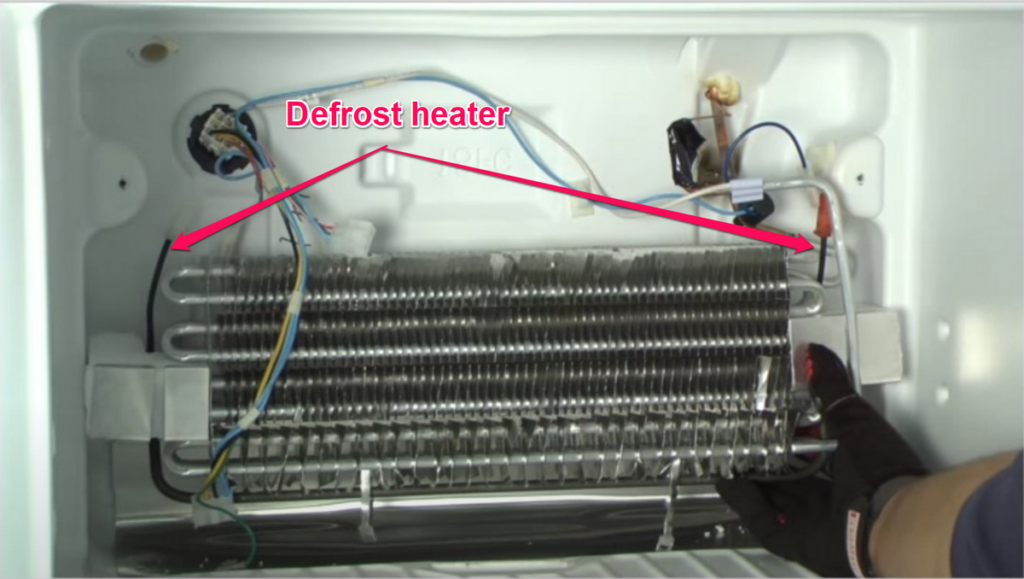
4. Defrost Heater Failure
| Part | Defrost heater |
| Location | It can be found behind the refrigerator’s back panel, beneath the evaporator coil |
| Ease of troubleshooting | Easy |
| Cost | $15 – $25 |
| Repairable | No – if the defrost heater is faulty, it must be replaced |
Problem:
A refrigerator’s defrost heater is another factor that can prevent cold air from circulating inside the fresh food compartment.
The thing is:
The defrost heater is responsible for ensuring ice doesn’t build up in the back panel of your refrigerator. Once it fails, ice coats the evaporator coils, preventing cold air circulation.
Identification:
If you open the back panel of your refrigerator and discover the evaporator coils are frozen, it means the defrost heater is failing.
Recently:
I came across a Reddit user’s comment on how his refrigerator was experiencing the warm fridge, cold freezer problem because the evaporator coils were frozen.
After he manually defrosted the coils, the problem returned after a few weeks.
Based on this:
I believed his fridge was warm because of the defrost heater, and Todd agreed.
Solution:
In this case, Todd recommends replacing the defrost heater by following these steps:
- Step 1: Unplug the refrigerator and remove the shelves blocking the back panel.
- Step 2: Remove the mounting screws on the back panel.

- Step 3: Remove the wires and connectors attached to the back panel.
- Step 4: Unplug the wires attached to the defrost heater.
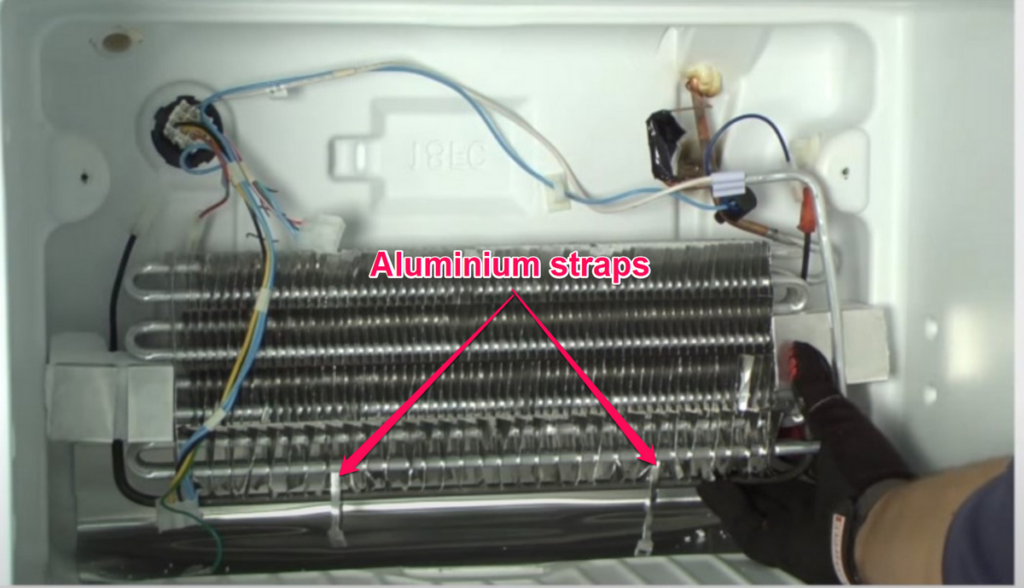
- Step 5: Remove the aluminum straps securing the defrost heater.
- Step 6: Gently raise the evaporator coils and slide the defrost heater out.
- Step 7: Install the new defrost heater behind the evaporator coil.
- Step 8: Secure the defrost heater with the aluminumm straps.
- Step 9: Attach the wires to the new defrost heater.
- Step 10: Reconnect the wires to the back panel.
Afterward:
Screw the back panel into place and plug the refrigerator in. The new defrost heater will prevent the evaporator coils from getting frozen.
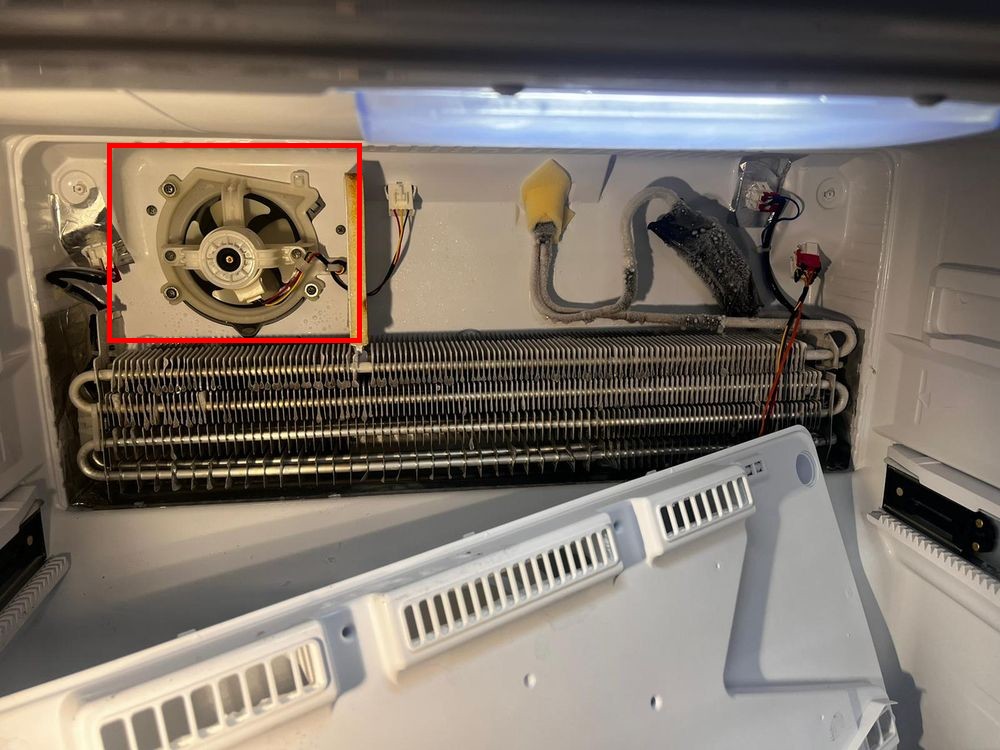
5. Damaged Evaporator Fan Motor
| Part | Evaporator fan motor |
| Location | It is connected to the evaporator fan, which is found behind the back panel of the refrigerator |
| Ease of troubleshooting | Difficult |
| Cost | $15 – $60 |
| Repairable | No – if the motor is faulty, it must be replaced |
Problem:
If your refrigerator’s evaporator coils aren’t frozen, inspect the evaporator fan motor.
You see:
The evaporator fan motor is a vital component of your refrigerator. Itdrives the evaporator fan, which assists in cooling inside your fridge.
As such:
Once the motor is faulty or damaged, it will not be able to power the evaporator fan. This will impede the circulation of air between the fridge and freezer compartments.
Eventually, the fridge will get warm even though the freezer is well below its freezing point.
Identification:
Last year:
I stumbled upon a Reddit user’s post. He complained that his fridge was much warmer than usual, even though the freezer was still cold.
When he took his Whirpool refrigerator apart, he observed that the coils weren’t frosted over, but the fan at the top of the coil wasn’t spinning.
Now:
After Todd and I read this, we knew his evaporator fan motor was no longer working. If you suspect this is the case with your fridge, follow these steps to test the motor:
- Step 1: Unplug your refrigerator from the power outlet.
- Step 2: Empty the refrigerator and remove the shelves.
- Step 3: Remove the screws securing the back panel of the refrigerator.
- Step 4: Detach the wires connected to the back panel and remove the back panel from the refrigerator.
- Step 5: Remove the panel covering the evaporator fan by removing the safety clips on the motor.

- Step 6: Gently remove the evaporator fan blade from the motor.
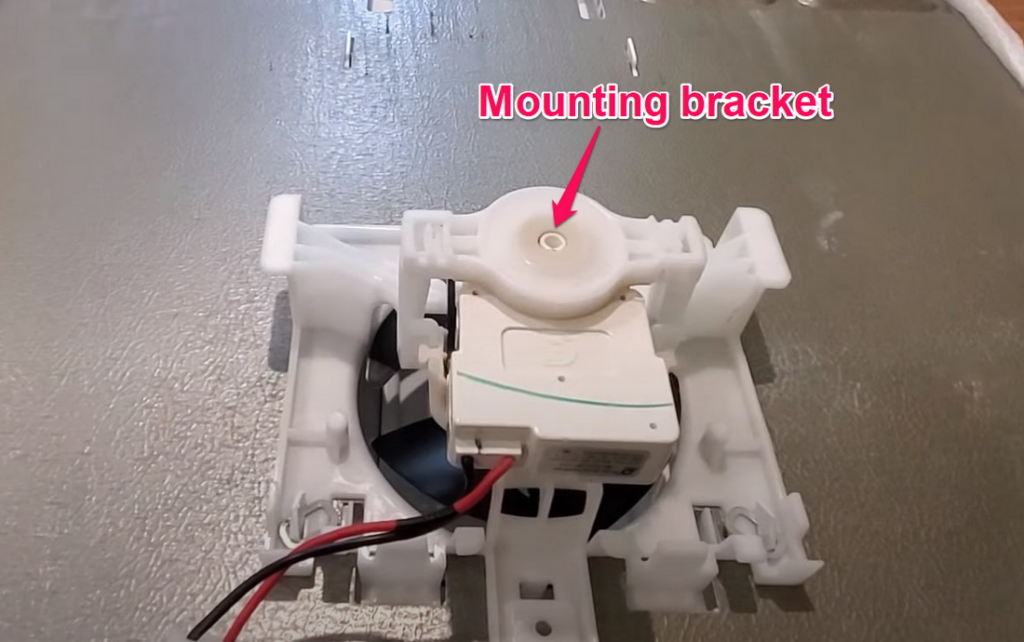
- Step 7: Remove the mounting brackets securing the evaporator fan motor.
- Step 8: Remove the motor from the back panel.
- Step 9: Use the two leads on the multimeter to test for continuity on the terminals on the evaporator fan motor.
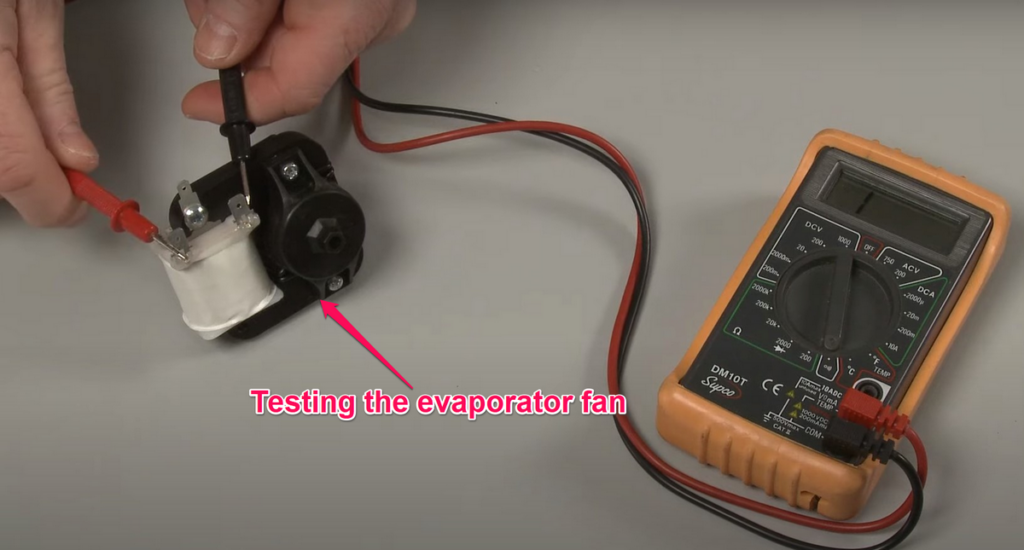
Solution:
If there is no continuity on the motor, you’ll need to replace it. To do so, proceed to the next step:
- Step 10: Insert the new motor into the back panel.
- Step 11: Reinstall the mounting bracket to secure the motor in place.
- Step 12: Install the fan blade on the new motor.
- Step 13: Reinstall the panel covering the evaporator fan using the safety clips.
Finally:
Reinstall the back panel into the refrigerator. Once this is complete, the temperature in your fridge will fall.
6. Dirty Condenser Coils
| Part | Condenser coils |
| Location | It is located inside the access panel at the back of the refrigerator |
| Ease of troubleshooting | Easy |
| Cost | $25 – $200 |
| Repairable | Yes – if the coils are covered with dust but not damaged |
Problem:
If there’s continuity on the evaporator fan motor, the next thing you’ll need to inspect is your refrigerator’s condenser coils.
Here’s why:
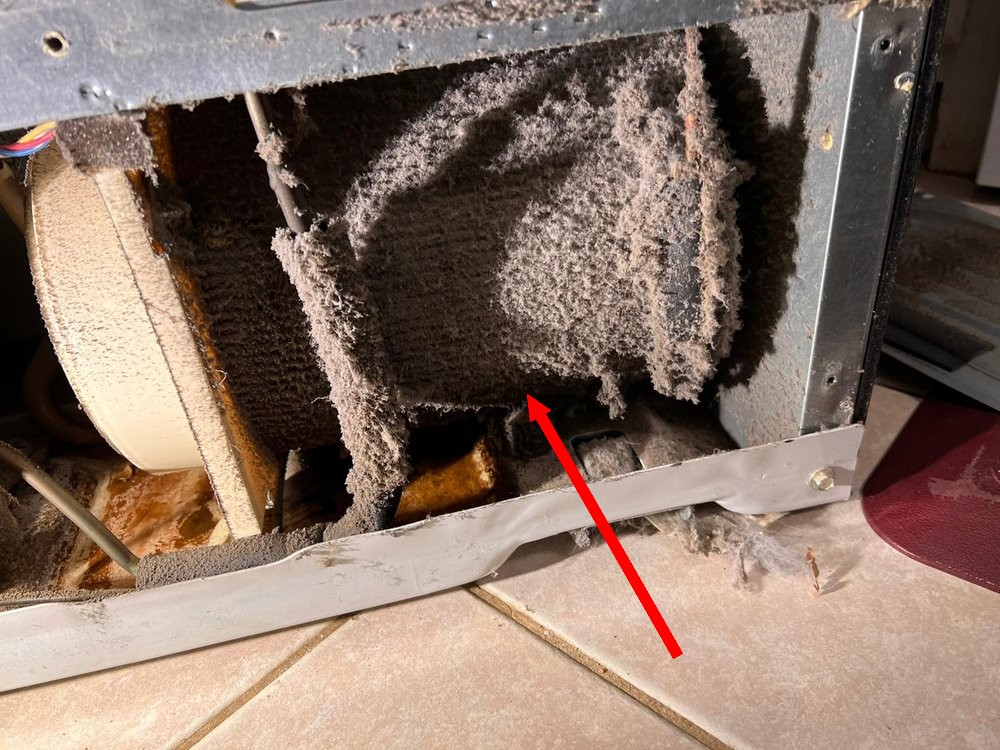
Your refrigerator’s condenser coils are next to the condenser fan. As the condenser fan rotates,dust will accumulate on the condenser fan and coils.
After a while, the dust on the coils will prevent your fridge from cooling properly. It can also cause your fridge to make peculiar clicking noises.
Identification:
Harriet, one of our Facebook community members, reached out when her refrigerator started acting up.
After I inspected her Kenmore refrigerator, I discovered the condenser coils at the back of the refrigerator were completely covered with dust.
As such:
The temperature in her fridge began to rise even though the freezer was still icy.
Solution:
To fix this problem, you’ll need to clean the condenser coils. Before you begin, remember to unplug your refrigerator from the outlet. Afterward, follow the steps below:
- Step 1: Gently move your refrigerator to reveal the access panel at the bank.
- Step 2: Remove the screws securing the access panel at the back of the refrigerator.
- Step 3: Remove the dust coating the coils with a vacuum cleaner.
- Step 4: Use a coil cleaning brush to clean the cavity between the coils
- Step 5: Vacuum the coils once again until they are clean.
- Step 6: Reinstall the access panel and return the fridge to its rightful position.
Todd adds:
“Although this problem is easy to fix, it’s always better to prevent it from happening in the first place. To prevent this issue from coming up in the future, I recommend cleaning the condenser coils at least once a year.”
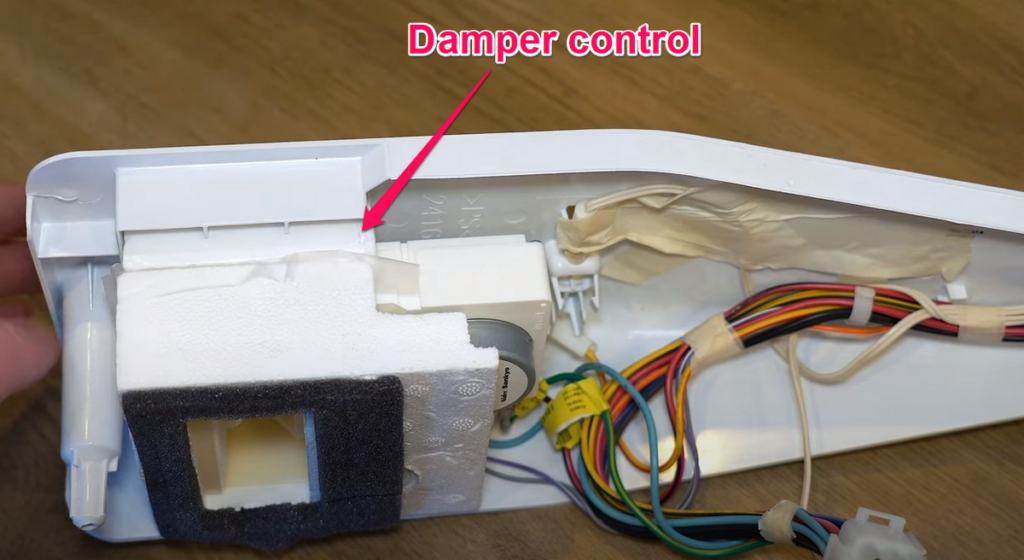
7. Damper Control Problems
| Part | Damper control |
| Location | It is located between the fridge and freezer compartment, inside a control box |
| Ease of troubleshooting | Difficult |
| Cost | $50 – $120 |
| Repairable | No – if the damper control is stuck open or close, it must be replaced |
Problem:
One of the primary reasons your fridge will experience an unusual temperature rise is when the damper control is stuck.
The damper control is fundamental as it aids in the circulation of cold air in the fridge.
Here’s how:
Most refrigerators are built with the damper control between the fridge and freezer compartment. Thus, the damper control will regulate the amount of cold air that moves from the freezer to the fridge.
For instance:
This Reddit user discovered that the fridge compartment of his Frigidaire refrigerator was barely below room temperature, even though the freezer section was fine.
Now:
After reading all the comments he made, Todd suspected his problem started because the damper control was stuck, and I agreed.
Once the damper control is stuck, cold air from the fridge will not flow into the fresh food compartment. This will cause the temperatures in the fridge section to rise.
Identification:
The easiest way to inspect the damper control is to check the vent between the fridge and the freezer compartment.
If cold air isn’t flowing between these vents, you’ll need to replace the damper control.
Solution:
Since the Reddit post cited a Frigidaire refrigerator, I will explain how to replace the damper control using this model as a reference.
First:
Unplug your refrigerator from the power outlet. Then proceed to replace the damper control using the steps below:
- Step 1: Remove the contents from the top shelf of the refrigerator.
- Step 2: Remove the top shelf of the refrigerator.
- Step 3: Remove the light bulb inside the refrigerator.
- Step 4: Remove the mounting screws securing the control box to the top of the refrigerator.
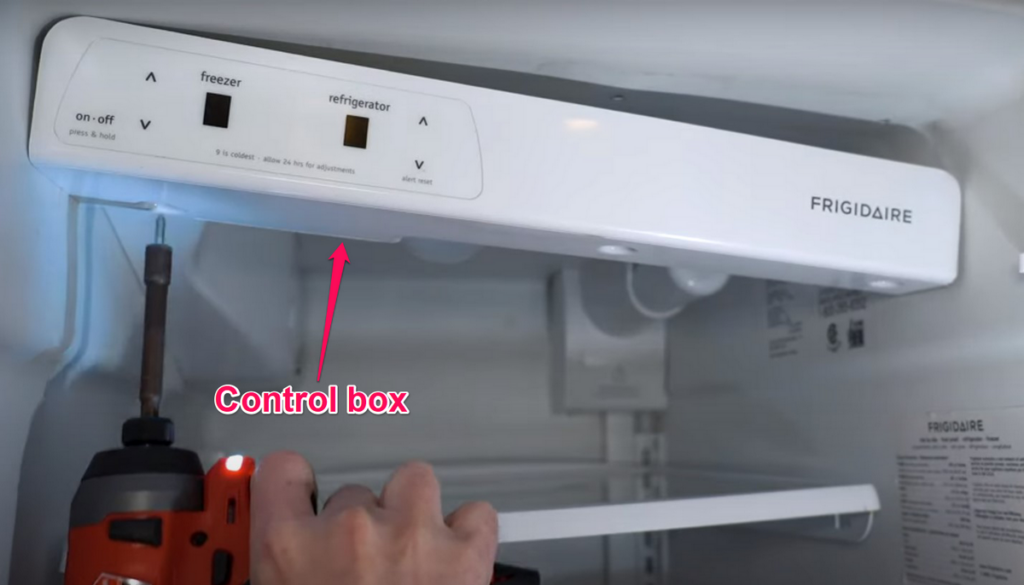
- Step 5: Detach the nine-pin plug between the control box and the top of the fridge.
- Step 6: Detach the yellow connector securing the control box.
- Step 7: Remove the temperature sensor from its housing and remove the control box.
- Step 8: Remove the damper control and disconnect the wires attached to it.

- Step 9: Remove the styrofoam adhesive that once secured the old damper control to the control box.
- Step 10: Remove the protective adhesive cover on the new damper control and install it on the control board.
- Step 11: Reconnect the wires to the damper control.
- Step 12: Return the temperature sensor to its slot and reinstall the control board.
- Step 13: Reinstall the light bulb.
Finally:
Plug the refrigerator back in. After a few minutes, the temperature in the fridge will drop.
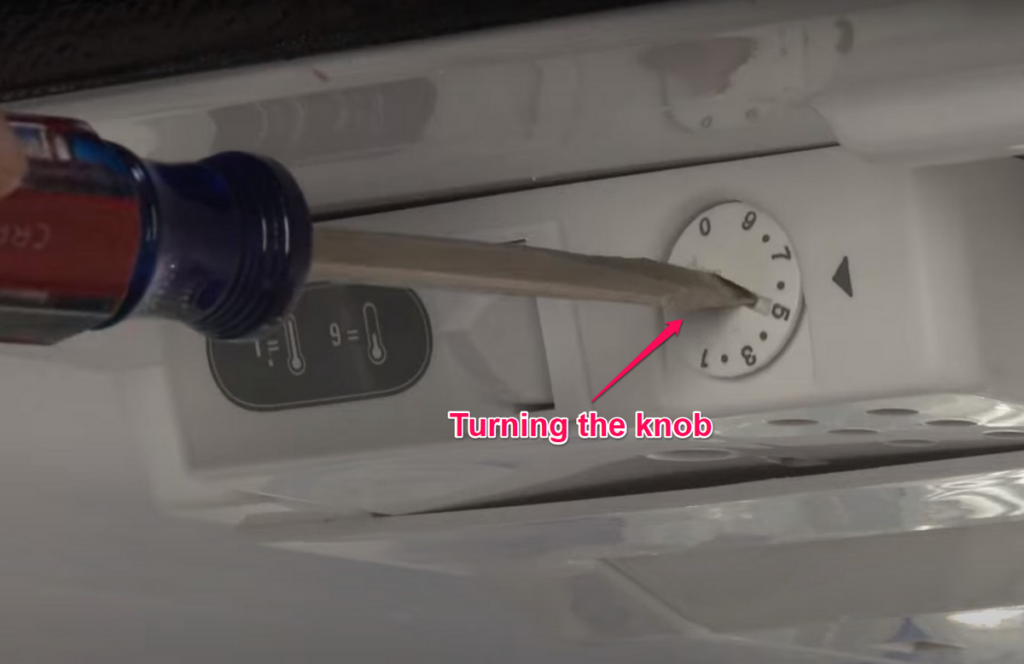
8. Thermostat Issues
| Part | Thermostat |
| Location | It can be found in the thermostat panel, which is either at the top or by the right side of the fridge |
| Ease of troubleshooting | Difficult |
| Cost | $15 – $40 |
| Repairable | No – once faulty, the thermostat must be replaced |
Problem:
As the thermostat is one of the components that regulate cooling in your refrigerator, it can also be responsible for the warm fridge, cold freezer problem.
Here’s why:
The thermostat monitors the temperature inside your refrigerator. Based on its readings, it controls the flow of electricity to the compressor. This helps keep your fridge cold.
Once the thermostat is faulty, it could prevent some compartments in the fridge from getting cold.
Identification:
First:
Locate the thermostat panel in your refrigerator. Depending on the model, the panel would be at the top or on the right side of your refrigerator.
Next, Todd says:
“Turn the knob on the thermostat. If you hear a sharp click after turning the knob for a while, your thermostat is fine. However, if you don’t hear a click, you’ll need to replace the thermostat.”
Solution:
Ezra, a member of our Facebook community, once discovered the food in his fridge had gone bad. He was confused when he realized this happened because his fridge was warm even though his freezer was frozen.
Now:
When I didn’t hear a click after turning the knob of his thermostat, I knew the it was faulty and needed to be replaced.
If you need to replace your thermostat, I recommend following the steps below:
- Step 1: Unplug your refrigerator from the power outlet.
- Step 2: Locate the thermostat’s panel. Depending on the model, it would either be on the right side or at the top of the refrigerator.
- Step 3: Gently remove the knob on the thermostat.
- Step 4: Use a plier to remove the nut securing the thermostat.

- Step 5: Remove the screws securing the thermostat’s panel.
- Step 6: Before detaching the wires on the thermostat, take a picture of the wires attached to it.
- Step 7: Pull the thermostat’s probe out of the hole in the refrigerator.
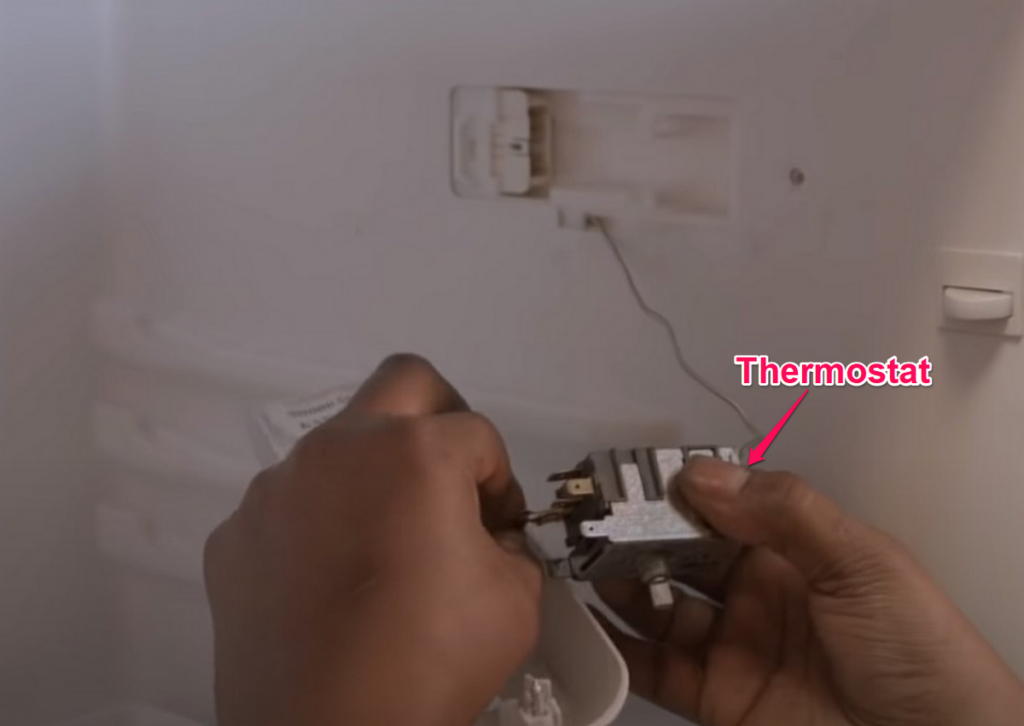
- Step 8: Straighten the new thermostat and insert it into the hole in the refrigerator.
- Step 9: Attach the connectors to the new thermostat.
- Step 10: Reinstall the thermostat’s panel using its mounting screws.
- Step 11: Use the nut to secure the new thermostat to the panel.
- Step 12: Reinstall the knob.
Finally:
Turn on the refrigerator and set the thermostat to an appropriate temperature.
The Bottom Line
As you’ve seen:
Multiple factors can prevent cold air from flowing between the freezer and fridge compartment.
These factors will cause the temperature inside your fridge to rise beyond acceptable limits.
In a nutshell:
The most common causes of the warm fridge, cold freezer issue are an overstuffed refrigerator, loose door gasket, frozen evaporator coils, and a faulty defrost heater.
It can also be caused by issues affecting the evaporator fan motor, condenser coils, damper control, and thermostat.
All the same:
You can quickly troubleshoot this problem by:
- Ensuring proper airflow between the fridge and freezer
- Replacing the door gasket
- Defrosting the evaporator coils
- Replacing the defrost heater
- Replacing the evaporator fan motor
- Cleaning the condenser coils
- Replacing the damper control
- Replacing the thermostat
However:
If you need further guidance to troubleshoot this problem, you can use our “Ask the Expert” feature. We’ll be happy to answer any questions you have!
Finally:
Which one of our troubleshooting hacks did the trick? Be sure to let me know in the comment section.